Free printable shapes chart: 10 Best Printable Shapes Chart
Posted onFree Printable Shapes Chart: 2D Shapes
A printable shapes chart, like the one below, featuring ten common shapes your kid is likely to encounter, is an easy (and free!) way to introduce them to the world of 2D shapes. This chart includes 2D shapes, names, and blank space in case your little Picasso wants to color the shapes in.
In fact, I encourage you to use this as a 2D shapes kindergarten and preschool chart and as a shapes coloring page so you can work on shape and color recognition as well as take advantage of the numerous benefits of coloring! 🙂
What Are 2D Shapes?
What does 2D shapes even mean? What are 2D shapes? The phrase “2D shape” just means a flat figure that has two dimensions (get it, 2D)—length and width.
What are 2D Shapes? Well, some examples would be a square, circle, and rectangle. You can see pictures of 2D shapes (pentagon 2D shape, circle 2D shape, etc.) in the shapes chart for preschool and kindergarten below!
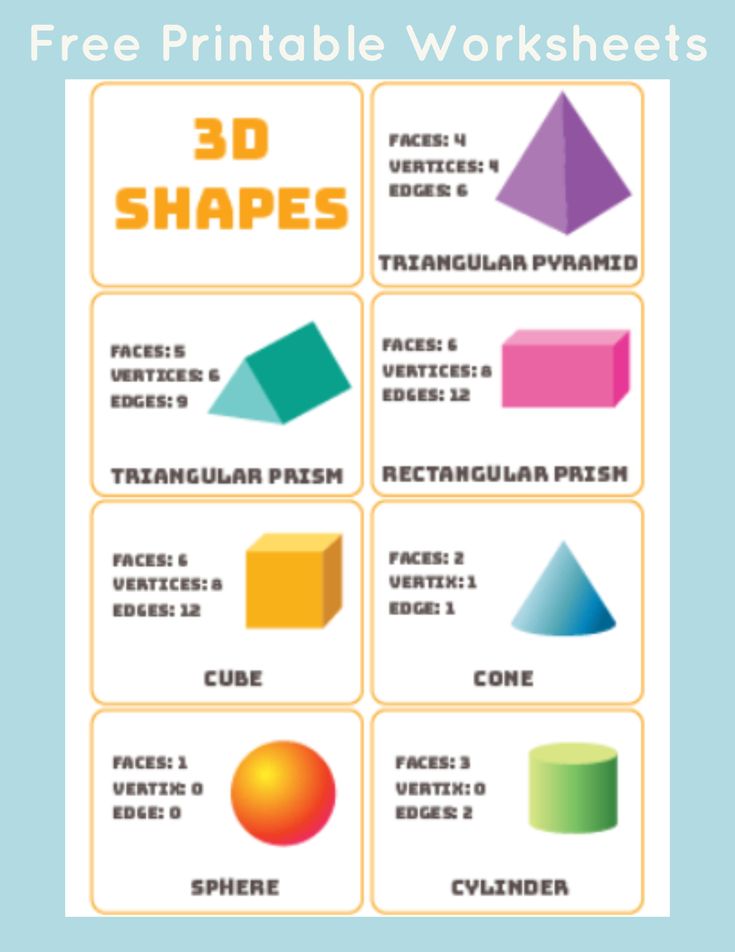
Tip: In contrast, examples of 3D shapes would include a cube, sphere, and rectangular prism!
Free Printable Shapes Chart: 2D Shapes
The printable shapes chart for preschool or kindergarten features the following ten shapes on one 2D shapes worksheet:
- Circle 2D Shape
- Square 2D Shape
- Triangle 2D Shape
- Hexagon 2D Shape
- Diamond 2D Shape
- Oval 2D Shape
- Octagon 2D Shape
- Rectangle 2D Shape
- Trapezoid 2D Shape
- Pentagon 2D Shape
Download 2D Shapes Chart
As already mentioned, you can use this chart as a 2D shapes worksheet to color. Other potential uses include:
- A reference guide. In other words, something for your child to refer to when he or she is working on other 2D shapes kindergarten and preschool printables, like those in the printable shapes bundle. (More on that in a sec.)
- Games. For example, print two copies of this 2D shapes chart, cut out squares that have the shapes on them, and create a homemade matching game.
Individual 2D Shapes Kindergarten and Preschool Printables
The shapes chart for preschool and kindergarten is awesome, but if you’d prefer to work on shapes one at a time, be sure to check out these free 2D shapes worksheets that cover each shape independently:
- Free Printable Octagon Shape
- Free Printable Square Shape
- Free Printable Hexagon Shape
- Free Printable Rectangle Shape
- Free Printable Trapezoid Shape
- Free Printable Pentagon Shape
- Free Printable Oval Shape
- Free Printable Diamond Shape
- Free Printable Triangle Shape
- Free Printable Circle Shape
Each printable features a 2D shape, name, and information on the shape such as the mathematical definition and how to find area and perimeter. These can also be used as shapes coloring pages!
Printable Shapes Chart: 2D Shapes and the Printable Shapes Bundle
While the printable shapes chart of 2D shapes is a freebie, it’s part of the overall 132-page printable shapes bundle, which includes many different shapes worksheets for toddlers, preschoolers, and kindergartners. The printable shapes bundle includes:
- Printable Shape Tracing Worksheets for Preschool and Kindergarten
- Matching Shapes Worksheets
- Shapes Coloring Pages
- Printable Shapes Worksheets for Kindergarten (PDF Downloads) like Counting Shapes Worksheets and Shape Pattern Worksheets
- Printable Shapes
- Printable Preschool Shapes Worksheets (PDF Downloads)
- 2D Shapes Chart – This post! Here’s a color 2D Shapes Chart.
- Shapes Flashcards
Want Our Best Printables for Free?
join our facebook group
Shape Preschool Printables — Preschool Mom
Our shape printables are just right for little hands. Here you’ll find shape bingo, printable shape charts, full-page classroom charts, file folder games, puzzles, matching game and much more. Learning about shapes provides children with early math skills, talk with them about how many sides, points/corners they can find. Look for shapes around the classroom and keep a tally graph of what you find together.
Try our NEW Shape of the Week Program!
Shape-of-the-Week is a no-prep, print-&-go curriculum that covers 10 exciting shapes! With daily hands-on activities, students learn about circles, triangles, squares and more. Scheduled over a 4-day week, this set coordinates perfectly with our Letter of the Week and our Learn to Read Curriculum.
Silly Shape Charts
This is a silly set
of Shape Charts
you can hang in
your classroom. Featuring 13 different shapes this set is simple and bright for all ages.
View Resource
Shape Wordwall Cards
This is a set of printable wordwall cards
featuring pictures of eight different shapes.
shapes; circle, triangle,
square, diamond, star,
oval, rectangle, and
heart.
View Resource
Shape Tracing Worksheets
There are so many benefits to tracing for young kids. These practical printables for shapes like triangles, octagons, hexagons, circles and more can help develop fine motor skills, build drawing abilities, and prepare your child for the next step: writing!
View Resource
Shape Mazes for Preschoolers
Students follow the shapes through the maze to bring the Mama Pig to the Baby pig. These free mazes build key logic skills.
View Resource
Printable Shape Bingo Game
Shape Bingo is a great game for children of
all ages! Preschoolers love to play games
and this is a great way to reinforce shape
recognition in a fun way.
View Resource
Simple Printable Shape Chart
This is a printable shape
chart featuring the
shapes; circle, triangle,
square, diamond, star,
oval, rectangle, and
heart.
View Resource
Shape Minibook
This is a printable minibook featuring eight
different shapes; circle, square, triangle,
oval, rectangle, diamond, heart and star.
View Resource
Pumpkin Tracing Worksheets
This is a free set of pumpkin shape tracing worksheets! Covers 10 different shapes with ideas for fine motor expansion.
View Resource
Tracing Snowman Shapes
This free set of shape tracing worksheets has a silly snowman theme! These pages are great review during your winter preschool lessons.
View Resource
Shape Bookmarks
Our shape bookmarks are a great way
to keep children learning outside of
the classroom! Use the bookmarks as
rewards or even take home gifts for
children. Print on heavy cardstock
and laminate for best results.
View Resource
Spring Shapes Color & Find
This is a free activity page for children to seek and find different shapes and color them to match the color guide. For young children you might color in the example guide for them.
View Resource
Full Color Shape Charts
These printable charts
feature full size shapes
you can use in a variety of
different ways; Classroom
posters, printable puzzles,
game boards, floor
games…ect.
View Resource
Shape Coloring Pages
These blank shape printables are great for
marble painting, basic coloring with line
shapes and even make great puzzle
templates.
View Resource
Shape Puzzles
These full color Shape puzzles
are great for center time
activities. Print on cardstock
and laminate for best results.
Provide younger children with
a blank template from the
Black and White shapes.
View Resource
Shape & Number Sequencing Game
This is a sequencing game made up of
different shapes. Children place the shapes
in order from 1-8. Children who are ready
can also try putting them in reverse order.
View Resource
Looking for more? Try our new Shape of the Week Program today!
Printing a chart — Microsoft Support
Excel for Microsoft 365 Excel 2021 Excel 2019 Excel 2016 Excel 2013 Excel 2010 Excel 2007 More…Less
If you need to print a chart in Excel 2013 or Excel 2016, you can use the Print option on the File tab. Use menu Parameters to specify exactly which book element to print.
-
Click the chart in the book.
-
On the File tab, select Print .
Tip: You can also use the keyboard shortcut CTRL+P to open the Print option.

-
Click the Printer drop-down menu, and then select the desired printer.
-
Press button Print .
Tip: In menu Options you can select the item you want to print. Click the Options drop-down menu and select Print Selected Chart or Print Entire Book .

See also:
Create a chart from start to finish
Fit on one page
Printing a chart with data on paper
 org/ItemList»>
Click the chart you want to print on it.
On the tab View, in the Book Views group, click the button Page Layout or Page Mode.
To move a chart, drag it to the desired location on the page you want to print.
To multiply a chart, do the following:
 org/ListItem»>
If a sheet contains several charts, you can print them on one page, reducing their size.
Select a sheet.
Click Microsoft Office Button and then Print .
By default, in area Print is set to Active Sheets .
To see how the diagram will look on the printed page, click the Preview button.
By default, cell gridlines are not printed on the site. To print a table with cell grid lines displayed, see the Print Grid Lines table on this screen.
You can print one chart without sheet data per page.
-
Click the chart you want to print.
If the chart is on a separate chart sheet, click the chart sheet appearance.
-
Click Microsoft Office Button and then Print .
By default, in the area Print, the selected diagram is selected.
To see how the diagram will look on the printed page, click the Preview button.
Note: Chart scale cannot be scaled before printing. Instead, you can move the chart area and resize it. See this topic for more information.
 org/ItemList»>
On the Page Layout tab, in the Page Setup group, click the button.
Do one or more of the following:
-
On the Page tab, specify the orientation, paper size, print quality, and page number on the first page.
Note: Chart scale cannot be changed.
To quickly set the orientation of printed pages, on the Page Layout tab, in the Page Setup group, click Orientation and select Princess or Landscape.
 org/ItemList»>
On the Page layout tab , in the Page setup group, select Margins .
Do one of the following:
-
To use predefined fields, select an option.
-
To set custom page margins, select custom margins , and then in the Top, Bottom, Left, and Right boxes, enter the desired margin sizes.
-
To customize the margins for margins, click Custom Margins , and then enter a new margin size in the Window box.
Adjusting the header and footer margins changes the distance from the top edge of the paper to the header, or from the bottom edge to the footer. Note: These settings must be less than the top and bottom margins for the sheet, but greater than or equal to the printer’s minimum margins.
-
To see how the margins will affect the printed table, click the Preview button. To adjust the margins in preview mode, click the Show Margins , button and then drag the black margins on both sides and at the top of the page.
 Adjusting the header and footer margins changes the distance from the top edge of the paper to the header, or from the bottom edge to the footer.
 Note: You cannot center the page horizontally or vertically for charts.
-
On the Page Layout tab, in the Page Setup group, click the button.
-
On the Chart tab , in the Print Quality list, select Draft, Draft, or Print in Black and White, or both.
To view the results of the selected print quality options, press the Preview button.
-
Press button Print .
 org/ListItem»>
Click the chart you want to print.
Using a picture in a chart — Microsoft Support
You can enhance a chart by inserting an image (such as a company logo) into the chart area. In addition, you can use a picture fill to draw attention to specific chart elements such as the chart area, plot area, data markers (in r column, line, region, bubble, 3D, and legend area charts (in 2D and 3D diagrams) or 3D walls and ceiling diagrams.0003
You can also copy a picture to a chart or to chart elements such as data markers in 3-D charts, scatter charts, or blank charts. If the drawing is no longer needed, you can delete it.
Inserting a picture into a diagram
-
Click in the chart area.
-
On the tab Insert , in the group Illustrations , click the button Pictures.
-
Find the picture you want to insert and double-click it.
Tip: To add multiple pictures, hold down the CTRL button and then click the 9 button0005 Insert .
-
To resize a picture, drag its resizing handle from the center of the picture or towards the center of the picture. To do this, you can do the following:
-
To keep the center of the picture in the same place, CTRL-drag it.
 org/ListItem»>
To maintain the proportions of the picture, drag it while holding shift.
-
-
To keep the center of the picture in one place and maintain its proportions, hold down CTRL+SHIFT while dragging.
You can also select a pattern and enter the desired size in the Shape Height and Shape Width fields (tab Format, Size group).
-
To move a picture, drag it to the desired location.

Note: Pictures inserted in a chart are embedded in the chart and therefore increase the file size. To reduce the file size, you can add a link to the picture instead of pasting it. AT Insert Picture dialog box, click the picture you want to insert, click the arrow next to the Insert and button, select Link to file .
Top of page
Filling a chart element with a picture
-
In a chart, click the chart area, plot area, data marker, legend, 3D wall, or 3D floor that you want to fill with a pattern.
The Chart Tools panel opens with additional tabs Design , Layout and Format .
-
Click Image .
-
Find the picture you want to insert and double-click it.
 org/ListItem»>
On the Format tab in group Shape styles click the Fill button shape .
Top of page
Copying a picture to a chart or chart element
-
Select the picture you want to copy and press CTRL+C.
-
Click to select the chart area or chart element where you want to paste the picture into it.
-
Press CTRL+V to inspect the selection.

Top of page
Removing a picture from a diagram
Do one of the following:
-
To delete a picture inserted in a chart, click it and press the DELETE button.
-
On tab Format in group Current fragment press the button Selected fragment format .
-
On the Fill & Line tab times, open the Fill list and select Auto.
Tip: To remove the picture and other fill effects applied to the selected chart element, select no fill .
 org/ListItem»>
To delete a picture that has been filled with a chart element, select it and do the following:
Top of page
Inserting a picture into a diagram
 org/ItemList»>
Click in the chart area.
Panel 9 opens0005 Working with charts with additional tabs Design , Layout and Format .
On the Layout tab, in the Insert group, click the Picture button.
Find the picture you want to insert and double-click it.
Tip: To add multiple pictures, CTRL-click them, and then click Insert .
To resize a picture, drag its resizing handle from the center of the picture or towards the center of the picture. To do this, you can do the following:
-
To keep the center of the picture in the same place, CTRL-drag it.
-
To maintain the proportions of the picture, drag it while holding shift.
-
To keep the center of the picture in one place and maintain its proportions, hold down CTRL+SHIFT while dragging.
You can also select a picture and enter the desired size in the Shape Height and Shape Width fields ( Format tab, Size group).

To move a picture, drag it to the desired location.
Note: Pictures inserted in a chart are embedded in the chart and therefore increase the file size. To reduce the file size, you can add a link to the picture instead of pasting it. AT Insert Picture dialog box, click the picture you want to insert, click the arrow next to the Insert and button, select Link to file .
Top of page
Filling a chart element with a picture
 org/ItemList»>
In a chart, click the chart area, plot area, data marker, legend, 3D wall, or 3D floor that you want to fill with a pattern.
The Chart Tools panel opens with additional tabs Design , Layout and Format .
On tab Format in group Shape Styles select item Shape fill .
Click Image .
 org/ListItem»>
Find the picture you want to insert and double-click it.
Top of page
Copying a picture to a chart or chart element
-
In the chart or chart, select the picture you want to copy.
-
On the tab Home, in the Clipboard group, click the Copy button.
Keyboard shortcuts. To copy the selection, press CTRL+C.
-
On the tab Home in the group Clipboard click button .
Keyboard shortcuts. To modify the selection, press CTRL+V.
 org/ListItem»>
Click the chart area or chart element where you want to paste the picture into it.
Top of page
Removing a picture from a diagram
Do one of the following:
-
To delete a picture inserted in a chart, click it and press the DELETE button.
