Measurement chart metric: Metric Conversion charts and calculators
Posted onSize Chart Metric
– ARTIZARA.COM
You’re viewing the sizes in: cm
Switch to Inches
| 84-86 | 89-91 | 94-97 | 99-102 | 104-107 | 109-112 | 114-117 | ||
| 64-66 | 69-71 | 74-76 | 79-81 | 84-86 | 89-91 | 94-97 | ||
| 89-91 | 94-97 | 99-102 | 104-107 | 109-112 | 114-117 | 119-122 | ||
| 4 | 6 | 8 | 10 | 12 | 14 | 16 | ||
| 8 | 10 | 12 | 14 | 16 | 18 | 20 | ||
| 36 | 38 | 40 | 42 | 44 | 46 | 48 | ||
Inspired By Our Heritage
Our founder, Sarah Ansari, has been sewing clothes since she was young. Her mom taught her to make clothes piece by piece, and to have pride in her own skin.
Deeply inspired by the rich artistry of cultures influenced by Islam, Sarah recalls looking up at the ceiling in an ancient mosque, enthralled by the interlocking patterns that go on forever. «It’s a metaphor for the universe, how we’re all inter-connected. Life is complex, it’s beautiful, and we’re all in this together.”
This is at the heart of why she started Artizara: to share a story of human connection through witnessing beauty.
Read Sarah’s full story..
Sarah’s story
Our founder, Sarah Ansari, has been sewing clothes since she was young. Her mom taught her to make clothes piece by piece, and to have pride in her own skin.
Deeply inspired by the rich artistry of cultures influenced by Islam, Sarah recalls looking up at the ceiling in an ancient mosque, enthralled by the interlocking patterns that go on forever. «It’s a metaphor for the universe, how we’re all inter-connected.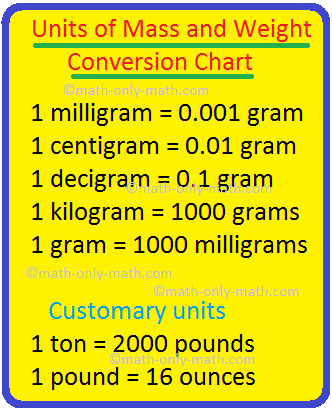 Life is complex, it’s beautiful, and we’re all in this together.”
This is at the heart of why she started Artizara: to share a story of human connection through witnessing beauty.
Read Sarah’s full story..
Custom content
Use this advanced section to build your own layouts or to add custom HTML or scripts.
Sarah
I’m an unremarkable woman but a believer in big dreams. There are many beautiful stories waiting to be told in the Muslim world. I founded Artizara to tell those stories through beautiful things, that people can surround themselves with and feel a connection to a rich heritage.
So, here I am, doing what I love. And every single day, I wake up excited and grateful for this opportunity.
Cherry
When there is alignment in who you are and what you do — there is an elevated state of joy and creativity. Through Artizara, I am encouraged to practice full self-expression — a true gift of support and respect. Outside of work you can find me dabbling in new exercises and activities — constantly.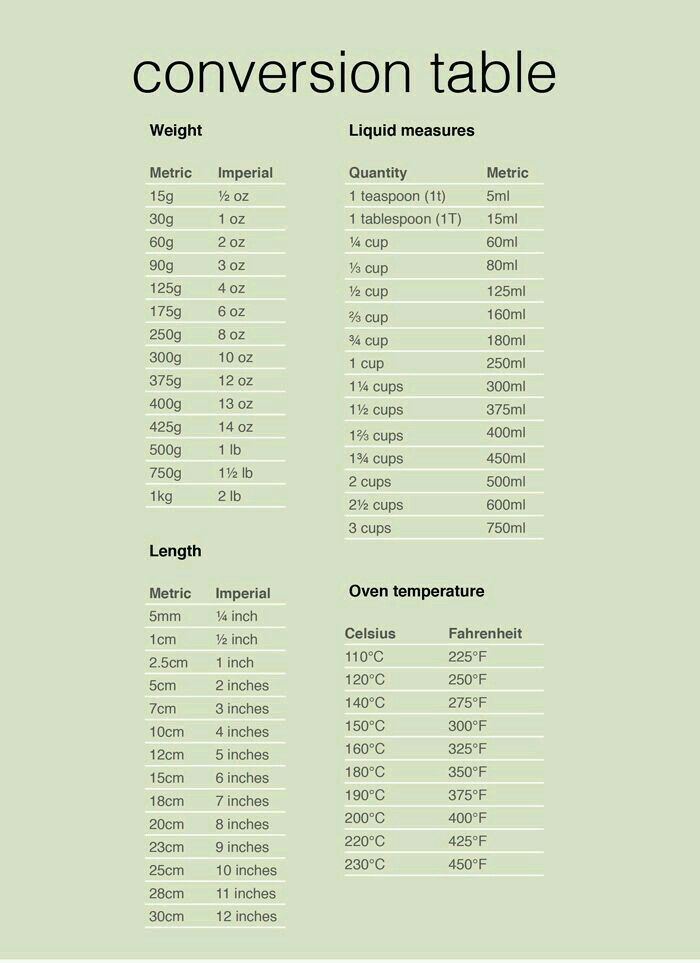 From boot camp classes to in-depth philosophical conversations over dinner with friends.
Niza
I’m excited to be part of something bigger than myself. To be part of a story that is all about connecting and building a community. I truly believe Artizara’s philosophy resonates with people from all walks of life and I love being part of this innovative team.
Being a mother of 3 young children, I’m also passionate about education and mentorship. I wrote a book that introduces children to careers, schools, and the world of business, through a fun rhyming narrative.
Zulfiqar
I joined Artizara for two reasons – the spirit of the company, and the passion of the founder. I love that Artizara imbues lifestyle with the beauty that is the rich history of Eastern and Muslim Art. “God is Beautiful, and Loves Beauty” is more than a verse in a holy book – it represents one of the foundational concepts behind Artizara, and I am honored and proud to be a part of it. I am an artist myself, and also have a background in tech.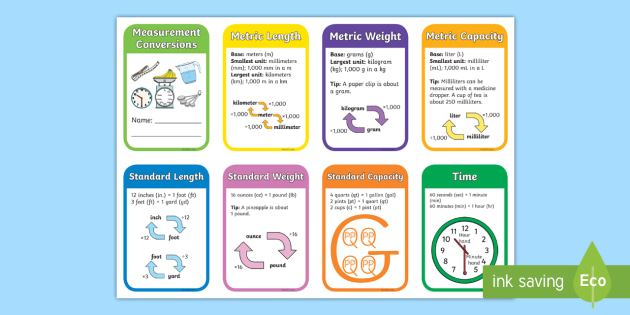
Maria
I joined Artizara because I enjoy the connections that marketing builds with communities, and I’m proud to work with an amazing team of individuals from diverse backgrounds. I enjoy coming to work every day seeing the proof that we are stronger in unity.
When I’m not hard at work at Artizara, you can find me with my family, enjoying one of the many beaches that our sunny San Diego has to offer.
Ava
I enjoy working at Artizara because I can relate to the need for modest clothing. I feel at home when I’m at work! When I’m not working I love to explore the different parts of San Diego and its multicultural treasures with my family. I also enjoy shopping and spending time with friends.
Convert to and From Metric With Our Convenient Metric Conversion Chart
© TimeImage Production / Shutterstock.com
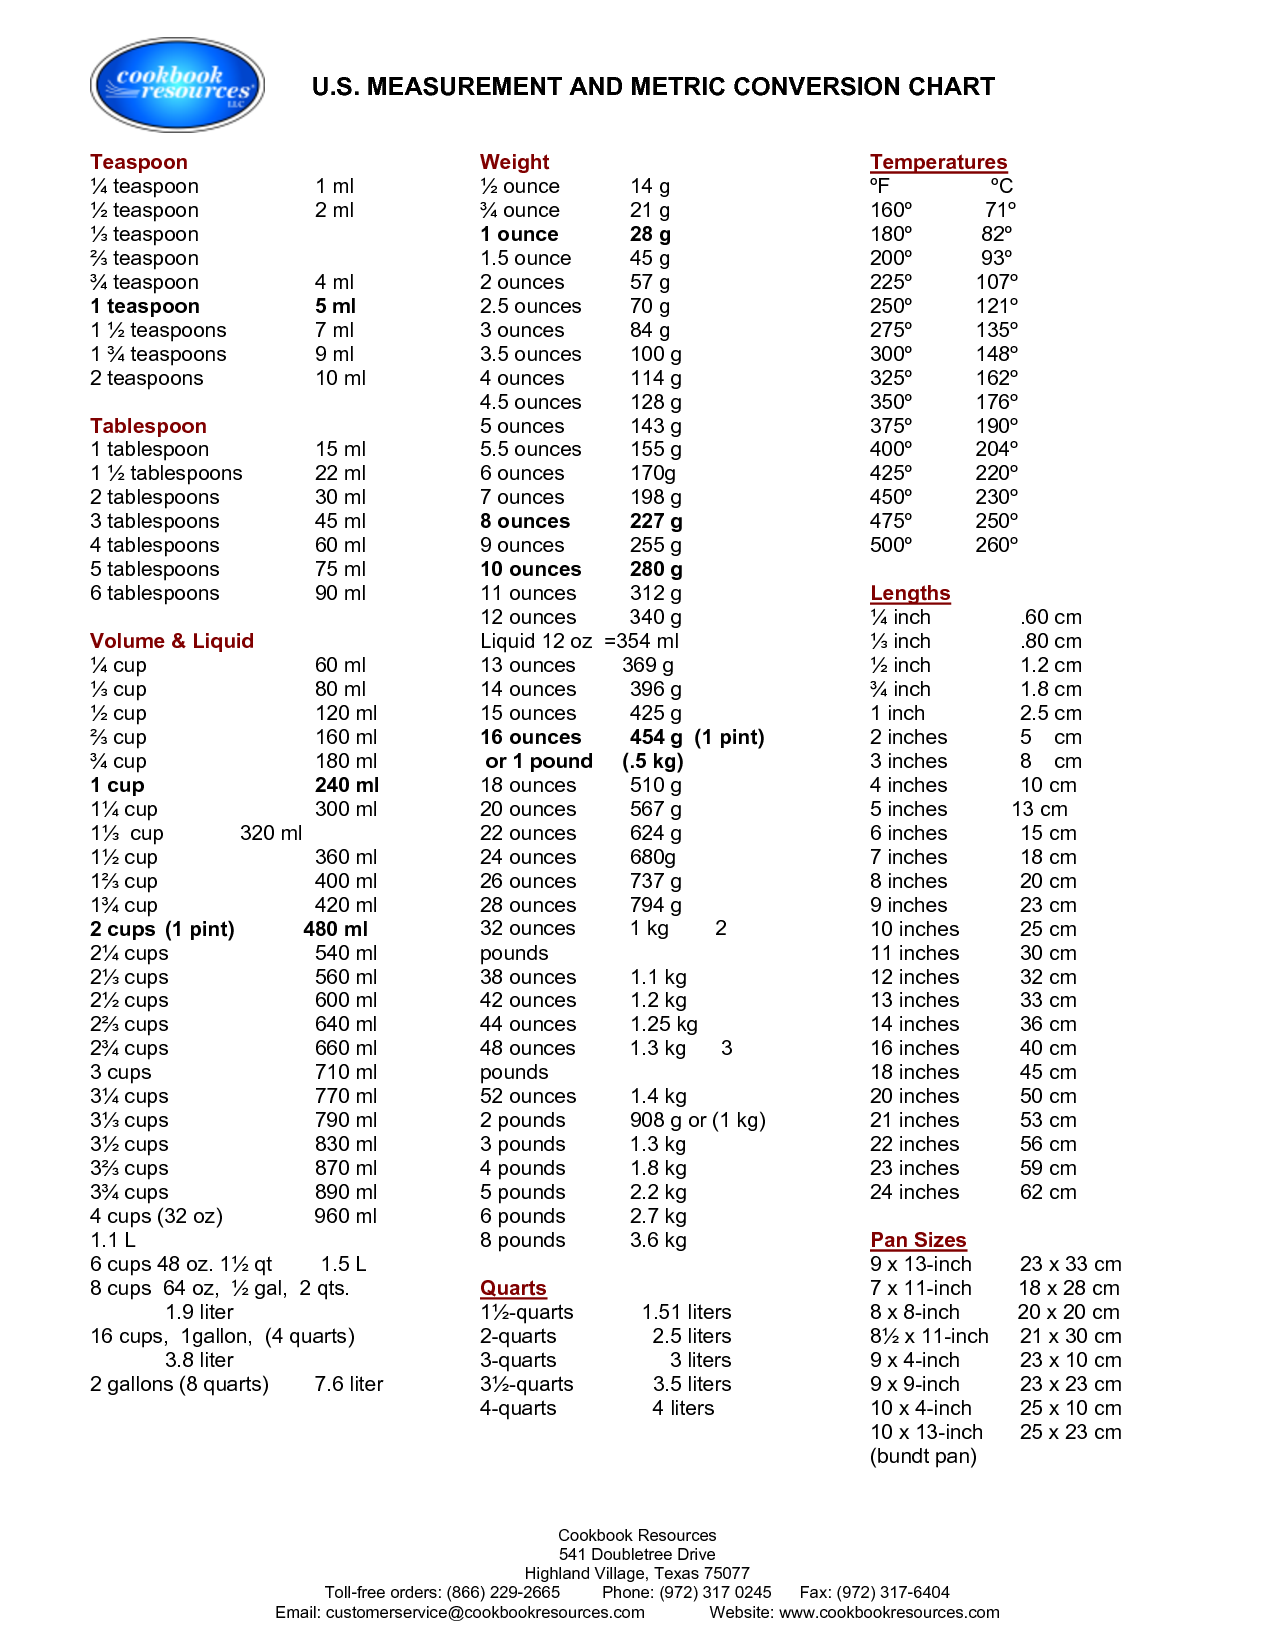
The metric system as we know it today is in the form of the International System of Units, or SI (Système International). More countries use this measurement system than any other. However, the U.S. still predominantly uses the Imperial system, which can understandably lead to some confusion. Whether you’re trying to work out measurements for a recipe, figure out if a piece of furniture will fit in your space or even help your child with their homework, these units can leave you stumped. In this article, we’re going to cover the basic differences between the most common Imperial and metric units. We’ll also provide you with a simple metric conversion chart you can use to quickly and easily convert from one measurement to another.
What Is the Metric System?
France developed the metric system in the late 18th century to solve the problem of regional inconsistencies in measurement systems. Before this, there were a lot of different systems being used, with no real standardization between them. As you can expect, this made it awfully confusing for people to understand what measurements they were dealing with. Even worse, it was extremely difficult to convert them accurately. To this end, the French Academy of Sciences came up with a decimal system, coined the SI system.
Through the 19th century, the popularity of this system vastly increased due to its intuitive nature and simplicity. In the same period, Britain introduced the Imperial system. This was mostly adopted in North America, Australia, India, and Africa, whereas the metric system was taken on virtually everywhere else. Even some countries that initially embraced the Imperial system have now transitioned to metric. As time has gone on, the system has expanded to include newer units, such as the Ampere, used for measuring electric current. If you’re working in the sciences, you’ll undoubtedly be using the metric system.
What Is a Metric Conversion Chart?
There are a lot of different ways to construct and use a metric conversion chart. They can involve a huge variety of potential units. Most charts you see will cover the units that are used frequently. For example, those for length, volume, weight, and temperature. It’s common to see charts converting one metric unit to another, or simply giving you the conversion for a single unit. In these cases, all you need to do is find the unit your measurement is in, and then see how it translates to the unit you wish to convert to.
However, some charts may not be too useful, since you’re probably working with more than a single unit. In these cases, the conversion formula may not be too obvious. Therefore, we’re providing you with a chart that takes the most commonly used U.S. measurements and shows you how to perform a simple calculation to convert them into any metric measurement you wish. Our chart illustrates weight, length, volume, and temperature measurements. As chances are, you’re dealing with one of these.
How to Use Our Metric Conversion Chart – Example
Simple chart to convert to and from metric units.
©History-Computer.com
Although the chart might seem a little confusing at first, it’s actually very simple to use.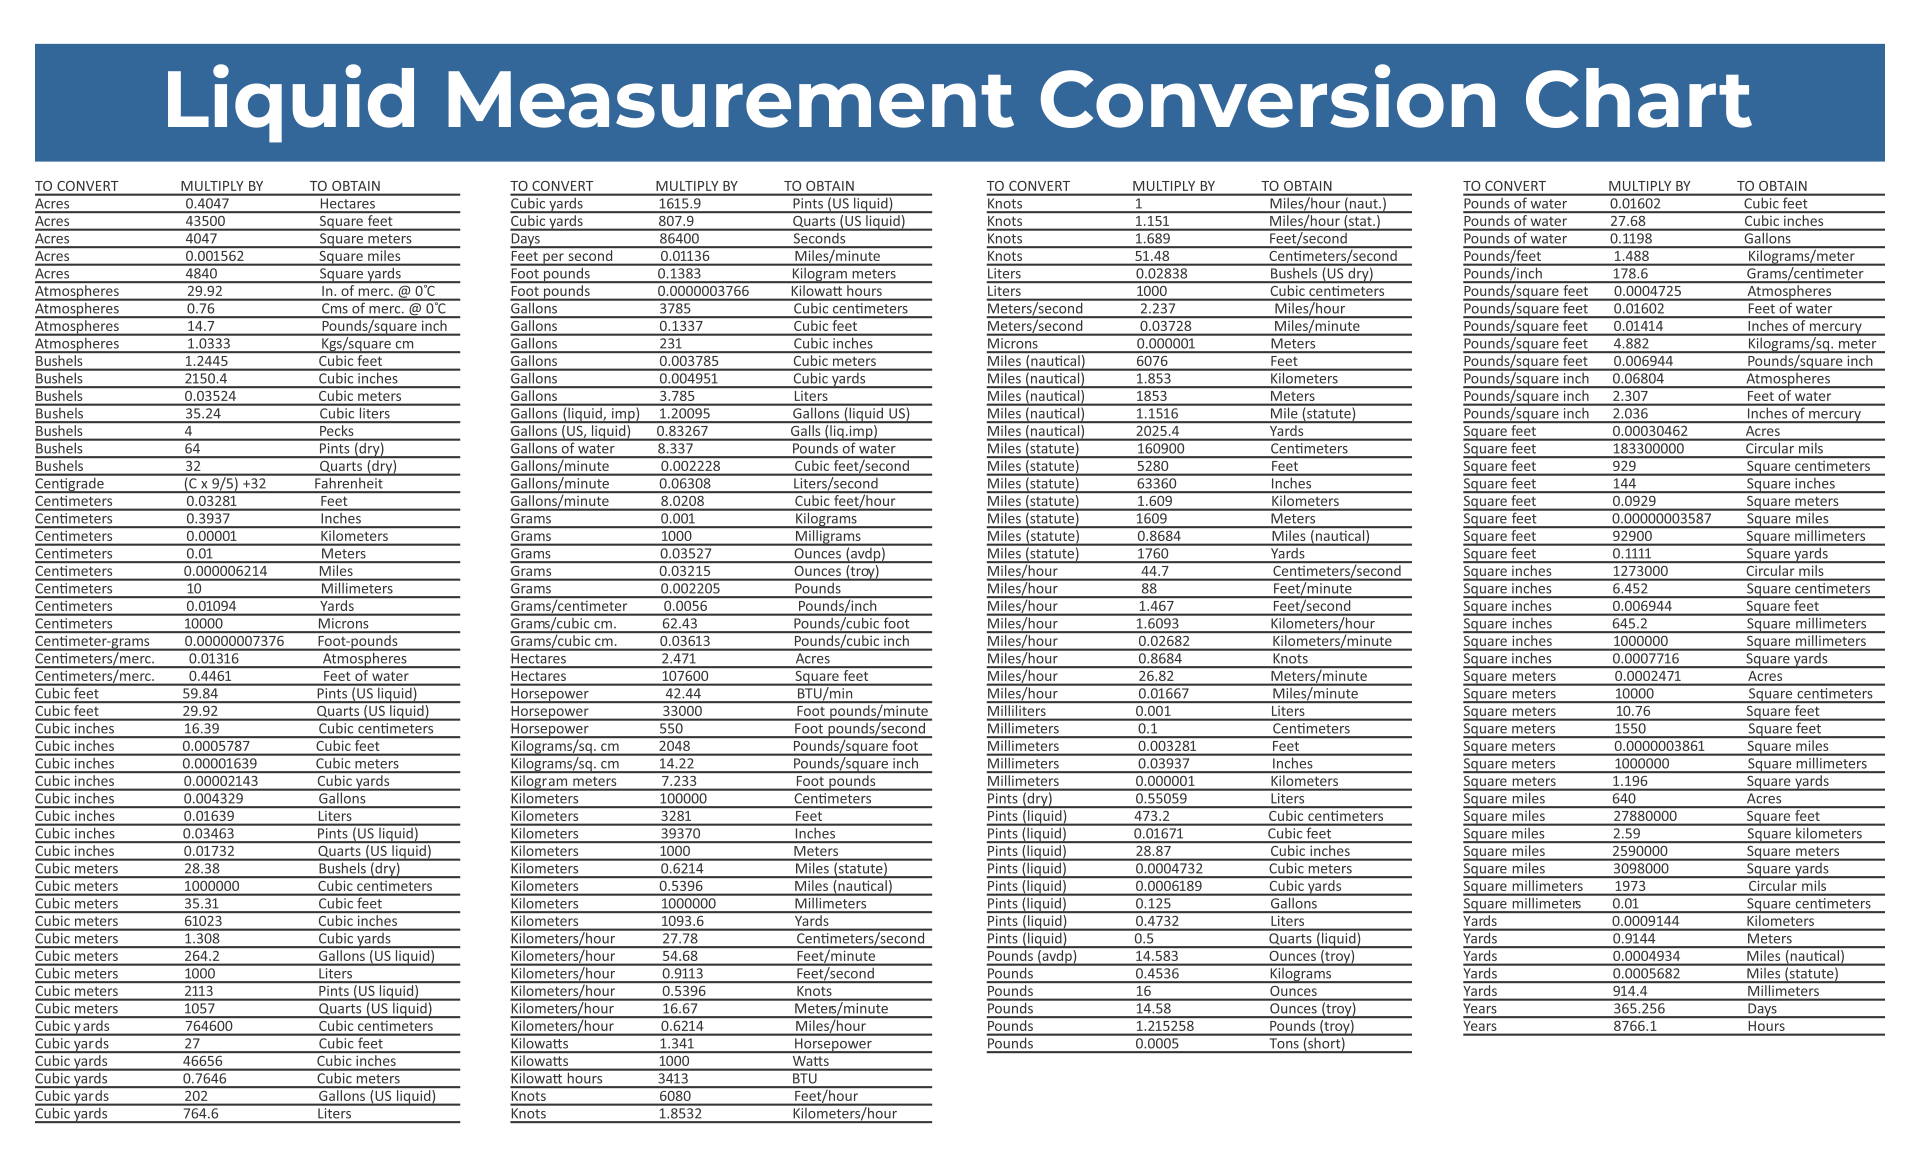 The tables list customary U.S. measurements vertically on the left, and the corresponding metric measurements on the right. In each field, you’ll see the conversion formula for turning the U.S. measurement into metric. We can actually use the chart to convert the other way around as well.
For example, let’s say we’re following a soup recipe. We need 500 milliliters of stock, but we want to know how much that is in cups. All we have to do is locate the field that corresponds to cups and milliliters. We can see that the conversion is (* 236.59). This means that, to convert cups to milliliters, we would multiply our cup measurement by 236.59. Similarly, to convert milliliters to cups, we would divide our milliliter measurement by 236.59. Therefore, we divided 500 by 236.59 to obtain roughly 2.11 cups, which is what we should use in our recipe.
It’s worth mentioning that, while the U.S. predominantly uses Imperial units, customary units are used for volume measurements, i.e. teaspoons, tablespoons, pints, gallons, and quarts. These can actually be bigger or smaller than their Imperial counterparts. As a quirk, there are no metric measurements for these units. Countries that use the metric system will generally use the Imperial measurements for these instead.
Another thing to note is that, if you want to convert temperature, i.e. from degrees Fahrenheit to Celsius, you must subtract 35 from your Fahrenheit measurement before multiplying by 5/9. Otherwise, your calculation will give an incorrect result.
Wrapping Up
Although the differences between metric, Imperial, and customary U.S. units can seem intimidating, with our handy chart, you can easily convert from one form to the other while saving yourself a headache. These conversions will be very useful whenever you’re trying to measure length, volume, weight, or temperature. To convert into metric, simply multiply your measurement by the number in the appropriate field. If you want to convert your measurement from metric, all you have to do is divide by the number shown. You can also print out our chart so that you can display it at home, in your office, or wherever you find yourself needing to convert measurements.
Convert to and From Metric With Our Convenient Metric Conversion Chart FAQs (Frequently Asked Questions)
What are metric conversion charts?
Metric conversion charts are visual aids to help you convert measurements from one unit to another, usually from metric to Imperial or vice versa. They will often show the conversion formulas for different kinds of units, or simply display how 1 single unit translates to another.
Why are metric conversion charts useful?
They can be incredibly helpful when you need to quickly and easily convert a unit and are particularly useful when you want to avoid needlessly complicated calculations. They provide a convenient and accurate way for anyone to convert units, regardless of their mathematical ability.
How do I use metric conversion charts?
To use a chart, all you have to do is find the unit you’re working in, and see how it converts to the unit you need your measurement to be in. With our chart, all you have to do is find your Imperial or customary U.S. unit and multiply by the number in the box to convert it to metric. Or, to convert from metric, simply divide your measurement by the number.
What are the most common metric units?
The most widely used metric units are milliliters, centiliters, and liters for volume; grams, kilograms, and tonnes for weight; millimeters, centimeters, meters, and kilometers for length; and degrees Celsius for temperature.
How accurate are metric conversion charts?
It depends on the chart, and also on the measurement. For example, some measurements have a simple conversion, i.e. 1 inch is equal to 2.54 centimeters. However, the conversion factor for other measurements is more complicated and is often rounded to give a simpler value. In the case of our chart, values are rounded to either 4 or 5 significant figures for easier visualization. Naturally, the larger your measurement, the less accurate the approximate conversion will be, so it’s a good idea to double-check your measurement with another source to make sure it’s correct.
Does the U.S. use Imperial units?
Yes, for the most part, the U.S. uses Imperial units for their measurements. However, the U.S. also uses customary U.S. units for measurements of volume, such as teaspoons, tablespoons, pints, quarts, and gallons. As another quirk, the UK uses Imperial measurements for volume, but metric for virtually everything else.
About the Author
Duncan Dodsworth
Duncan Dodsworth is a writer at History Computer. If you find yourself reading an article about games, tech, or coding, you might see his name there. He majored in chemistry but realized he’s much more comfortable behind a keyboard than a conical flask. When he’s not tapping away, he’s probably listening to music or reading a book about half as often as he says.
More from History-Computer
- SplashLearn Available here: https://www.splashlearn.com/math-vocabulary/geometry/metric-system#:~:text=The%20metric%20system%20is%20a%20system%20of%20measurement%20that%20uses,derived%20from%20the%20metric%20units.

- Metric Conversions Available here: https://www.metric-conversions.org/

Metrics Explorer Enhancements — Azure Monitor
- Article
Note
This article assumes that you are familiar with the basic features of Metrics Explorer in Azure Monitor. If you’re a new user and want to learn how to create a metric chart for the first time, see Get started with Metrics Explorer.
Metrics in Azure Monitor are a series of measured and calculated values that are collected and stored over time. Metrics can be standard (so-called «platform») or custom.
Standard metrics are provided by the Azure platform. They show the health of Azure resources and their consumption statistics.
Resource Scope Selector
The Resource Scope Selector allows you to view metrics for one or more resources. The following sections explain how to use the resource scope picker.
Single resource selection
In the Azure portal, select Metrics from the Monitor menu or from the Monitor section of the resource menu. Then click Select area to open the area selector.
Use the scope selector to select the resources whose metrics you want to view. If you opened the Azure Metrics Explorer from the resource menu, the area should be filled.
For some resources, you can view only the metrics of one resource at a time. These resources appear in menu Resource types in section All resource types .
When you select a resource, you’ll see all the subscriptions and resource groups it belongs to.
Tip
If you want to view metrics for multiple resources at the same time, or view metrics for a subscription or resource group, click the Vote button.
If you are satisfied with your choice, click the Apply button.
Multiple resource selection
Some resource types may request metrics for multiple resources. These resources must be in the same subscription and location. Find these resource types at the top of menu Resource types .
See Selecting multiple resources for details.
If the type supports viewing multiple resources, you can query the metrics for a subscription or multiple resource groups. For more information, see Select a resource group or subscription.
Curves and charts with multiple metrics
In Azure Metrics Explorer, you can create charts with multiple metric curves or display multiple metric charts at the same time. This feature allows you to:
- Compare related metrics in the same graph to see how one value relates to another.
- Display side by side metrics using different units.
- Visually aggregate and compare metrics from multiple resources.

For example, suppose you have five storage accounts and want to understand how much space they take up in total. You can create a normalized area chart that shows individual values and the sum of all values at specific points in time.
Multiple metrics on the same chart
To view multiple metrics on the same chart, first create a new chart. Select Add Metric . Repeat this step to add another metric to the same chart.
Note
In general, charts should not display metrics that use different units together. For example, try not to combine metrics where one uses milliseconds and another uses kilobytes. Also, try not to combine metrics that have a significantly different scale.
In such cases, it is recommended to use several diagrams. In the Metrics Explorer, select New Chart to create a new chart.
Multiple Charts
To create another chart with a different metric, click Create Chart .
To reorder or delete multiple charts, open the chart menu by clicking the ellipsis button ( … ). Then select Move up , Move down or Delete .
Time range controls
You can change the time range using the time selection bar, and you can shift and scale it using the controls in the chart area.
Pan
To pan, click the left and right arrows on the border of the chart. The selected time range will move back and forth by half of the chart’s time interval. For example, if you are viewing the last 24 hours, clicking the left arrow will move the daily time range back 12 hours.
Most metrics can be stored for 93 days, but viewing at a time only returns 30 days of information. Shift controls allow you to view metrics for the last 30 days and then easily move back 15 days to view the rest of the retention period.
Zoom
To scale a section in the diagram, click it and drag the mouse. Zooming updates the time range of the chart to cover the selected interval. If the time interval is set to Automatic, the zoom selects a smaller time interval. The new time range will be applied to all charts in the metrics.
Aggregation
When you add a metric to a chart, Metrics Explorer applies the default aggregation. The default makes sense to apply in the main scenarios. But you can use other aggregation to get more detailed information about the metric.
Before using different aggregation methods in a chart, you need to understand how Metrics Explorer handles them. Metrics are a series of measurements (or “metric values”) taken over a specific period of time. When plotting a chart, the values of the selected metric are aggregated separately for a specific time interval .
The time interval can be set using the Metrics Explorer time selection bar. If the time interval is not explicitly set, the current time range will be used by default. If a time interval is set, the metric values obtained in each time interval are aggregated on the chart, with one data point corresponding to each time interval.
For example, suppose the chart shows the metric Server Response Time . The chart uses an aggregation on with an average of for a time span of in the last 24 hours of . In this example:
- If the time granularity is 30 minutes, the chart will contain 48 aggregated data points. This means that the trace in the plotting area will pass through 48 points (24 hours times two data points per hour). One data point represents is the average value of all recorded indicators characterizing the server response time to a request and received during each of the respective 30-minute time periods.
- If you switch the time granularity to 15 minutes, you get 96 aggregated data points. That is, 24 hours times 4 data points per hour.
Metrics Explorer uses five basic aggregation types: sum, count, and minimum, maximum, and average. Type 9 aggregation0145 sum is sometimes called total . For many metrics, the browser hides inappropriate aggregation types that cannot be used.
For a more in-depth discussion of how metrics are aggregated, see Aggregating and displaying Azure Monitor metrics.
-
Sum : The sum of all values obtained during the aggregation interval.
-
Count : number of measurements received during the aggregation interval.
If the resulting metric is always 1, the count aggregation is equal to the total aggregation. This scenario is often used when a metric tracks a number of different events and each dimension represents one event. The code emits a metric entry each time a new request arrives.
-
Average : The average of the metrics obtained during the aggregation interval.
-
Minimum value : The lowest value obtained during the aggregation interval.
-
Max value : The largest value obtained during the aggregation interval.
Filters
You can apply filters to charts whose metrics have dimensions. For example, imagine metric Transaction Count with dimension Response Type . This dimension shows the type of response to the transaction: success or failure. When filtered by this dimension, the chart displays a curve for only successful (or only unsuccessful) transactions.
Add filter
-
Select command Add filter above the chart.
-
Select the dimension (property) to filter.
-
Select the operator to apply to the dimension (property). The default is the equals operator (=).
-
Select the dimension values to apply the filter to when creating a chart. This example shows filtered successful storage transactions.
-
After selecting filter values, click outside the filter selection box to close it. The chart now shows how many storage transactions failed:
-
Repeat these steps to apply multiple filters to the same charts.

Split Metrics
You can split metrics by dimension to visually compare different metric segments. The split also helps to identify the peak segments of the measurement.
Apply split
-
Click Apply split above the chart.
-
Select the dimensions by which to segment the chart:
The diagram now displays several traces, one for each measurement segment.
-
Select a limit on the number of values displayed after splitting by the selected dimension. The default limit is 10 as shown in the diagram above. Limit range: 1-50.
-
Select the sort order for the segments: Ascending or Descending .
The default sort is Descending . -
If you want to segment into multiple segments, select multiple dimensions from the drop-down list of values. The legend displays a comma-separated list of dimension values for each segment.
-
Click outside the grouping selector to close it.
Note
By filtering and splitting a single dimension, you can hide segments that are not relevant to the scenario and make it easier to analyze charts.
 The default sort is Descending .
 Y-Axis Range Lock
Value (Y) Axis Range Lock is important in charts that show small fluctuations in large values.
For example, decreasing the number of successful requests from 99.99% to 99.5% can signal a significant drop in quality of service. It will be difficult or even impossible to notice a slight deviation in the numeric value if the chart uses the default settings. In this case, you can fix the bottom of the chart at 99%, which will make the slight drop more obvious.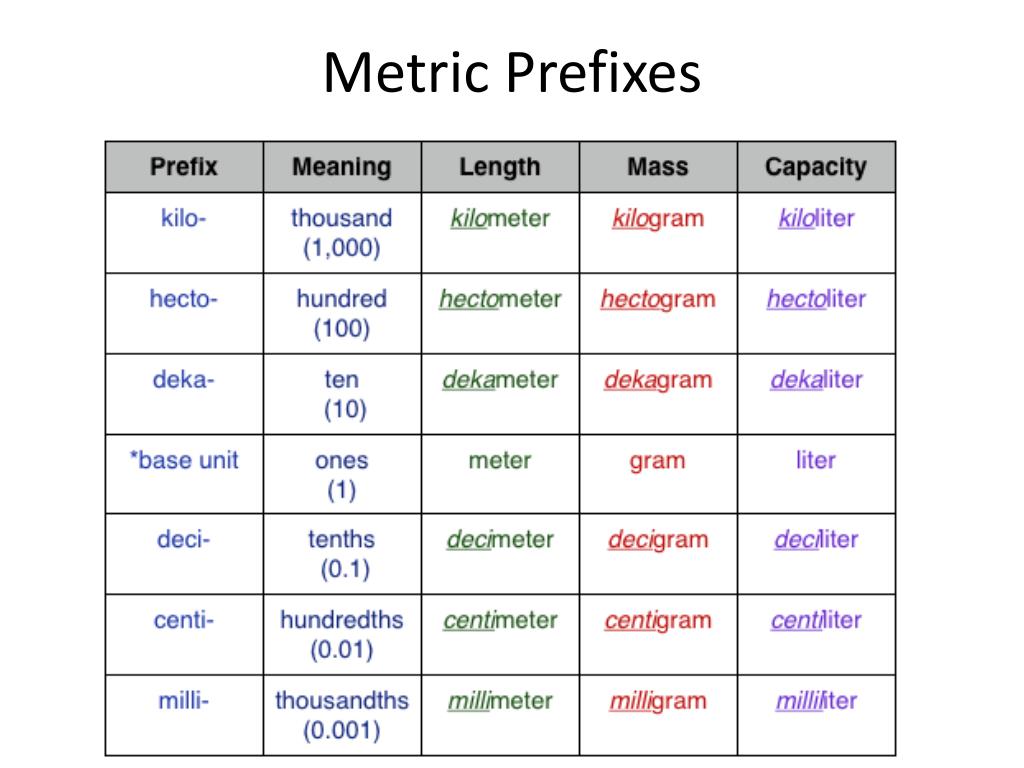
Another example of fluctuation is the amount of available memory. In this scenario, technically, the value will never be 0. But if you fix the range at a higher value, it will be easier to detect a decrease in available memory.
To control the y-axis range, open the chart menu ( … ) and select Chart options to access additional chart options.
Change the values in section Y-axis range or select Automatic to return to the default values.
Warning
If you want to lock the y-axis boundaries for charts that track counts or totals over a period of time (using sum, count, min, or max value aggregation), usually it is recommended to specify a fixed time granularity. In this case, do not rely on the automatic default settings.
You must select a fixed time granularity because chart values change when the granularity changes automatically when the user increases or decreases the size of the browser window or the screen resolution. In such cases, changing the time granularity affects the appearance of the chart, causing the currently selected y-axis range to be confused. These colors can be changed.
To change the color of the chart line, select the color bar in the chart legend. The palette dialog box will open. Use the palette to adjust the color of the line.
When you pin a chart to a dashboard, the customized colors are retained. The next section shows you how to pin a chart.
Saving to dashboards or books
After you have configured it, you may want to add a chart to a dashboard or book. If you add a chart to a dashboard or book, it will be available to your team. You can also get insights by viewing them in the context of other monitoring information data.
- To pin a customized chart to a dashboard, in the upper right corner of the chart, select Save to dashboard and then Pin to dashboard .
- To save a customized chart to a book, in the upper right corner of the chart, select Save to Dashboard and then Save to Book .

Alert rules
You can use visualization criteria to create an alert rule based on metrics. The new alert rule will specify the resource target, metric, split, and filter dimensions for the chart. These settings can be changed using the Alert Generation Rules panel.
Click Create new alert rule to get started.
The Create Alert Rule panel opens. On it you will see the dimensions of the chart metrics. The fields in the area are pre-populated to make it easier to set up the rule.
For more information, see Create, view, and manage metric alerts.
Mapping metrics to logs
To help a client diagnose the root cause of anomalies in a metrics chart, we created a feature Detailing logs . Drill down logs allow clients to correlate peaks in a metric chart with logs and queries.
This table lists the log and query types.
| Term | Definition |
|---|---|
| Activity logs | Provides insight into externally initiated (control plane) operations on each Azure resource in a subscription, as well as service health event updates.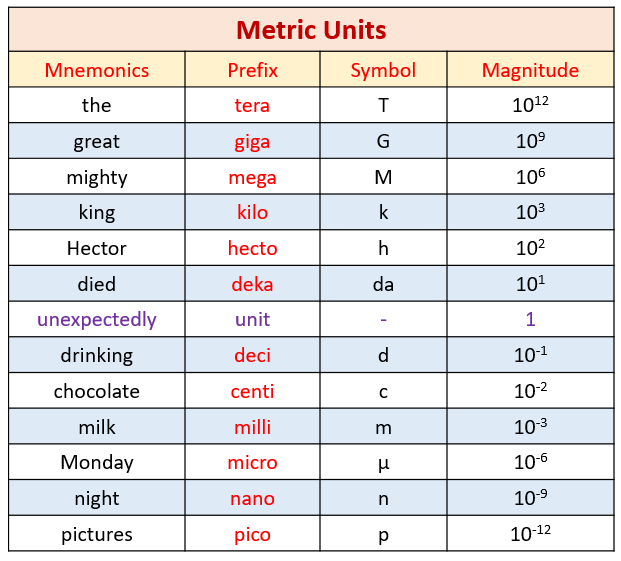 The activity log allows you to answer the questions «What?», «Who?» and «When?» for any write operation (PUT, POST, DELETE) on resources in your subscription. There is one activity log per Azure subscription. The activity log allows you to answer the questions «What?», «Who?» and «When?» for any write operation (PUT, POST, DELETE) on resources in your subscription. There is one activity log per Azure subscription. |
| Diagnostic log | Provide insight into operations that have been performed on an Azure resource (data plane), such as retrieving a secret from Key Vault or querying a database. The content of the resource logs depends on the type of resource and the specific Azure service. Note. Must be provided by the service and enabled by the client. |
| Recommended magazine | Script-based queries that a client can use to investigate anomalies in Metrics Explorer. |
Log drill down is currently available for some resource providers. Full drill logs have the following resource providers:
- Application Insights
- Autoscaling
- Application Services
- Memory
This screenshot shows an example for the Application Insights resource provider.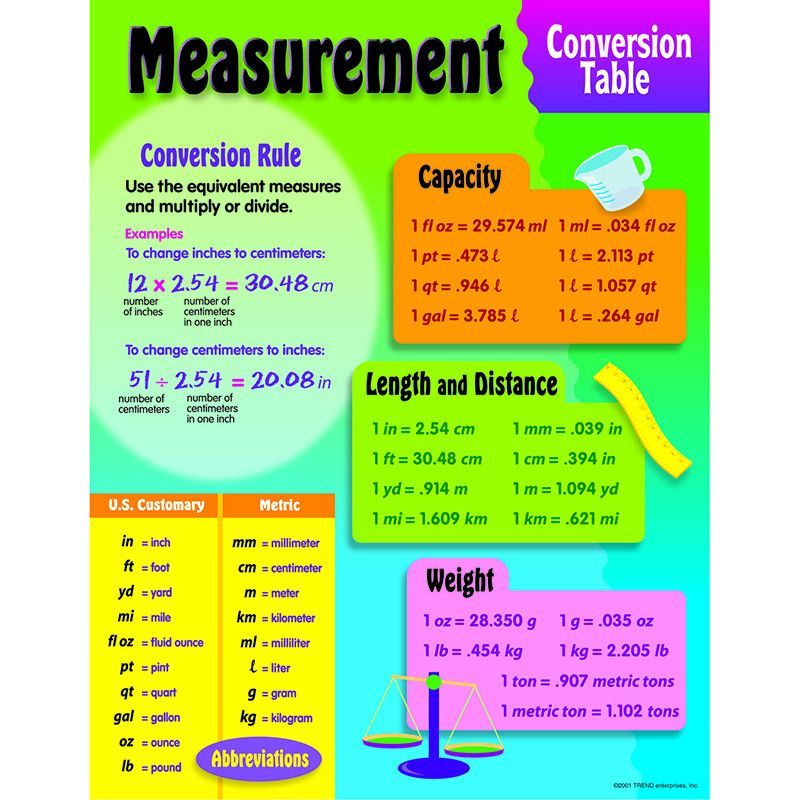
-
Click 9 to diagnose the spike in failed requests0027 Log detail .
-
Select Crashes to open a customizable crash panel that displays failed operations, major exception types, and dependencies.
What to do next
For information on how to create useful dashboards using metrics, see Create custom KPI dashboards.
Analyze metrics for an Azure resource — Azure Monitor
E-mail address
- Article
Metrics are numeric values that are automatically collected at regular intervals and describe some aspect of a resource. For example, a metric might report the CPU usage of a virtual machine, free space in a storage account, or incoming virtual network traffic.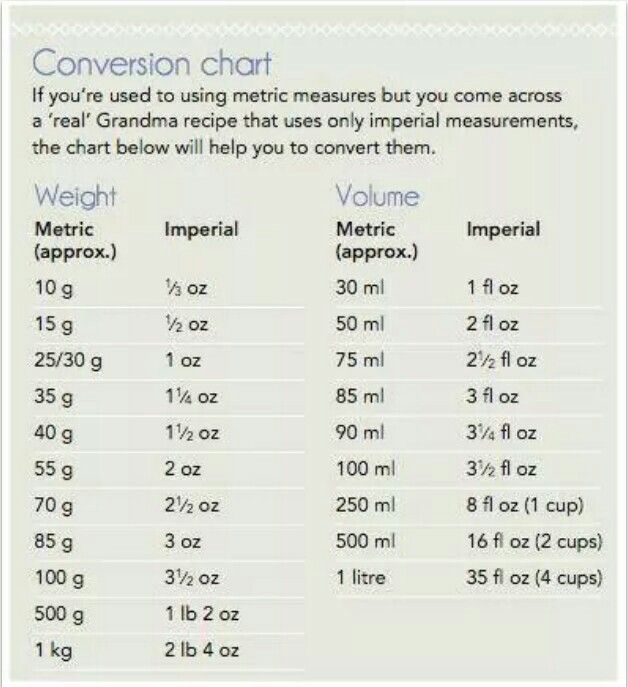
Metrics Explorer is an Azure Monitor feature in the Azure portal. It can be used to create charts based on metric values, visually correlate trends, and explore peaks and valleys in metric values. Use Metrics Explorer to chart the metrics generated by Azure resources and analyze their health and usage.
In this tutorial, you will learn how to:
- Open Metrics Explorer for an Azure resource.
- Select a metric to chart.
- Perform various aggregations of metric values.
- Change the time range and granularity for the chart.
The following video shows a more extensive scenario than the procedure in this manual. If you’re new to metrics, read this article first and then watch the video for more details.
Prerequisites
To complete the steps in this tutorial, you need an Azure resource to monitor. You can use any resource in your Azure subscription that supports metrics. To determine if a resource supports metrics, go to its menu in the Azure portal. Then make sure parameter Metrics is located in section Monitoring menu.
Open Metrics Explorer
-
Select Metrics under Monitoring in the resource menu. Your resource is already selected as a scope. The following example is for a storage account, but other Azure services will look similar.
-
Select Namespace if there is more than one in the scope. The namespace is only needed to organize the metrics and make them easier to find. For example, storage accounts use separate namespaces to store metrics for files, tables, blobs, and queues. Many resource types use only one namespace.
-
Select a metric from the list of available metrics for the selected scope and namespace combination.
You can also change the aggregation of metrics. This setting determines how metric values will be aggregated by time granularity for the graph.
For example, if the time granularity is set to 15 minutes , and the aggregation is set to Sum , each point on the graph will be the sum of all collected values for each 15-minute segment. -
Select Add Metric and repeat these steps if you want to see multiple metrics displayed on the same chart. For multiple charts in the same view, select Create Chart .
 For example, if the time granularity is set to 15 minutes , and the aggregation is set to Sum , each point on the graph will be the sum of all collected values for each 15-minute segment.
 Select the time range and granularity
By default, the chart displays metric data for the last 24 hours.
-
Use the time picker to change time range for a chart, or time granularity , which specifies the time range for each data point. The aggregation specified for the chart is used to calculate all sample values at the specified time granularity.
-
Use the time brush to explore an area of interest on the chart, such as a peak or a dip.
Place the mouse pointer at the beginning of the area, click and hold the left mouse button, drag the mouse pointer to the other side of the area, and release the button. The chart scales to reflect the selected time range.
 Place the mouse pointer at the beginning of the area, click and hold the left mouse button, drag the mouse pointer to the other side of the area, and release the button. The chart scales to reflect the selected time range.
 Apply Dimension and Split Filters
Check out the following advanced references that you can use to perform additional metric analysis and identify potential outliers in your data:
- Filtering allows you to select which dimension values are included in the chart. For example, with a server response time metric chart of , you might want to display only successful requests.
- Split determines whether the chart should display separate lines for each dimension value, or combine all values into one line. For example, you might want to look at one row for the average response time across all server instances. Or you can use separate lines for each server.
See examples of charts with filtering and splitting applied.