Prompt picture: Picture Prompts — The New York Times
Posted on20 Picture Writing Prompts for Kids
A picture is worth a thousand words, and that’s certainly the case with visual writing prompts!
Be it a simple object or a fantastical scene, a picture is all it takes to spark a child’s imagination.
That’s why I love picture writing prompts for kids who are learning how to write.
They help alleviate the burden of not knowing where to start while providing creative flexibility for students to pen their own stories.
I especially like to use picture prompts for teaching descriptive writing. They encourage children to focus, study, and evaluate an image with all its colors and scenery, which naturally sparks more descriptive text.
get this picture prompt printable for free!
SEND IT TO ME ⇨
What Is Picture Prompt Writing?
If you’re unfamiliar with picture prompts, they are a type of writing prompt that uses an image to start a story.
Students then create a story, using the picture as either the setting or simply a jumping off point.
The benefit of visual writing prompts is that it gives students a place to start. Not only that, it encourages them to use more adjectives and write in more detailed sentences.
Most students need some guidance beyond “write about this.” The again, too many details can be overwhelming.
Picture prompts give kids just enough information to act as a stress-free starting point, and from there, they can tell their own stories.
They aren’t necessary for every writing activity, but they’re a fun and simple way to spark creativity—and they often prompt students to think (and write!) outside the box.
How to Use Picture Writing Prompts
Students who struggle to write may naturally gravitate towards picture prompts.
In fact, picture writing for kids is particularly helpful for reluctant writers who struggle with expressing themselves in words.
The prompts can be paired with any number of writing activities, from freewriting to journal writing to creative writing.
Choosing pictures for kids to write about will largely depend on the skill level and age of your student.
As a general rule of thumb, you want to use the most interesting pictures for writing prompts you can find.
As kids get older, their writing world expands, so their prompts can be more in-depth and structured.
You can even try using two unrelated prompts and have your students develop a story that incorporates both perspectives.
Here are a few more specific ways to use visual writing prompts:
1. Choose pictures that aren’t so clear-cut. Ambiguous images lead to more brainstorming, providing plenty of room for interpretation and creativity.
2. Give students ample time to look at and study the image.
3. Give them 5-10 minutes to write everything they can think about when they look at the picture.
4. Use the 5 Ws to start the conversation. This encourages young writers to look closely for clues about a possible storyline.
- What? What’s going on in the image?
- Where? Where is it taking place?
- Who? Who or what is the subject of the scene?
- Why? What caused the scene in the image? Why did it happen?
- When? What happened before the picture? What happens after?
5. You can also give them a series of pictures for story writing. This is a great option for older elementary up to middle school students.
As you can see, picture prompts are pretty open-ended. You can tweak and use them whichever way works best for your student.
Want to try using picture prompts?
We’ve provided 20 creative, engaging visual prompts below.
Have fun!
For more writing fun, try these fall-themed prompts, winter writing prompts, or one-sentence story starters.
20 Picture Writing Prompts for Kids
The IceBreaker
- Something mysterious caused the cracking.…
- What do you think is underneath this sheet of ice?
- How far will the cracks spread? What will happen?
The Gardener and the Magical Plant
- It’s not an ordinary seed sprouting…
- What do you think will grow?
- Who is planting the seedling?
Adventures Of The Dive Club
- Did they find treasure under the sea?
- What did they capture on camera?
- Where in the world are they?
The Lion and the Lost Lambs
- It was an unlikely friendship…
- Do the lambs feel safe with the lion?
- What is the lion thinking?
Runaway Cow
- Why is the cow so far away from the rest of the herd?
- What is the cow looking at?
- What’s going through her mind?
Sunset at the Meadow
- The tire swing was still swaying as they left…
- Who was playing here?
- Where are the birds going?
A Kitty of a Different Kind
- Why does the cat have different eye colors?
- It’s not just his eyes that made him different…
- What is the cat’s name?
The Missing Plane
- Where is the plane going?
- How did it get lost?
- What happens next?
Best Friends in a Snowstorm
- What are their names?
- How did they become friends?
- What are they talking about?
The Icky Sticky Ice Cream Cone
- The person who dropped this ice cream was startled…
- What made them drop their ice cream?
- Describe the scene, the emotions, etc.
A Bug’s Life
- What is the bug doing?
- What is his name?
- His friends made fun of him because he was green…
The Secret Spy Frog
- What or who is the frog watching?
- Why is the frog hiding?
- What is his secret mission?
The Surprise of a Lifetime
- What is this little boy’s story?
- What or who surprised him?
- What happens next?
The Hidden House in the Woods
- There is something very special about this house…
- Could this be the house everyone in the village spoke of?
- Who lives there?
Beneath the Waves
- Who took this photo?
- Where are all the fish going?
- Are they running away from someone/something?
The Boy and the Giant Roly-Poly Pumpkin
- It was no ordinary pumpkin…
- What’s inside the pumpkin?
- What is the boy going to do with it?
The “Cat-tastrophe” Shower
- The cat made such a mess…what happened?
- What is the cat thinking?
- What does he do after getting bathed?
World-Famous PupStar
- What is the dog’s name?
- What made this dog famous?
- Why is he taking the photo?
The Sinking House
- What do you think caused the house to sink?
- Where are the people who lived in the house? Are they still there?
- Use your imagination!
The Dinosaurs and the Broccoli Forest
- Why are these dinos eating broccoli?
- Where are all the other dinosaurs?
- Are there other animals in the forest?
Download and Print FREE Picture Prompts (PDF)
No matter what grade your kids are in, they will love these fun (and often funny!) elementary picture writing prompts.
The concepts are suitable for a wide age range and can be used by first graders all the way up to middle school students.
get this picture prompt printable for free!
SEND IT TO ME ⇨
Now when you hear the dreaded, “I have nothing to write about!” just pull out these picture prompts, provide pencil and paper, and let your young writers create!
The Images Shed — THE LITERACY SHED
Winter Scene Writing Prompts
Abandoned Places
Double click the image to make fullscreen
Landscapes
Watch the film through. Simply pause the film on a beautiful scene and then ask the children to describe it. Simple! |
Some forest/woodland stimuli
A pathway to where?
Thanks to Louise Brookes @lobroo on Twitter for providing this collection of stunning images. |
Key Questions |
Use similes and metaphors along with personification to descrbe how some of these paths ‘move’ across the landscape. |
Tiny Dragon
Questions for discussion:
- Where is it from?
- Why is it so small?
- Are there more like him?
- Where does he live?
- How will you look after it?
- Will you keep it a secret or tell someone?
- What is it called?
- Is it magic? What magic can it do?
I like to imagine that it is a really small dragon which you can keep in your pocket but when you need to it can grow huge so that you can ride it.
Flying Houses
I came across these amazing images in a Sunday supplement.
Your class could debate what is meant by ‘being healthy’.
Write ‘A guide to keeping healthy’ include sub headings such as; Diet, Exercise, Drugs etc
Statues
All statues have a back story, the children can write that. Who is it? What is? Where is it? Does it come alive? What happens? Is it watching us? What is it thinking?
With thanks to Jane Hewitt
Everyone has a favourite season or favourite seasonal activities. Let these images spark your memory of a joyous moment you spent with family, friends, or by yourself. You may choose one image or link a few together to tell/show a deeper-more detailed memoir. With thanks to Stephen Yost — Neil Armstrong Middle School — Bethel Park, Pennsylvania, USA for the pictures and ideas.
Download File |
Its pouring down and he is just stood there. Who is he and who is he waiting for?
Friend or foe?
There is a Wizard in My Potting Shed
Imagine you discover this ‘shed’ at the bottom of your garden, What is inside? I can imagine it’s magical inside, much bigger than it seems on the outside. Perhaps lit by candles, strange instruments on the tables, cobwebbed and dusty.
Behind you the door closes gently and you espy this man sat in emerald green robes, peering at you over his glasses, the candles flicker and die out. It’s pitch black and he whispers….
|
|
Allow the children 10 words only. No more and no less. What does the Wizard say to them? Make it mysterious. This is the opening scene to a story. Perhaps something like «Come, follow me.. Don’t make a sound, she is upstairs!»
Time stood still for all but one man.
What has happened? How did it happen? Who did it? Why did they do it? What will happen next?
I saw her and then she was gone, I heard her whispering for me to follow. It only took me a few seconds for me to decide…
These moving images can be copy and pasted into powerpoint etc and they still move.
Where does it lead to? Who is at the other end? Who are the two people?
Who made it? When was it made?
Top of page
70 Picture Prompts for Creative Writing (with Free Slides)
Share this post!
Visual writing prompts help young writers generate new ideas and overcome writer’s block. We’ve put together 70 picture prompts for creative writing that you can use in your writing centers or lesson plans to get your students’ creative juices flowing.
Picture Writing Prompts for All Ages
Writers of all ages and experience levels can get stuck thinking about what to write. Writer’s block is not just a challenge for reluctant writers. Even professional writers have days when they feel less than inspired.
Visual prompts can result in a vast array of story ideas. A single image viewed by ten writers will result in ten completely different stories. Even if you use verbal cues to get students thinking about the picture, each student will still write a unique response to the image.
Visual creative writing prompts are fantastic for elementary school because younger students often relate more to a pictorial prompt than a written one, but don’t shy away from using these with high school and middle school students as well. Pictures make a fun alternative to your typical writing prompts and story starters and can help shake up your regular routine.
How to Use Picture Prompts for Creative Writing
There’s no limit to the ways you can use writing prompts. Here are some of our favourite ways to incorporate image prompts into your writing times.
- Writing Center. Print cards or writing pages with these images on them and put them in a writing center for your students to discover at their own pace.
- Specific Skills. Use story picture prompts to help kids work on specific writing skills. For example, you could work on descriptive writing by having them describe the setting of the picture in detail. Or you could work on character development by having them make up a history for a person in a picture.
- Warm-up Activity: You could pop the pictures into Google slides and project an image on a screen or whiteboard for the first fifteen minutes of class and have students work on a short story as soon as they enter the class.
No matter how you decide to use them—whether at home or in the classroom—photographic writing prompts are a great way to cultivate a daily writing habit and encourage kids to explore new topics.
70 Pictures for Writing Prompts
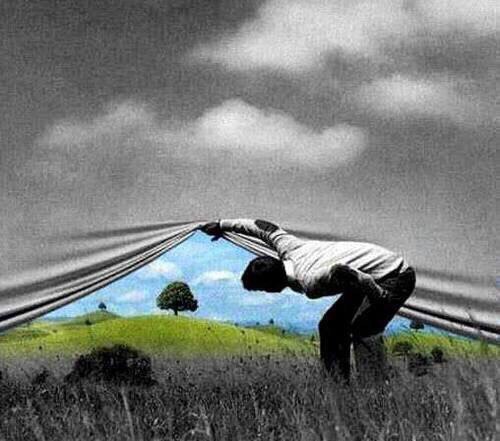
We’ve selected 70 of the most interesting pictures we could find for this exercise. When choosing photos for writing prompts, we look for high-quality photos with intriguing subject matter, but we try to go beyond that. We want to share images that suggest a story, that make the viewer ask questions and wonder why things are the way they are.
We want to feel propelled to explore questions like, What happened before the photo that led to this moment? What are we witnessing in this photo? What’s about to happen?
A photo doesn’t make much of a story starter if it doesn’t suggest that there might be a bigger picture lurking beneath the surface.
We hope you and your students love these picture prompts for creative writing as much as we do. If you love them, go ahead and scroll to the bottom to grab your own copy.
We’ve included a couple of questions with each picture that you could use to spark pre-writing conversations in your classroom, which can be helpful when working with younger students who might need a little more direction.
Good luck!
Sign Up for Your FREE Picture Writing Prompt Slides
Whose cat is this? What is he looking at? Where is he?
What is the owl thinking about? Is he alone? What does he hope to eat for dinner?
Who are these frogs? What is their relationship with each other? Why are they taking photos?
How did the dog get a phone? Why is he taking selfies? What is he doing with the pictures he takes?
This cat doesn’t look too happy. What’s bugging him? Did he get too many phone calls or is he waiting on an important call that’s taking too long to come?
What do these chicks think of the dog? What does the dog think of the chicks? Do you think they can communicate with each other? If so, what would they say?
Where do these lemurs live? What are they looking at? What is something unusual that might happen to them?
What is this fox doing? Is he yawning and stretching or is he trying to scare someone away? What kind of mischief does he like to get up to?
Is this wolf alone? If not, who is with him? What is he planning to do? Does he have a family to feed or protect?
What is this child doing on the laptop? Can he actually read and type or is he just playing? If he can read and type, how did he learn that at such a young age? What other cool things can he do?
Where is this woman? Is she lost? How did she get to this street? What interesting things might she discover as she explores this new city?
Why is the dog wearing glasses? Can he see through them? What are he and the girl doing? How does he feel about it?
Who are these two little boys? What is their relationship with each other? What is the teddy bear’s story?
Who are these children? Why are they running? Is it a race or are they playing a game? Who’s going to win?
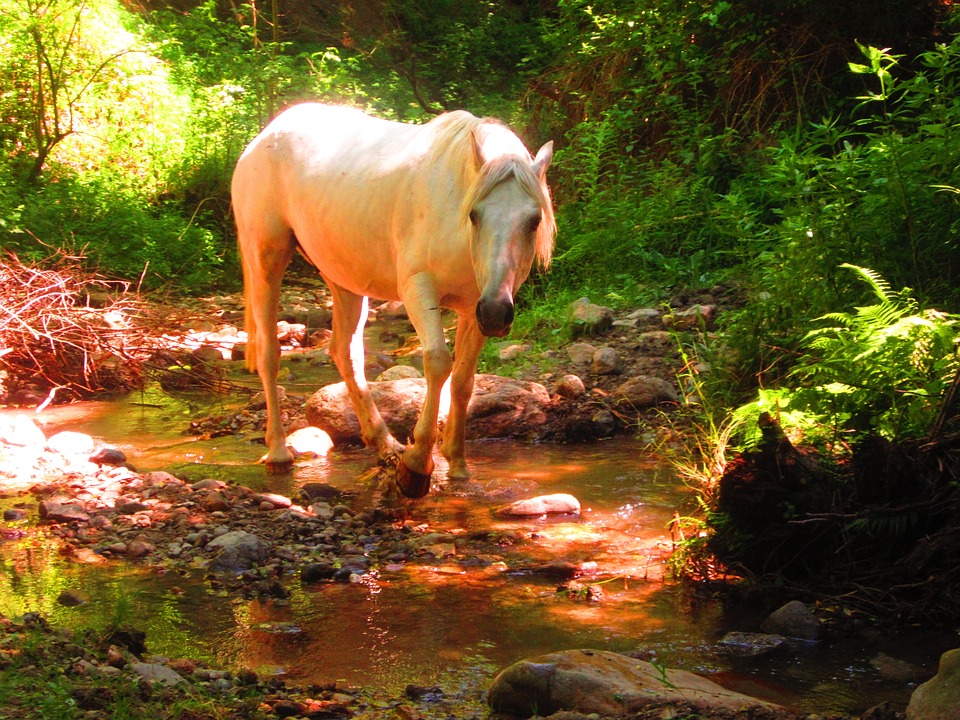
Whose horse is this? Does the little boy own it or does he just visit it? Can the horse talk? How does the boy feel when he’s with the horse?
What is this boy reading? Does the book have magical powers? Does the boy? Do the stories in the book become real or does something else special happen?
Where is this man? How did he get there? What is he looking for?
Who is walking over the bridge? What’s on the other side? Is it worth the risk?
What are these people doing on the elephant? Where are they? Are they tourists or is the elephant their pet? What would life with an elephant be like?
Who made this map? It looks old. Has it been hidden away for a long time? Who discovered it and how? What does it lead to?
Whose typewriter is this? What important or secretive thing might they be working on? What could happen if the wrong person finds their work?
Who are these three stuffed animals? Are they living? What is their story?
Whose ukulele is this? Why did they leave it here? Who might find it?
Where is the owner of the bike? Where does this path lead? What if the bike’s not there when the owner returns?
Whose shoes are these? Why did they leave them here? Why are they so dirty?
Who was reading the newspaper? What was the most interesting thing they read? Where have they disappeared to?
Who put this sign on the old truck? What do you think of it? How did the truck end up in its current condition and location?
Who set the table? Who are they expecting? What special occasion are they celebrating? What could go wrong?
Whose birthday cake is this? Are they having a party? Who is there? Who did they want to have there that didn’t show up?
Who lives here? How do they access their home? What is their life like?
Who built the igloo? Where is it? How does it feel to spend the night inside it?
What is the history of this castle? Who lives in it now? Does it have any special or magical features?
Is this barn abandoned or do people live on the property? What kind of animals might live here? How do they keep themselves entertained?
What is it like living on a houseboat? What kind of community do you think forms among the neighbors? Imagine you live on one of these boats and think about how your daily life might change. What interesting things could you do if you lived here? What would you miss the most?
Where is this hut? Who lives here? What mystery might unfold if a stranger came knocking at their door?
What is this lighthouse called? Who runs it? How often do they leave? What is the most memorable experience they’ve had as a lighthouse operator?
How did this house get here? Does anyone live in it? What would life be like here?
Where is this festive street? Are the people there celebrating something? Where is everybody?
Who lives here? How did they build this house? Are they hiding from something? What does it look like inside?
Whose notebook is this? Why did they leave it here? What’s written in it and how might it change the life of the person who finds it?
What are these women doing? What are they supposed to be doing? Will they be in trouble if they get caught?
Who might be represented in this statue? Why is she being pulled by lions? What amazing things might she have done to deserve a statue in this prominent place?
Where is this? Who is riding in the hot air balloons? Where are they going and why?
How old is this tree? Where is it? What are some of the most fascinating stories it could tell?
Where is this carousel? Who is riding it? Can you think of a special or strange story about how it came to exist in this particular place?
What are these people thinking about? What’s at stake for them? What happens if one of them sneezes?
Where are these penguins? What are they talking about? Which one of them is the leader?
What is this place? Was it designed to be open like this or was it once part of someone’s home or a public building? How have people’s opinions of this place changed over time?
Who are these kids? Is this what they’re supposed to be doing? What happens when their teacher sees them?
Who is supposed to ride in this boat? Where are they going? Will they make it there?
Is this plane special to someone? What did they have to do to get it/build it? Where will they fly to in it?
Who decorated this train car? Which passengers will fill it up? What will they talk about?
Whose skis are these? Why are they sticking out of the snow? How did their owner get down the mountain without them?
Where does this gondola go? Who rides it? How does it feel to ride it?
Who’s driving the monster truck? Why is it at the beach? What is it going to crush? Who is watching?
Where is the boat going? Who is on it? What is their mission?
What city is the helicopter flying over? Why? Is the driver looking for something specific or do they have a special delivery?
What’s the little boy doing in the boat? Is he alone or is someone with him? Where is he trying to go?
Who is in the sub? What’s it like inside? What are they doing?
Whose book is this? What’s it about? What’s happening to it?
How did that piece of land with the house on it break off from the rest of the world? Why? Where is it going? Is anyone in the house?
Who is this girl? Where is she? Who is she shooting at?
Where does this scene take place? Is the lizard/dragon good or bad? What is its relationship with the girl?
What do these books represent? What kind of world is this? What (or who) is inside the books?
What are these dinosaurs discussing? Where are they? What do they do for fun?
Whose cottage is this? Do they still live there? If not, where have they gone? If so, what do they do there?
What is the moth thinking about? Is it alone? What’s the biggest challenge it faces in this moment?
Who is the owl looking at? Has it read these books? What is its greatest talent?
Where are these trees? Why are they pink? Do they have any special powers or features?
What do you think? Which kind of pictures do you like best for creative writing prompts? Let us know in the comments.
Sign Up for Your FREE Picture Writing Prompt Slides
Share this post!
Picture Prompts For Writing: A teacher’s guide
Membership
Classroom Practice
Paul Main
How can we use images to develop and scaffold the writing process for children?
What are picture prompts for writing?
Everything that makes a learner is already in children. Unlocking and developing this potential is one of the most significant rewards as instructors. Children are born with an innate ability to learn, but it takes time and effort to develop their natural skills.
Children have all the skills to be enviably creative because they are naturally interested, energetic, driven, spontaneous and exploratory. In this article, we will look at how simple visuals can be manipulated into different manifestations to generate ideas. This playful approach can fuel the creative writing process and be incorporated into all kinds of student writing.
Our job is to help each kid discover and develop their unique talents while also allowing them to do so from a position of strength. Simple imagery can create new thoughts that act as writing prompts. Whatever type of writing you are developing, an intriguing image can generate story ideas to spur on child imagination. The key to helping each kid flourish is providing a secure atmosphere in which innate talents may grow, develop, and mature.
Why should we use picture prompts in KS1 literacy?
Children benefit significantly from visual cues in their quest to make sense of the world around them. Picture writing prompts can help a child add more meaning to their work and put them on a path to developing the art of writing. Whether your school is trying to embrace a daily writing challenge or advance non-fiction writing, picture writing prompts are a very useful utility. In recent years, Dual coding has received a lot of attention and it has shone the light on the importance of incorporating pictures in all kinds of writing. Descriptive writing assignments can also benefit from inspiring images that help pupils generate new adjectives.
Using a wide variety of ever-evolving skills and expertise, images can…
- Invoke recollections
- Develop vocabulary
- Generate fresh ideas ideas
- Sequence and organize ideas
- Assist memory
- Develop imagination
- Encourage us to «think beyond the box.
Picture prompts using dual coding methods
How should we use picture prompts?
Talking
A simple image or series of photographs might prompt children to describe what they see. Amazing images are waiting to be explored using rich language. This type of generative activity can very quickly help young school children find the words they will use in a piece of writing. Argumentative writing can be developed with pictures that cause someone to take a certain position. This conflict can be discussed through Oracy activities acting as the perfect writing stimulus.
Fear of giving an incorrect response is eliminated by opening the assignment to interpretation. The children will believe that this is a secure place to express their creative thinking without fear of consequences. Talk is the prerequisite for personal writing as children discover what they believe by entertaining different perspectives.
Encourage pupils by asking:
- Can you locate a picture of anything you like?
- What do you think you’ve noticed so far?
- What is it, exactly?
- Is there anything else it may be?
Children will soon be talking, reasoning, and explaining due to this process. For children who don’t want to talk, we can show them how to make observations, play with words, and develop imaginative ideas. They’ll develop the confidence to join their friends and give it a go on their own in due time.
Using picture icons as a writing prompt
Sequencing picture prompts for structuring writing
Fantasy images are very useful for stimulating new ideas but the photos don’t always have to be stunning images. Simple icons available from sites like the Noun Project can be used instead of complex imagery that might distract the child away from the task at hand. These visual writing prompts are often one colour and represent one idea. As pupils place the image next to another they often combine the meanings and generate new ideas. This can act as a very effective story starter for even the youngest children. Having a collection of story picture prompts in your top draw will mean that you’ll always have new ideas ready to be forged.
How do we go about using a simple photo prompt to structure writing? Request that the children select two or three photographs that they like or find fascinating.
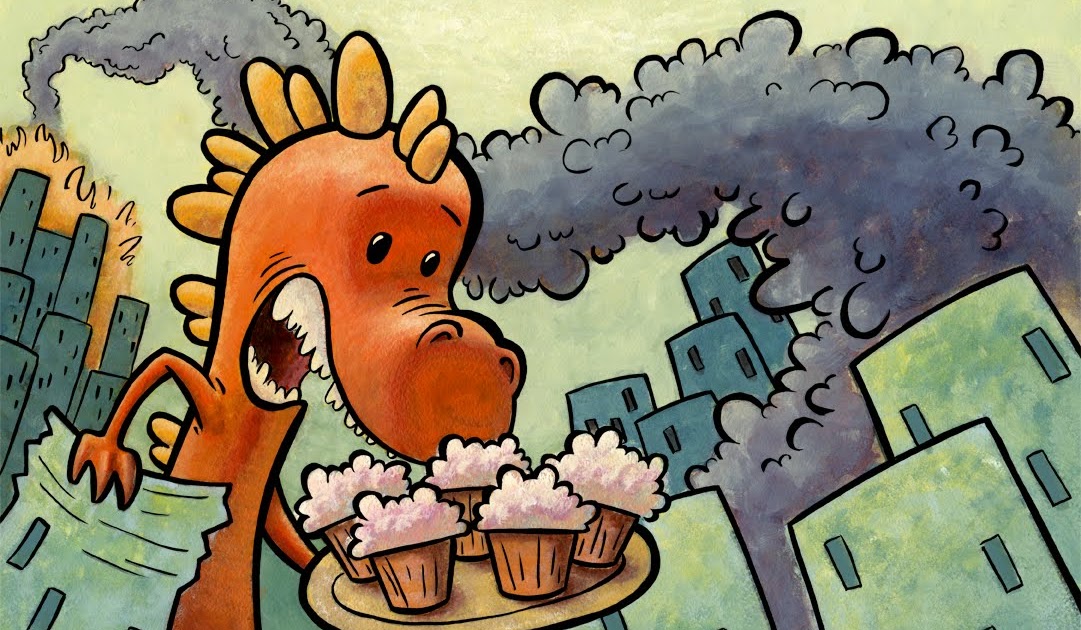
You may then use a simple yet engaging statement to link these images.
For example:
‘A big dinosaur once went into a dark wood and discovered a magical potion.’
Using pictures to sequence ideas together
Celebrate the children’s innovative ideas that they came up with, which you then expressed aloud. Children can then choose two or three additional images they like and explore them by linking them. You should expect to hear them discussing the photographs in various ways shortly after you introduce them. Using their speed, they can connect and expand their thoughts.
It is possible to create high expectations for vocabulary and creative content in young children as early as the stages of language development allow for sensitive inquiry.
For example:
- What do you think will happen next?
- What are their options?
- What are their movements like?
- What are their emotions?
- What’s the best way to put it?
By linking more and more photos, children may build on this.
As time goes on, they’ll be able to compose whole stories, poems, and recounts that enable them to immerse themselves in their creativity and communicate the fascinating worlds they possess in their thoughts.
Ordering ideas using ‘Writers Block’
Picture prompts can help build tomorrow’s enthusiastic writers
Utilising imagery into a daily writing habit is not cheating. We are utilising a different medium to help pupils order and combine their thoughts ready for writing. Children will remember good experiences like this for the rest of their lives, creating a formative sense of what it means to be a writer. If you are interested in this process and want to explore other areas relating to this practice you might want to read our other articles on:
- Dual coding
- Dialogic teaching
- Oracy
- Colourful semantics
- Critical thinking
- Mind maps
- Graphic organisers
We educate even the youngest children to own language without limitations via empathetic, enjoyable and liberated creative activities. After all, the world is their oyster, and they are more than able to put these abilities to use — all we need to do now is plant the seed.
Step 1/6
Your free resource
Download the learner observation framework.
We’ll send this straight over now.
Download
Step 2/6
Contact Details
We’ll send it over now.
Please fill in the details so we can send over the resources.
Back
Next Step
Step 3/6
School Type
What type of school are you?
We’ll get you the right resource
PrimarySecondaryOther
Back
Next Step
Step 4/6
CPD
Is your school involved in any staff development projects?
Are your colleagues running any research projects or courses?
YesNoNot sure
Back
Next Step
Step 5/6
Priorities
Do you have any immediate school priorities?
Please check the ones that apply.
Independent learningDeeper knowledgeLiteracy levelsClassroom engagementCommunication skillsMetacognition
Back
Next Step
Step 6/6
Confirmation
Download your resource
Thanks for taking the time to complete this form, submit the form to get the tool.
Previous
Next step
Thanks, submission has been recieved.
Click below to download.
Download
Oops! Something went wrong while submitting the form
Recent Posts
Kolb’s Learning Cycle
Tests for Dyscalculia
Moderate Learning Difficulties
Memorable Teaching
Developmental Global Delay
VR in Education
Back to Blog
What are picture prompts for writing?
Everything that makes a learner is already in children. Unlocking and developing this potential is one of the most significant rewards as instructors. Children are born with an innate ability to learn, but it takes time and effort to develop their natural skills.
Children have all the skills to be enviably creative because they are naturally interested, energetic, driven, spontaneous and exploratory. In this article, we will look at how simple visuals can be manipulated into different manifestations to generate ideas. This playful approach can fuel the creative writing process and be incorporated into all kinds of student writing.
Our job is to help each kid discover and develop their unique talents while also allowing them to do so from a position of strength. Simple imagery can create new thoughts that act as writing prompts. Whatever type of writing you are developing, an intriguing image can generate story ideas to spur on child imagination. The key to helping each kid flourish is providing a secure atmosphere in which innate talents may grow, develop, and mature.
One of my favorite assignments in elementary school was the picture writing prompts, normally in the form of a coloring book page. The goal was to think about what was happening in the scene while we were coloring. Who are these kids? What are they doing? Why are they doing it?
Then we’d write about it, normally in a timed session.
Years (I won’t say how many) after elementary school, picture writing prompts are still one of my favorite ways to get inspired and get the creative juices flowing. I use them for simple exercises, as the spark of a short story, and collect them for a general inspiration board.
“
Writing prompt: Find a picture that sparks your imagination. Then, write a new story based on that image.
5 Reasons to Dive in with Picture Writing Prompts
If you follow any kind of writing blog or social page, you’ve probably seen picture writing prompts before. People love them and there’s no end to sites that provide them. Not to mention the millions of pictures that are out there that aren’t “official” writing prompts. You’ve probably got a ton on your phone that could spark an idea.
If you haven’t taken the plunge and tried writing from picture writing prompts before, here are five reasons why you should:
1. A different take on creativity
There are a lot of reasons why teachers use pictures as prompts for their students. One is that it opens up the creative side of your brain in a different way than simply saying “Write about your summer” does. A person might write about where they went on vacation if given this verbal prompt, but if they’re looking at a picture of said vacation, they’re more likely to comment on the heat or the smell or how the sand felt between their toes.
2. Focus on details
Because the scene is already set, using pictures as prompts allows you to hone in on more sensory details than you may have done otherwise. You may look at a tree bright with crimson leaves and think of the crisp air that’s blowing down the sidewalk. Or children playing might spark the idea of sticky hands and the taste of Kool-Aid.
The placement of the picture’s actors is already set, allowing your brain to move on to the finer details of the scene, which will ultimately give your writing more authenticity and feeling.
3. Visual stimulation
Pictures are visually stimulating. You already see what is happening. You notice the colors, the action, the background. You don’t have to concentrate on imagining the scene. You simply put yourself in what’s already there and describe it.
4. Snapshots of life
Pictures convey a narrative on their own. They’re literally a snapshot of life, but just a snapshot. They don’t give context or background. They simply show you what is, and leave any interpretation up to you.
You get to decide how those people got where they are and where they’re going from there.
5. Sparks feeling/memory
Humans are very visual. We love taking pictures, looking through stranger’s pictures online, and sifting through old black-and-whites in our grandparents’ attics. Just one picture can strike a cord of feeling and memory. Look at a picture of a major event in your life and tell me you’re not transported back to that time. You know how you felt, what you did, possibly even how the room smelled or what that birthday cake tasted like.
The same can happen with pictures of other people or places you’ve never been. One good picture can capture melancholy or intense joy. By looking at someone else feeling it, you feel it. And then you can write about it.
Don’t let pictures limit you
When you’re writing based on a picture writing prompt, remember that you don’t have to conform to the picture in the literal sense. Whatever the image sparks, go with it. What comes out the other side might not have anything to do with the picture. And that’s fine! You’re using the picture as inspiration, not doing a journalistic piece on it. The sky’s the limit when using any prompt.
Do you do better with word or picture writing prompts? Let me know in the comments!
PRACTICE
Go to a site like this one or this one or this one and choose a picture. Don’t spend a ton of time choosing one. Just pick on and go with it. Take a good look at the picture, then spend fifteen minutes writing about it.
Don’t worry if it’s not a complete story. Just free write. If you can develop it into a full story later, great! If not, it was a nice exercise to get the juices flowing!
BONUS: If you want the full elementary school experience (and to give your creative mind a different outlet) print out and color one of these sheets from Crayola. Then write about it.
Don’t forget to share your writing in the comments and give your fellow writers some feedback!
Sarah Gribble
Website
Sarah Gribble is the author of dozens of short stories that explore uncomfortable situations, basic fears, and the general awe and fascination of the unknown. She just released Surviving Death, her first novel, and is currently working on her next book.
Follow her on Instagram or join her email list for free scares.
Photoshop Quick Selection
User’s Guide
Cancel
Search
Last update
Aug 18, 2022 03:27:05 AM GMT
- Photoshop
- Introduction to Photoshop
- Dream about it. Do it.
- What’s New in Photoshop
- Editing the first photo
- Create documents
- Photoshop | FAQ
- Photoshop
- Transferring presets, operations and settings
- Introduction to Photoshop
system requirements
- Photoshop and other Adobe products and services
- Working with Illustrator artwork in Photoshop
- Working with Photoshop files in InDesign
- Substance 3D Materials for Photoshop
- Photoshop and Adobe Stock
- Working with the built-in Capture extension in Photoshop
- Creative Cloud Libraries
- Creative Cloud Libraries in Photoshop
- Working in Photoshop using the Touch Bar
- Net and guides
- Create transactions
- Cancellation and transaction history
- Photoshop on iPad
- Photoshop on iPad | General questions
- Introduction to the working environment
- System requirements | Photoshop on iPad
- Create, open and export documents
- Adding photos
- Working with layers
- Drawing and painting with brushes
- Selecting areas and adding masks
- Retouch compositions
- Working with Adjustment Layers
- Adjusting the key of a composition using the Curves layer
- Applying transform operations
- Trim and rotate compositions
- Rotate, pan, zoom and restore canvas
- Working with text layers
- Working with Photoshop and Lightroom
- Getting missing fonts in Photoshop on iPad
- Japanese text in Photoshop on iPad
- Application parameter management
- Touch shortcuts and gestures
- Key combinations
- Image resizing
- Live stream your creative process in Photoshop on iPad
- Fix imperfections with Healing Brush
- Creating brushes in Capture and using them in Photoshop
- Working with Camera Raw files
- Creating and using smart objects
- Adjusting the exposure of images with the Dodge and Burn tools
- Photoshop Web Application Beta
- Frequently Asked Questions | Photoshop Web App Beta
- Working environment overview
- System requirements | Photoshop 9 Web App Beta0010
- Keyboard shortcuts | Photoshop Web Application Beta
- Supported file formats | Photoshop Web Application Beta
- Opening and working with cloud documents
- Collaboration with stakeholders
- Limited editing options for cloud documents
- Cloud Documents
- Photoshop Cloud Documents | Frequently Asked Questions
- Photoshop Cloud Documents | Workflow Questions
- Work with and manage cloud documents in Photoshop
- Cloud storage update for Photoshop
- Unable to create or save cloud document
- Troubleshooting Photoshop cloud documents
- Collection of cloud document synchronization logs
- Sharing and editing cloud documents
- File sharing and commenting in the application
- Working environment
- Working environment basics
- Learn faster with the What’s New panel in Photoshop
- Create documents
- Working in Photoshop using the Touch Bar
- Tool gallery
- Performance settings
- Using tools
- Touch gestures
- Touch gestures and customizable workspaces
- Technology overview versions
- Metadata and comments
- Default key combinations
- Touch gestures and customizable workspaces
- Putting Photoshop images into other applications
- Installations
- Default key combinations
- Rulers
- Show or hide non-printing auxiliaries
- Specifying columns for the image
- Cancellation and transaction history
- Panels and menus
- File storage
- Positioning of elements with referencing
- Positioning with the ruler tool
- Setting sets
- Customizing keyboard shortcuts
- Net and guides
- Web, screen and application content development
- Photoshop for design
- Artboards
- View on device
- Copy CSS from layers
- Splitting web pages into fragments
- HTML options for snippets
- Changing the arrangement of fragments
- Working with web graphics
- Create web photo galleries
- Understanding images and working with color
- Resizing images
- Working with raster and vector images
- Image size and resolution
- Importing images from cameras and scanners
- Creating, opening and importing images
- Image viewer
- «Invalid JPEG marker» error | Opening images
- Viewing multiple images
- Customize color palettes and color swatches
- HDR images
- Image color matching
- Converting between color modes
- Color modes
- Erase sub-images
- Blend Modes
- Choice of colors
- Making changes to indexed color tables
- Image information
- Distortion filters not available
- Color details
- Color and monochrome corrections with channels
- Selecting colors in the Color and Swatches panels
- Sample
- Color mode (or picture mode)
- Shade
- Add color mode change to operation
- Add swatches from HTML CSS and SVG files
- Bit depth and settings
- Layers
- Understanding Layers
- Reversible editing
- Create and manage layers and groups
- Selecting, grouping and linking layers
- Putting images into frames
- Opacity and layering
- Layer masks
- Application of smart filters
- Layer compositions
- Move, arrange and lock layers
- Layer masking with vector masks
- Manage layers and groups
- Effects and Layer Styles
- Editing layer masks
- Extract resources
- Display layers with clipping masks
- Generation of graphic resources from layers
- Working with Smart Objects
- Blend Modes
- Combining several fragments into one image
- Combining images with Auto Layer
- Alignment and distribution of layers
- Copy CSS from layers
- Load selections based on layer boundaries or layer masks
- See-through to show the contents of other layers
- Layer
- Mixing
- Composite images
- Background
- Selections
- Select and Mask workspace
- Quick area selection
- Getting Started with Selections
- Selecting with the Marquee Toolbox
- Selection with the Lasso tools
- Selecting a color range in the image
- Pixel highlight setting
- Convert between contours and selection boundaries
- Channel Basics
- Moving, copying and deleting selected pixels
- Creating a temporary quick mask
- Save selections and alpha channel masks
- Selecting focus areas in an image
- Duplication, splitting and merging of channels
- Channel calculation
- Extraction
- Bounding box
- Image corrections
- Perspective distortion
- Blur reduction due to camera movement
- Healing Brush Tool Examples
- Export color lookup tables
- Image sharpening and blurring
- Introduction to color grading
- Applying the Brightness/Contrast setting
- Shadow and Highlight Detail Correction
- «Levels» correction
- Hue and saturation correction
- Juiciness correction
- Adjusting the color saturation in image areas
- Quick tone correction
- Applying special color effects to images
- Image enhancement with color balance correction
- HDR images
- View histograms and pixel values
- Image color matching
- Crop and straighten photographs
- Converting a color image to black and white
- Adjustment and fill layers
- Curves correction
- Blend Modes
- Target Imaging for Press
- Color and tone correction with Levels and Curves eyedroppers
- HDR Exposure and Toning Compensation
- Filter
- Blur
- Lighten or darken image areas
- Selective color correction
- Changing object colors
- Adobe Camera Raw
- Camera Raw
- What’s New in Camera Raw
- Introduction to Camera Raw
- Creating panoramas
- Supported lenses
- Camera Raw 9 Vignetting, Grain, and Haze Removal0010
- Default key combinations
- Automatic perspective correction in Camera Raw
- Reversible editing in Camera Raw
- Camera Raw Radial Filter Tool
- Manage Camera Raw Settings
- Processing, saving and opening images in Camera Raw
- Improving Images with Camera Raw’s Improved Spot Remover
- Rotating, cropping and modifying images
- Camera Raw color correction
- Function overview | Adobe Camera Raw | Issues for 2018
- Overview of new features
- Processing versions in Camera Raw
- Making local adjustments in Camera Raw
system requirements
- Fixing and restoring images
- Removing objects from photos using Content-Aware Fill
- Content-aware patching and relocation
- Retouching and fixing photos
- Image Distortion and Noise Correction
- Basic troubleshooting steps to solve most problems
- Image transformation
- Object transformation
- Crop, rotate and canvas adjustment
- Crop and straighten photographs
- Creating and editing panoramic images
- Deforming images, shapes and contours
- Perspective
- Using the Liquify filter
- Content-aware scale
- Transforming images, shapes and paths
- Deformation
- Transformation
- Panorama
- Drawing and painting
- Drawing symmetrical ornaments
- Options for drawing a rectangle and changing the stroke
- Drawing details
- Drawing and editing shapes
- Paint tools
- Creating and modifying brushes
- Blend Modes
- Adding color to contours
- Edit contours
- Painting with mix brush
- Brush Presets
- Gradients
- Gradient interpolation
- Fill and stroke selections, layers, and paths
- Drawing with the pen tool group
- Making patterns
- Creating a pattern with the Pattern Builder filter
- Loop control
- Managing pattern libraries and presets
- Drawing with pen tablet
- Creating textured brushes
- Adding dynamic elements to brushes
- Gradient
- Draw stylized strokes with the Artistic Archive Brush
- Drawing with pattern
- Synchronizing presets across multiple devices
- Text
- Adding and editing text
- Universal text editor
- Working with OpenType SVG Fonts
- Character formatting
- Paragraph formatting
- Creating text effects
- Text editing
- Leading and letter spacing
- Font for Arabic and Hebrew
- Fonts
- Troubleshooting fonts
- Asian text
- Create text
- Text Engine error when using Photoshop’s Type tool | Windows 8
- Video and animation
- Video editing in Photoshop
- Editing video and animation layers
- Introduction to video and animation
- Video and animation preview
- Drawing frames in video layers
- Import video files and image sequences
- Create frame animations
- Creative Cloud 3D Animation (Preview)
- Create timeline animations
- Creating images for videos
- Filters and effects
- Using the Liquify filter
- Using Blur Gallery group effects
- Filter basics
- Filter effects guide
- Adding lighting effects
- Using the Adaptive Wide Angle filter
- Oil Paint Filter
- Effects and Layer Styles
- Application of specific filters
- Image area feathering
- Saving and exporting
- Saving files in Photoshop
- Export files to Photoshop
- Supported file formats
- Saving files in other graphic formats
- Moving projects between Photoshop and Illustrator
- Saving and exporting video and animation
- Saving PDF files
- Digimarc copyright protection
- Printing
- Printing 3D objects
- Printing with Photoshop
- Printing and color management
- Checklists and PDF presentations
- Print photos in a new image layout
- Spot color printing
- Duplexes
- Printing images on a printing press
- Photoshop Color Enhancement
- Printing troubleshooting | Photoshop
- Automation
- Create activities
- Creation of data-driven images
- Scenarios
- File batch processing
- Operation playback and management
- Adding conditional operations
- About actions and the Actions panel
- Recording tools in operations
- Add color mode change to operation
- Photoshop UI Development Kit for Plugins and Scripts
- Color Management
- Understanding Color Management
- Accurate color assurance
- Color settings
- Working with color profiles
- Color management of documents for viewing on the web
- Color management for printing documents
- Color management of imported images
- Perform proofing
- Content authenticity
- Learn more about content credentials
- Identity and origin of NFT tokens
- Connecting accounts for creative attribution
- 3D objects and technical images
- 3D in Photoshop | Common questions about deprecated 3D features
- Creative Cloud 3D Animation (Preview)
- Printing 3D objects
- 3D drawing
- 3D Panel Enhancement | Photoshop
- 3D Concepts and Tools
- Rendering and saving 3D objects
- Creating 3D objects and animations
- Image stacks
- 3D graphics workflow
- Measurements
- DICOM files
- Photoshop and MATLAB
- Image object count
- Combining and transforming 3D objects
- Editing 3D textures
- HDR Exposure and Toning Compensation
- 3D panel settings
User Guide
Use the Object Selection, Quick Selection, or Magic Wand tools to make quick selections in Photoshop.
Use a selection to define an area that can be further edited to enhance images and compositions. You can quickly select the desired area using a variety of selection tools in Photoshop.
Update Photoshop
The new Object Selection tool simplifies the process of selecting a single object or fragments of an object in an image, whether it be people, cars, furniture, pets, clothes, and more. Simply draw a rectangle or lasso around an object, and the Object Selection tool will automatically select the desired object within the specified area. Selections created with the Object Selection tool are now more accurate and retain more detail around the edges of the selection. That is, you spend less time getting those perfect highlights.
You can access the Object Selection tool from the following locations:
- From the main application toolbar in Photoshop
- From the toolbar in the workspace Selection and mask
Does the Object Selection tool not appear on the toolbar? See Tools Disappeared from the Toolbox.
To select objects in an image using the Object Selection tool:
-
Select the Object Selection tool from the toolbar.
-
Make sure the Object Finder is enabled and hover over the desired object
In the Options Bar, make sure the Object Finder is enabled (default behavior: ON). Then simply hover over the image object you want to select. Photoshop automatically selects the object when you hover over it. Click to create a selection.
If you don’t want to use automatic selection, turn off the Object Finder and select the selection mode Mode: Rectangle or Lasso and drag the mouse along the object to create a selection.
- Rectangle: Drag the pointer to define a rectangular area around the object.
- Lasso: Draw an approximate lasso line outside the object.
-
Subtract or add selection
On the Options Bar, choose one of the following selection options: Create, Add To, Subtract From, or Intersect With Selection. If no option is selected, the default is Create. When the initial selection is complete, the setting automatically changes to Append To.
Append to Selection: Hold down SHIFT or select Append to Selection in the Options Bar, then hover over or draw a new rectangle or lasso around the missing area. Repeat this process for any missing areas that you want to add to the selection.
Subtract from selection: There are two options for subtracting from selection.
- Use the Subtract From Selection option in the Options Bar: Hold down the Option (Mac)/ALT (Win) key or choose the Subtract From Selection command in the Options Bar, then hover or draw a precise rectangle or lasso around the unwanted area.
- Activate the option «Subtract Object» in the advanced options section (gear icon in the options bar) : In particular, it is recommended to use the Subtract Object option when removing background areas inside the currently selected object. The Object Subtraction tool works in much the same way as the Object Selection tool, only it performs the opposite function. Set the Subtract Object option in the Options Bar to ON. Hold down the Option (Mac) / Alt (Win) key or choose the Subtract From Selection command in the Options Bar, then hover over or draw a rough rectangle or lasso around the unwanted area.
-
Select object selection options
Sample from all layers: Creates a selection based on all layers, not just the currently selected layer.
Hard Edges : Enables hard edges on the selection border.
-
Further refine the selection edge in the Select and Mask workspace
To further customize the selection borders, view the selection against different backgrounds or as a mask, click Select and Mask in the Options Bar.
Also, use the Selection Feedback dialog box to share information about a selection made with the Object Selection tool. This will help us improve the product.
Improved hair selection
In the June 2022 release of Photoshop 23.4, the Object Selection tool has been redesigned to improve hair selection in human portrait images. The Object Selection tool can now recognize portraits and apply hair refinement to get the same quality mask as the one that the Select Subject function gives.
Simply open a portrait image and select the Object Selection tool from the toolbox and make your choice by clicking on the portrait or by lassoing or creating an area around the person and get a mask that captures all the details of the hair.
After making a selection with the Object Selection tool, you can further and more naturally refine mask results using the Refine Hair option in the Selection and Mask workspace in the Options panel for images that are not human portraits, such as images domestic animals, wild animals or fur products.
One-click masking all objects on a layer
Save time with this method, which uses the power of Adobe Sensei to create masks for all objects on the desired layer with one click.
Choose Layer > Mask All Objects and see how Photoshop easily creates masks for all objects found on a layer with a single click.
Select «Mask All Objects» A layer mask is created for all objects found in a layer with one click.
How is the Select Object tool different from the Select Object command?
The Object Selection tool is useful when you want to select only one of the objects or a part of an object in an image that contains multiple objects. And the «Select Subject» command is designed to select all the main objects in the image.
For more information about the Select Item command, see the next section of this article below.
Optimized for improved selection when processing portraits in Photoshop 21.2 (June 2020 release)
The Select Item command allows you to select the most prominent items in an image with a single mouse click. The Highlight Object feature, powered by advanced machine learning technology, is designed to identify a variety of objects in an image: people, animals, vehicles, toys, etc.
-
Automatic selection of objects
The Select item command automatically selects noticeable objects in the image. To access the Select Item command, do the following:
- While editing an image, choose Select > Subject.
- With the Object Selection, Quick Selection, or Magic Wand tool active, click Select Object in the options bar.
- When the Select Object or Quick Selection tool is active in the Select and Mask workspace, click Select Object in the options bar.
Starting with Photoshop 21.2 (June 2020 release), Select Item is content-aware and applies new custom algorithms when it detects a person in an image. When creating a selection in portrait images, the edging around the hair has been greatly improved for added detail. To temporarily disable content-aware processing, press and hold the 9 key0872 Shift when using command Select item .
-
Add or subtract a selection
Use any of the Selection tools with the Add To Selection or Subtract From Selection options to clean up the original selection as needed. See the document Customizing Selected Areas Manually.
-
Further refine the selection edge in the Select and Mask workspace
Choose Selection > Selection and Mask to open the image in the Selection and Mask workspace. Use the tools and sliders in the workspace to further refine your selection.
See document Highlight and Mask workspace.
Select Item Cloud Service
Highlight desired areas more precisely and get high-quality images thanks to processing in the cloud with Select Item service.
To get the results you want, simply go to Image Processing in the Preferences dialog and choose the mode that best suits you, either Cloud or Device.
Switching to the Select Item cloud service To process in the Select Item service, select Device mode or Cloud mode.
Selecting can also be done using the Select and Mask workspace.
Tool
«Quick Selection» allows you to
quickly «paint» a selection with a customizable round brush tip.
When dragging the cursor, the selected area expands outward, automatically detects the edges of the image
and follows them.
-
Select the Quick Selection tool. (If a
this tool is not displayed, press and hold the Magic Wand tool.) -
Select one of the following selection options from the Options Bar: New, Add To, or Subtract From.
If no option is selected, the default is Create. After the initial selection is completed, the value of the parameter automatically changes to «Add to Selection».
-
To change the brush tip size, click the drop-down
the Brush menu in the options bar and enter a size in pixels or use the slider to set it.
Using the Size drop-down menu options, you can set the brush tip size sensitivity
to pen or copy wheel pressure.When creating a selection, click the button with the right square
bracket (]) to increase the size of the brush tip of the Quick Selection tool,
click the button with the left square bracket ([) to decrease it. -
Select options for the Quick Selection tool.
Sample from All Layers: Creates a selection based on all layers, not just the currently selected layer.
Enhance Edge: Reduces the jaggedness and blockiness of the selection border. The Enhance Edge option automatically moves the border of the selection toward the edges of the image and applies some of the edge refinement techniques available for manual use in the Select and Mask workspace.
-
You can draw inside the part of the image you want to highlight. As you draw, the selection area expands. If updating is slow, continue dragging, allowing time for the selection to complete. When drawing near the edges of a shape, the selection expands so that its border follows the shape’s outline.
Draw with the Quick Selection tool to expand the selection
- To subtract a portion from the selection, click Subtract From in the Options Bar and drag over an existing selection.
- Hold down the Alt (Windows) or Option (Mac) key to temporarily switch between Add and Subtract modes.
- To change the tool cursor, choose Edit > Preferences > Cursors > Drawing Cursors (Windows) or Photoshop > Preferences > Cursors > Drawing Cursors (Mac). The Normal Brush Tip is the default cursor for the Quick Selection tool, with plus and minus signs indicating the selection mode.
If you stop dragging the cursor and then click in the adjacent area
or drag in it, the selection will expand to include
new area. -
Click the Select and Mask button to further adjust the border of the selection.
Tool
The «Magic Wand» allows you to select a uniformly shaded area (
for example, a red flower) without stroking its outline. Required
set selected color range or approval regarding
the original color you clicked.
Tool
Magic wand cannot be applied to images with 32 bits per channel
or in bit mode.
-
Select the Magic Wand Tool. (If a
this tool is not visible, it can be accessed by pressing and holding the tool
«Quick selection» .) -
Select the parameter that determines how the selection works on
options panel. The cursor of the Magic Wand tool changes depending on which
which option is selected.Selection Options
A. New selection B. Add to selection C. Subtract from selection D. Intersect with selection
-
On the Options Bar, you can select one of the following options:
Tolerance: Specifies the color range of the selected pixels. Enter a pixel value between 0 and 255. A low value will select only a few colors that are very similar to the specified pixel. Specifying a higher value will select pixels from a wider range.
Antialiasing: Creates a selection with smooth edges.
Adjacent Pixels: Selects only adjacent areas of the same color. Otherwise, all matching pixels in the image will be selected.
Samples from all layers: Extracts colors using data from all visible layers. Otherwise, the Magic Wand tool only picks colors from the active layer.
-
Select the desired color by clicking on the image. If the option is selected
«Adjacent Pixels», then all adjacent pixels in the allowed range will be selected.
color range. Otherwise, all pixels are selected from the allowed
color range. -
To further adjust the selection’s borders, match the background image, or create a mask, click Selection and Mask.
More similar
- Select areas
- Save selections and alpha channel masks
- Convert paths to selection borders
- Selection tool gallery
-
To come in
Manage your account
View and edit files with Quick View on Mac
Search this guide
-
Welcome!
-
-
Menu bar
-
Spotlight
-
Control point
-
Siri
-
Notification Center
-
Desktop
-
Dock
-
Finder
-
-
-
Internet connection
-
Website Browsing
-
Volume control
-
Taking a screenshot or screen recording
-
Viewing and editing files with Quick View
-
Quick note writing
-
Set up Screen Time for yourself
-
Setting focus to focus on the task
-
Edit photos and videos in the Photos app
-
Using the «What’s in the picture?» with photos
-
Get directions in the Maps app
-
Create a recording in the Recorder application
-
Using trackpad and mouse gestures
-
Using the Touch Bar
-
Using Touch ID
-
Using keyboard shortcuts
-
macOS update
-
-
-
Embedded Applications
-
Opening apps
-
Working with application windows
-
Using applications in full screen mode
-
Using Applications in Split View
-
Download apps from the Mac App Store
-
Installing and reinstalling apps from the Mac App Store
-
Installing and uninstalling other applications
-
-
-
Changing system settings
-
Change desktop picture
-
Using splash screens
-
Adding an email account and other accounts
-
Using shortcuts to automate tasks
-
Create a Memoji in the Messages app
-
Change the picture that represents you or other people in apps
-
Changing the system language
-
Improved screen visibility
-
-
-
Creating and working with documents
-
Opening Documents
-
Using dictation
-
Adding notes to files
-
Combining files into one PDF file
-
Printing Documents
-
Organize your desktop with stacks
-
Grouping files into folders
-
Adding tags to files and folders
-
Sending emails
-
Using the Online Text feature to interact with text on a photo
- File backup
-
File recovery
-
-
-
Create an Apple ID
-
Manage your Apple ID settings
-
What is iCloud?
-
What is iCloud+?
-
Set up iCloud on Mac
-
Store files in iCloud Drive
-
Sharing files with iCloud File Sharing
-
iCloud storage management
-
Using iCloud Photos
-
-
-
What is Family Sharing?
-
Setting up Family Sharing
-
Adding Users on Mac
-
Set up Screen Time for your child
-
Sharing shopping with family members
-
Making a FaceTime call
-
Using SharePlay to Share Viewing and Listening
-
Sending text messages
-
Share your calendar with family members
-
View content shared with you
-
View the locations of friends and family
-
Multiplayer games with friends
-
-
-
Using Continuity to Work with Multiple Apple Devices
-
Stream audio and video via AirPlay
-
Using keyboard and mouse or trackpad to control multiple devices
-
Using iPad as a Second Display
-
Transfer tasks between devices
-
Insert photos and scanned documents from iPhone or iPad
-
Insert sketches from iPhone or iPad
-
Copy and paste using multiple devices
-
Use your Apple Watch to unlock your Mac
-
Make and receive calls on Mac
-
Transfer files between devices using AirDrop
-
Sync music, books and more between devices
-
-
-
Music playback
-
Listening to podcasts
-
Watching movies and TV shows
-
Reading and listening to books
-
Reading the news
-
Stock price tracking
-
-
-
Subscribing to Apple Music
-
Subscribing to Apple TV+
-
Subscribing to Apple Arcade
-
Subscribe to Apple News+
-
Subscribe to podcasts and channels
-
Subscription management in the App Store
-
View family subscriptions to Apple services
-
-
-
Manage cookies and other website data in Safari
-
Using Private Browsing Mode in Safari
-
View privacy reports in Safari
-
About passwords
-
Reset your Mac login password
-
Create and autofill strong passwords
-
Securing your Apple ID
-
Set up security for your Mac
-
Protecting privacy in Mail
-
Maintaining privacy
-
Pay with Apple Pay in Safari
-
Use Sign in with Apple for apps and websites
-
Protecting your Mac from malware
-
Camera access control
-
Search for a missing device
-
-
-
Getting started with accessibility features
-
Vision
-
Hearing
-
Motor skills and coordination
-
Main
-
-
-
Change screen brightness
-
Connecting a wireless keyboard, mouse, or trackpad
-
Connecting other wireless devices
-
Connecting a monitor, TV or projector
-
Adding a Printer
-
Using the built-in camera
-
Using AirPods with Mac
-
Save Energy on Mac
-
Storage optimization
-
Burning CDs and DVDs
-
Home accessories management
-
Starting Windows on a Mac
-
-
Resources for Mac
-
Resources for Apple Devices
-
Copyright
The Quick View feature displays full size thumbnails of almost any file type without having to open them. You can rotate photos, trim audio and video clips, and use markup right in the Quick View window.
Quick Look can be used on items in Finder windows, on the desktop, in emails, messages, and more.
When you open Live Photo in the Quick View window, the video portion plays automatically. To view it again, click the inscription «Live Photo» in the lower left corner of the photo.
See also Use apps in full screen on MacWays to quickly view items in Finder on MacOrganize files in Finder on MacUse iCloud File Sharing to share folders and documents with others
Maximum number of characters:
250Do not include personal information in comments.
Maximum number of characters: 250.
Thank you for your feedback.
translation into English, synonyms, antonyms, examples of sentences, meaning, phrases
An image of rapidly dispersing fragments of the boat Ragnhild Pavletich was displayed on his overview screen.
His visual display showed the rapidly dispersing wreckage of Ragnhild Pavletic’s pinnace.
To rotate the image, click one of the arrows on the tab of the quick fix.
Click the arrows under the Quick fixes tab to rotate your video to the right or left.
Modern cameras can capture the image faster than the human eye, so I set the shutter speed to 1/640 of a second, with a wide lens aperture.
Modern cameras can capture imagery faster than the human eye can process it, so I set the shutter speed to 1/640 of a second, opened the aperture wide…
women as fast as possible .
Circulate an image of this woman ASAP.
The only thing you can do is move forward fifteen minutes and quickly analyze image before moving on.
What I can do is move it forward in fifteen — minute stages and study it quickly before moving on.
If the fast focal point changes were to be made by the camcorder, the image on the screen would be a blurry, nauseating mess.
If a video camera were to perform such high speed changes in focal points, the image on screen would be a blurry, nauseating mess.
Some updated vector displays use a regular phosphor that fades quickly and needs to be constantly updated 30-40 times per second to show a stable image .
Some refresh vector displays use a normal phosphor that fades rapidly and needs constant refreshing 30 — 40 times per second to show a stable image .
The system also allows the to quickly and accurately control the process, providing a perspective physiological gated image .
The system also allows rapid, precise control, enabling prospective physiological gated imaging .
Hi mate, nice article about the time someone did this. Quick question Tho, why have a picture of Pukura?
Hiya mate, nice article, bout time someone made it. Quick question tho, why have an image of a Pucura?
If there is no other tag on this page and this image was uploaded after May 19, 2005, please quickly delete this image or tag it with {{db-f3}}.
If no other tag is present on this page, and this image was uploaded after May 19, 2005, please speedily delete this image or tag it with {{db — f3}}.
Lines have different brightness; the whole set of lines is drawn enough quickly for the human eye to perceive it as a single image .
The lines are of varying brightness; the whole set of lines is drawn quickly enough that the human eye perceives it as one image .
They went to various sites that hosted the image and quickly removed it.
They approached various sites that were hosting the image and quickly had it removed.
In July 2014, he released Bolt, a messaging app where users click on a friend’s profile picture to fast send image and the content disappears after viewing.
In July 2014, it released Bolt, a messaging app where users click on a friend’s profile photo to quickly send an image , with the content disappearing after being seen.
I just saw one image was quickly removed on fur soil — was that something special for the image or a new trend?
I just saw one image get speedily deleted on FUR grounds — was this something specific to the image or a new trend?
I’m assuming that selecting this option and then uploading the image automatically puts the image in the quick delete category .
I’m guessing that choosing that option and then uploading the image automatically puts the picture in the speedy deletion category.
Subsequently, another admin came up and removed this tag, saying that the image would not be quickly removed.
Another admin subsequently came along and removed that tag saying that the image would not be speedy deleted.
If an image is clearly infringing, it will be quickly removed.
If the image is clearly a violation, it will speedily get deleted.
This image became so popular that quickly spread to in Germany and England.
This portrayal became so popular that it quickly spread to Germany and England.
The shorter the time, the faster respondents find the given element in the image .
Smaller time duration equals faster findability.
In this example, we will show how to easily and quickly perform selective desaturation on a color image, i.e. desaturate part of the image, and leave part of the areas colored.
You will see how to desaturate a part of the image leaving other parts untouched.
To reduce motion blur image , when the pixels are not enough quickly respond to color changes, you can use the so-called pixel overdrive.
To reduce smudging in a moving picture when pixels do not respond quickly enough to color changes, so — called pixel overdrive may be used.
This may be due to their ability to quickly recognize patterns in an image .
This may be due to their ability to quickly identify patterns in the image .
Imported images can also be viewed in Windows Photo Viewer, where large preview thumbnails help you quickly determine which new images to remove from your computer.
You can also review your imported pictures in Windows Photo Viewer, where the large preview format makes it easier to decide which newly imported pictures to delete from your computer.
Performing this update is fast enough to avoid user nausea requires a large amount of computer processing images .
Performing this update quickly enough to avoid inducing nausea in the user requires a great amount of computer image processing.
This is consistent with brain imaging studies that show that frontal deactivation is common in fast sleep.
This is consistent with brain imaging studies that show frontal deactivation is characteristic of REM sleep.
After Episode 2 was released, it was quickly filmed and replaced with a censored version that eliminated some of the more gratuitous violence and images of .
After episode 2 was released, it was quickly pulled down and replaced with a censored version that eliminated some of the more gratuitous violence and imagery .
During the Cambrian Explosion, the development of eye rapidly accelerated , with radical improvements in image processing and light direction detection.
During the Cambrian explosion, the development of the eye accelerated rapidly, with radical improvements in image — processing and detection of light direction.
Rapid display of successive scans will give the illusion of smooth movement.
Quickly displaying successive scan images will allow the apparent illusion of smooth motion.
On fast hardware, these algorithms are suitable for games and other real-time image processing.
On fast hardware, these algorithms are suitable for gaming and other real-time image processing.
The slit scan keeps the images from simply blurring and the user sees a fast sequence of images, giving the illusion of movement.
The scanning of the slits keeps the pictures from simply blurring together, and the user sees a rapid succession of images , producing the illusion of motion.
This requires a quick extrapolation by the clinician from the visible transverse images to the desired longitudinal pattern.
This demands a rapid extrapolation by the physician from the transversal images seen to the longitudinal drawing needed.
The focus of the image shifted inward, slipped under the huge octagonal arch, and quickly drove along the corridor.
The focus of the image moved inwards, darted through a great octagonal archway and sped along the corridor within.
To activate the quick mask, click on the small button with red borders in the lower left corner of the image window .
To activate the QuickMask , click on the small red — outlined button at the lower left of the image window.
After undoing an action, you can redo it by selecting Edit -> Redo from the image menu, or using the shortcut key , Ctrl+Y.
After having undone an action, you can redo it by choosing Edit -> Redo from the image menu, or use the keyboard shortcut, Ctrl+Y.
This project uses two 1-meter aperture telescopes located close to each other using fast readable CCD imaging device.
The LINEAR survey observes with two, co — located, 1 — metre aperture telescopes using fast readout charge — coupled device imaging devices.
But how long does it take before computer software can read these images faster than better and cheaper than a radiographer in Bangalore can?
quick deletion.
Note that any fair use images lacking such an explanation can be deleted one week after being tagged, as described on criteria for speedy deletion.
Please note that any fair use images that do not have such an explanation may be removed one week after labeling, as described in the quick removal criteria section.
0857 lacking such an explanation can be deleted one week after being tagged, as described on criteria for speedy deletion.
Please note that any fair use images that do not have such an explanation may be removed one week after labeling, as described in the quick removal criteria section.
Note that any fair use images lacking such an explanation can be deleted one week after being tagged, as described on criteria for speedy deletion.
T-stops are often used in cinematography where many images are seen in a quick sequence and even small changes in exposure will be noticeable.
T — stops are often used in cinematography, where many images are seen in rapid succession and even small changes in exposure will be noticeable.
Unsaved and untagged images can be deleted one week after they were tagged, as described in Criteria quick deletion.
Unsourced and untagged images may be deleted one week after they have been tagged, as described on criteria for speedy deletion.
Although unlike the depiction of seen in westerns, quick duels at that time were conducted with the traditional dueling stance.
Although unlike the depiction seen in westerns, fast draw duels at that time were performed with the traditional dueling stance.
Please note that any fair use images that do not have such an explanation may be removed one week after labeling, as described in the quick removal criteria section.
Note that any fair use images lacking such an explanation can be deleted one week after being tagged, as described on criteria for speedy deletion.
A movie camera, movie camera, or movie camera is a type of camera that makes fast photo sequence on image sensor or film.
The movie camera, film camera or cine — camera is a type of photographic camera which takes a rapid sequence of photographs on an image sensor or on a film.
Phenakistikopa images distorted when rotated fast enough to give the illusion of movement; they seemed a little thinner and were slightly curved.
The pictures of the phénakisticope became distorted when spun fast enough to produce the illusion of movement; they appeared a bit slimmer and were slightly curved.
Please note that any fair use images that do not have such an explanation may be removed one week after labeling, as described in the quick removal criteria section.
Note that any fair use images lacking such an explanation can be deleted one week after being tagged, as described on criteria for speedy deletion.
The criteria, as I understand it, is that fair use replacement images can be quickly use 48 hours after notifying the bootloader.
The criteria as I understand it is that replacable fair use images are speedyable 48 hours after the uploader have been notified.
Please note that any non-free images not used in articles will be removed after seven days, as described in the quick removal criteria.
Note that any non — free images not used in any articles will be deleted after seven days, as described in the criteria for speedy deletion.
Please note that any fair use images that do not have such an explanation may be removed one week after labeling, as described in the quick removal criteria section.
Note that any fair use images lacking such an explanation can be deleted one week after being tagged, as described on criteria for speedy deletion.
Please note that any fair use images that do not have such an explanation may be removed one week after labeling as described in Criteria quick deletion.
Note that any fair use images lacking such an explanation can be deleted one week after being tagged, as described on criteria for speedy deletion.
We define this category for the purpose of quickly removing any image tagged with this tag without further justification.
We’re defining this category for the purpose of speedily deleting any image marked with such a tag, with no further rationale.
Please note that any fair use images that do not have such an explanation may be removed one week after labeling, as described in the quick removal criteria section.
Note that any fair use images lacking such an explanation can be deleted one week after being tagged, as described on criteria for speedy deletion.
All images you have added have been flagged for quick deletion from Commons due to possible copyright infringement.
All of the images you added have been tagged for speedy deletion from Wikimedia Commons due to possible copyright violations.
Please note that any fair use images that do not have such an explanation may be removed one week after labeling as described in Criteria quick deletion.
Note that any fair use images lacking such an explanation can be deleted one week after being tagged, as described on criteria for speedy deletion.
Please note that any fair use images that do not have such an explanation may be removed one week after labeling, as described in the quick removal criteria section.
Note that any fair use images lacking such an explanation can be deleted one week after being tagged, as described on criteria for speedy deletion.
Quick Access Toolbar Setup
excel
Entering and formatting data
View setup
View setup
Customizing the Quick Access Toolbar
Excel for Microsoft 365 Word for Microsoft 365 Outlook for Microsoft 365 PowerPoint for Microsoft 365 Access for Microsoft 365 OneNote for Microsoft 365 Project Online Desktop Client Publisher for Microsoft 365 Visio Online Plan 2 Excel 2021 Word 2021 Outlook 2021 PowerPoint 2021 Access 2021 Microsoft ® Project Professional 2021 Microsoft Project Standard 2021 Publisher 2021 Microsoft Visio Professional 2021 Microsoft Visio Standard 2021 OneNote 2021 Excel 201
A customizable Quick Access Toolbar contains a set of commands that are independent of the current ribbon tab. You can move the Quick Access Toolbar to one of two possible locations, and add buttons to it to perform various commands.
Notes:
-
The size of buttons representing commands cannot be increased using a Microsoft Office setting. To do this, you can only reduce the screen resolution.
-
The Quick Access Toolbar cannot be displayed as multiple lines.
-
Only commands can be added to the Quick Access Toolbar. You cannot add the contents of most lists, such as indentation and spacing values, or individual styles available on the ribbon, to it. However, you can customize the ribbon in Office to personalize the ribbon the way you want. For example, you can create your own tabs and groups for frequently used commands.
Intended action:
-
Show or hide the Quick Access Toolbar
-
Moving the Quick Access Toolbar
-
Show or hide command labels in the Quick Access Toolbar
-
Adding a Command to the Quick Access Toolbar
-
Adding a command that is not on the ribbon to the Quick Access Toolbar
-
Removing a command from the Quick Access Toolbar
-
Reorder commands on the Quick Access Toolbar
-
Customizing the Quick Access Toolbar with Options
-
Restoring Quick Access Toolbar Defaults
-
Export Customized Quick Access Toolbar
-
Importing a Customized Quick Access Toolbar
-
Reasons for the green ball icon
Show or hide the Quick Access Toolbar
Right-click the ribbon and do one of the following:
-
If the Quick Access Toolbar is hidden, select « Show Quick Access Toolbar» .
Note: You can also hide the Quick Access Toolbar from the Customize Quick Access Toolbar menu by selecting Hide Quick Access Toolbar .
Moving the Quick Access Toolbar
Location
There are two options for placing the Quick Access Toolbar.
Change location
The location of the Quick Access Toolbar can be moved from one location to another.
Click the button Customize Quick Access Toolbar .
-
-
From the list, select « Show below ribbon».
or show above tape .
Notes:
-
Location commands can be set in Options.
-
Select Options > > Quick Access Toolbars > Toolbars.
-
-
Press button Customize Quick Access Toolbar .
-
Select » Show command labels» from the list.
-
On the ribbon, select the appropriate tab or group to display the command you want to add to the Quick Access Toolbar.
-
Right-click the command and select «Add to Quick Access Toolbar» from the context menu.
-
Select «Customize Quick Access Toolbar > additional commands .
-
In the «Choose commands» list, select «Commands not on the ribbon» .
-
Find the command in the list and click the Add button .
-
Right-click the command you want to remove from the Quick Access Toolbar.
-
Select «Delete» from the shortcut menu in the context menu.
-
Right-click the Quick Access Toolbar and select «Customize Quick Access Toolbar » from the context menu.
-
In the Customize Quick Access Toolbar section, select the command you want to move.
-
Click up arrow or «Down «.
-
Select Settings > Files > Quick Access Toolbar .
-
Use the «Add and Delete » buttons to move items between the Customize Access Toolbar list and the «Select» command from the list.
Note: To locate an item in the Command Choice list, it can be helpful to first confirm its location and name in the application. Commands that no longer appear in the app can still be listed in Section «All teams» . To identify this type of command, a more meaningful hint name may appear in parentheses next to the legacy command name in this form:
Address [Document Location]
[Paste Values]Restoring default settings for the Quick Access Toolbar
-
Open the context menu of the Quick Access Toolbar and select Customize the Quick Access Toolbar .
-
In the Customize Quick Access Toolbar window, select Reset > reset only the Quick Access Toolbar .
-
From the File menu, select Options and Quick Access Toolbar.
-
Select import and export > export all settings .
-
Select Options > Files > Quick Access Toolbar .
-
Select import and export > import configuration file .
-
When adding a custom group to the Quick Access Toolbar.
-
to distinguish between a user-configured ribbon and a default ribbon.
- How it works?
-
Download a fresh copy
- You can learn about mouse control from this article.
- 1 navigation
- 2 Current page
- 3 Editing
- 4 Search
- 5 Windows and tabs
- 6 History
- 7 History
- 8 Miscellaneous
- 12 Miscellaneous
- 13 Miscellaneous
- 14 Miscellaneous
- 15 Media Control Keyboard Shortcuts
- 16 Multiple tab selection
- 17 Keyboard shortcuts for developers
-
Current selection. All new Skype features will be hosted here, such as real-time translation, whiteboard mode, and more.
-
New ways to share a link. Now it’s clearer how to share a link during a call to a Skype subscriber — we want to make it as easy as possible for you to connect with family and friends.
-
TwinCam. Admit it, have you ever wanted to share a video from another device during a call? We made sure to make it easy and simple.
-
Updated selection of reactions. Reactions are an important part of the application for us. We’ve redesigned the reactions interface so that any of them takes you less than a second.
Login
Show or hide command labels in the Quick Access Toolbar
If the Quick Access Toolbar is installed below the ribbon, you can show or hide command labels.
Important: The Quick Access Toolbar must be installed below the Ribbon to show or hide command labels.
or hide command labels .
Adding a command to the Quick Access Toolbar
Adding a command that is not on the ribbon to the Quick Access Toolbar
Tip: If you can’t find a command in the Commands Not in the Ribbon list, try selecting commands from the All » .
Removing a command from the Quick Access Toolbar
Reorder commands on the Quick Access Toolbar
Customizing the Quick Access Toolbar with Options
With the command Options , you can add commands to the Quick Access Toolbar, remove them, and change their order.
Export customized Quick Access Toolbar
Ribbon and Quick Access Toolbar settings can be exported to a file that other employees can import and use on their computers.
For more information about customizing the Ribbon, see Customizing the Ribbon in Office.
Import customized Quick Access Toolbar
You can import a settings file to change the current appearance of the Ribbon and Quick Access Toolbar. Importing settings allows you to ensure the same look and feel of Microsoft Office applications for all employees or simply on different computers.
Important: When you import a Ribbon Preferences file, all previously configured Ribbon and Quick Access Toolbar options will be lost. If the current settings need to be restored, they should be exported before importing the settings file.
For more information about customizing the Ribbon, see Customizing the Ribbon in Office.
Causes of the green ball icon
You will see a green ball if you have added a custom group or command to the Quick Access Toolbar after customizing the Ribbon, but have not assigned an icon to represent that custom group or command.
Notes: Used badge:
Keyboard Shortcuts — Quickly perform common tasks in Firefox
Set up Firefox
Clear Firefox
This article provides keyboard shortcuts for Mozilla Firefox. They only work if not used by the desktop environment or window manager. If you enable keyboard shortcuts for editing Emacs-style text in GNOME, they will also work in Firefox. When there is a conflict between an Emacs text editing shortcut and a default shortcut (as with Ctrl+K, for example), the Emacs shortcut takes precedence if a text input field (such as the address bar or search bar) is active. In such cases, use an alternate keyboard shortcut if listed below.
Team | Keyboard shortcut |
---|---|
Back | Alt + ←command + ← command + [Alt + ← Ctrl + [ Backspace* *if browser. backspace_action is set to 0 (in the settings editor), which is not the default value. |
Forward | Alt + →command + → command + ]Alt + → Ctrl + ] Shift + Backspace* *see above. |
Home | Alt + Homeoption + home |
Open file | Ctrl+Ocommand+O |
Update | F5 Ctrl + Rcommand + R |
Refresh (with cache reload) | Ctrl + F5 Ctrl + Shift + Rcommand + shift + R |
Stop | Esc command + . |
Team | Keyboard shortcut |
---|---|
Go to next link or input field | tab |
Go to previous link or input field | Shift + Tab |
Go down screen height | Page Down fn + ↓ Space |
Go up screen height | Page Up fn + ↑ Shift + Space bar |
Go to the bottom of the page | End Ctrl + ↓ command + ↓ |
Go to top of page | Home Ctrl + ↑ command + ↑ |
Go to next frame, popup window | F6 |
Go to previous frame, popup window | Shift+F6 |
Seal | Ctrl+Pcommand+P |
Save active link | Alt + Enteroption + return — If browser. altClickSave is set to true (in the settings editor), which is not the default. |
Save page as | Ctrl+Scommand+S |
Zoom in | Ctrl + +command + + |
Zoom out | Ctrl + -command + — |
Reset scale | Ctrl+0command+0 |
Team | Keyboard shortcut |
---|---|
Copy | Ctrl+Ccommand+C |
cut | Ctrl+Xcommand+X |
Delete | Deldelete |
Delete word on the left | Ctrl + Backspace |
Delete word on the right | Ctrl+Del |
Move one word to the left | Ctrl + ← |
Move one word to the right | Ctrl + → |
Go to the beginning of the line | Home Ctrl + ↑ |
Go to end of line | End Ctrl + ↓ |
Go to the beginning of the text | Ctrl+Home |
Go to end of text | Ctrl + End |
Insert | Ctrl+Vcommand+V |
Paste (as plain text) | Ctrl + Shift + Vcommand + shift + V |
Repeat | Ctrl + Y Ctrl + Shift + Zcommand + shift + Z |
Select all | Ctrl+Acommand+A |
Cancel | Ctrl+Zcommand+Z |
Team | Keyboard shortcut | |
---|---|---|
Find on this page | Ctrl+Fcommand+F | |
Find next | F3 Ctrl + Gcommand + G |
|
Find Previous | Shift + F3 Ctrl + Shift + Gcommand + shift + G |
|
Quick search in link text only | ‘ | |
Quick find | / | |
Close the search or quick search bar | Esc — when the search or quick search bar is active |
|
Switch search engine | Alt + ↓ Alt + ↑option + ↓ option + ↑ — after you have written something (or pressed ↓) in the address bar |
|
Search the Internet using the default search engine | Enter ? and a space (or just ?) to an empty address bar | |
Activate the address bar for Internet searches using the default search engine | Ctrl + Kcommand + K Ctrl + ECtrl + Jcommand + option + F — if the search bar is not displayed |
|
Activate search bar | Ctrl + Kcommand + K Ctrl + ECtrl + Jcommand + option + F — if the search bar is displayed |
|
Change default search engine | Ctrl + ↓ Ctrl + ↑command + ↓ command + ↑ — in the search bar or search field of the new tab page. |
|
Open a menu to switch, add or manage search engines | Alt + ↓ Alt + ↑ F4option + ↓ option + ↑ — when the search bar is active |
We also recommend that you read the article «Using tabs to organize browsing of many websites in one window.»
Team | Keyboard shortcut |
---|---|
Close tab | Ctrl + W Ctrl + F4command + W — except for pinned tabs |
Close window | Ctrl + Shift + W Alt + F4command + shift + W |
Cycle through bookmarks in order of last used time | Ctrl + Tabcontrol + tab — if the corresponding checkbox is checked in the settings |
Outlet | Ctrl + Shift + QCtrl + Qcommand + Q |
Move one tab to the left | Ctrl + Page Upcontrol + page up command + option + ← Ctrl + Shift + Tabcontrol + shift + tab* * see below |
Move one tab to the right | Ctrl + Page Downcontrol + page down command + option + → Ctrl + Tabcontrol + tab* * if unchecked in settings » Ctrl+Tab switches between tabs in order of recent use » |
Go to tab 1-8 | Ctrl + 1-8command + 1 to 8Alt + 1-8 |
Go to last tab | Ctrl + 9command + 9Alt + 9 |
Move tab left | Ctrl + Shift + Page Up |
Move tab right | Ctrl + Shift + Page Down |
Move tab to top | Ctrl + Shift + Homecommand + shift + home there will be no tab. |
Move tab to end | Ctrl + Shift + Endcommand + shift + end there will be no tab. |
Mute/Unmute | Ctrl+Mcontrol+M |
New Tab | Ctrl+Tcommand+T |
New window | Ctrl+Ncommand+N |
New private window | Ctrl + Shift + Pcommand + shift + P |
Open an address or search in a new background tab | Alt + Shift + Enteroption + shift + return — from address bar |
Open an address or start a search in a new active tab | Alt + Enteroption + return — from address bar or search bar |
Open address or start Search in new window | Shift + Entershift + return — from the address bar or search field on the new tab page |
Start searching in a new background tab | Ctrl + Entercommand + shift + return — From the search box on the new tab page. (see note below) |
Start searching in a new active tab | Ctrl + Shift + Entercommand + return — From the search box on the new tab page. Note: Keyboard shortcuts for active and background tabs are reversed if « Switch to the link, image or media that opens» is checked in the settings |
Open the active bookmark or link in the current tab | Return |
Open the active bookmark in a new active tab | Ctrl+Entercommand+return |
Open the active bookmark in a new background tab | Ctrl + Shift + Entercommand + shift + return |
Open active link in a new background tab | Ctrl + Entercommand + return (see note below) |
Open the active link in a new active tab | Ctrl + Shift + Entercommand + shift + return Note: keyboard shortcuts for active and background tabs work if «» is checked in preferences Switch to the link, image or media that opens » |
Open the active bookmark or link in a new window | Shift + Entershift + return |
Show all tabs | Ctrl + Shift + Tabcontrol + shift + tab — if the checkbox « Ctrl+Tab switches between tabs in order of recent use» is checked in the settings |
Restore closed tab | Ctrl + Shift + Tcommand + shift + T |
Restore a closed window | Ctrl+Shift+Ncommand+shift+N |
Move URL left or right (if cursor is in address bar) | Ctrl + Shift + Xcommand + shift + X |
Team | Keyboard shortcut |
---|---|
Side magazine panel | Ctrl+H |
Library window (history) | Ctrl+Shift+H |
Delete recent history | Ctrl+Shift+Del |
Team | Keyboard shortcut |
---|---|
Side magazine panel | command+shift+H |
Delete recent history | command + shift + delete |
Team | Keyboard shortcut |
---|---|
Bookmark all tabs | Ctrl + Shift + Dcommand + shift + D |
Bookmark this page | Ctrl+Dcommand+D |
Sidebar bookmarks | Ctrl + B Ctrl + Icommand + BCtrl + B |
Show/Hide bookmarks bar | Ctrl + Shift + Bcommand + shift + BCtrl + Shift + B |
Show all bookmarks (Library window) | Ctrl + Shift + OCtrl + Shift + Bcommand + shift + Ocommand + shift + BCtrl + Shift + OCtrl + Shift + B |
Show a list of all bookmarks | Space — in the empty search field in the bookmark library window or in the sidebar. |
Activate the next bookmark/folder whose name (or property to sort by) starts with the specified character or sequence of characters | Enter a character or quickly enter a sequence of characters. — in bookmarks library, bookmarks bar, bookmarks menu, bookmarks sidebar |
Team | Keyboard shortcut |
---|---|
Downloads | Ctrl + JCtrl + Shift + Ycommand + J |
Accessories | Ctrl + Shift + Acommand + shift + A |
Show/Hide developer tools | F12 Ctrl + Shift + Icommand + alt + I |
Web Console | Ctrl + Shift + Kcommand + alt + K |
Inspector | Ctrl + Shift + Ccommand + alt + C |
Take a screenshot | Ctrl + Shift + Scommand + shift + S |
Styles | Shift+F7 |
Profiler | Shift+F5 |
Network | Ctrl + Shift + Qcommand + alt + QCtrl + Shift + Ecommand + alt + E |
Responsive design | Ctrl + Shift + Mcommand + alt + M |
Page source code | Ctrl+Ucommand+U |
Browser Console | Ctrl + Shift + Jcommand + shift + J |
Page information | Ctrl + Icommand + I |
Team | Keyboard shortcut |
---|---|
Next page | N or J or → |
Previous page | P or K or ← |
Enlarge | Ctrl + +command + + |
Reduce | Ctrl + -command + — |
Automatic (scale) | Ctrl+0command+0 |
Rotate document clockwise | R |
Rotate document counterclockwise | Shift+R |
Switch to presentation mode | Ctrl+Alt+Pcommand+Alt+P |
Select the Text Selection tool | S |
Select Hand tool | H |
Activate page number entry field | Ctrl+Alt+Gcommand+Alt+G |
Team | Keyboard shortcut |
---|---|
Complete the address with . com | Ctrl+Enter |
Delete the selected autocomplete suggestion | Shift + Del |
Go to Full Screen/Exit Full Screen | F11 |
Temporarily show/hide menu bar again | Alt or F10Alt or F10 |
Enable/Disable Reading Mode | Ctrl+Alt+RF9 |
Active cursor mode | F7 |
Activate address bar | F6 Alt + D Ctrl + L |
Activate search field in library | F6 Ctrl+F |
Disable autoscroll | Esc |
Cancel drag operation | Esc |
Clear search field in library or sidebar | Esc |
Close menu | Esc Alt F10 |
Show/Hide context menu | Shift+F10 |
Team | Keyboard shortcut |
---|---|
Complete the address with . com | control + return |
Delete the selected autocomplete suggestion | shift + delete |
Go to Full Screen/Exit Full Screen | command+Shift+F |
Enable/Disable Reading Mode | command+option+R |
Active cursor mode | F7 |
Activate address bar | F6 command+L |
Activate search field in library | F6 command+F |
Disable autoscroll | Esc |
Cancel drag operation | Esc |
Clear search field in library or sidebar | Esc |
Close menu | Esc Alt F10 |
Team | Keyboard shortcut |
---|---|
Complete the address with .com | Ctrl+Enter |
Complete the address with the . net domain | Shift+Enter |
Complete the address with the .org domain | Ctrl+Shift+Enter |
Delete the selected autocomplete suggestion | Del |
Go to Full Screen/Exit Full Screen | F11 |
Temporarily show/hide menu bar again | Alt or F10Alt or F10 |
Enable/Disable Reading Mode | Ctrl + Alt + RF9Ctrl + Alt + R |
Active cursor mode | F7 |
Activate address bar | F6 Alt + D Ctrl + L |
Activate search field in library | F6 Ctrl+F |
Disable autoscroll | Esc |
Cancel drag operation | Esc |
Clear search field in library or sidebar | Esc |
Close menu | Esc Alt F10 |
Show/Hide context menu | Shift+F10 |
Team | Keyboard shortcut |
---|---|
Complete the address with . com | command + return |
Complete the address with the .net domain | shift + return |
Complete the address with the .org domain | command + shift + return |
Delete the selected autocomplete suggestion | shift + delete |
Go to full screen/Exit full screen | command+Shift+F |
Enable/Disable Read Mode] | command+option+R |
Active cursor mode | F7 |
Activate address bar | F6 command+L |
Activate search field in library | F6 command+F |
Disable autoscroll | Esc |
Cancel drag operation | Esc |
Clear search field in library or sidebar | Esc |
Close menu | Esc Alt F10 |
We also recommend that you read the article «HTML5 audio and video in Firefox».
Team | Keyboard shortcut |
---|---|
Play/Pause | Space |
Volume down | ↓ |
Volume up | ↑ |
Mute | Ctrl + ↓command + ↓ |
Unmute | Ctrl + ↑command + ↑ |
Go back 15 seconds | ← |
Go back 10% | Ctrl + ←command + ← |
Jump forward 15 seconds | → |
Go forward 10% | Ctrl + →command + → |
Go to top | Home |
Skip to end | end |
To use these keyboard shortcuts, the tab bar must be active. Currently, the only way to activate it is to activate the adjacent object and go to the tab bar: for example, press Ctrl + Lcommand + L, activating the address bar, and then press Shift + Tab until the selected tab is in the colored dotted box.
Team | Keyboard shortcut |
---|---|
Select left, right, first or last tab. Deselect all other tabs. | Arrow keys Home End |
Move the colored dotted box to the left, right, first, or last tab. | Ctrlcommand + arrow keys Ctrlcommand + Home Ctrlcommand + End |
Select or deselect the tab in the colored dotted box. Will not affect the selection of other tabs. | Ctrl + Spacecommand + space |
You can also use keyboard shortcuts with developer tools in Firefox. Learn more on the All Keyboard Shortcuts page of MDN Web Docs.
Share this article: http://mzl.la/16NAhwz
These wonderful people helped write this article:
cor-el, Cheng Wang, Unghost, Aleksej, Alenia, Harry, Anticisco Freeman, Valery Ledovskoy, SwanMr. pound, Denys
Volunteer
Grow and share your experience with others. Answer questions and improve our knowledge base.
Read more
Elegant, fast, colorful and pleasant to work with — Skype will become so very soon!
00.00.2021 | Skype blogs | Modern Skype
Today we look into the future of Skype . e
New look
As you can see in the picture above, we have improved a lot. The design has become lighter and brighter — and you can believe us, the application is now much more pleasant to use! It is too long to list all the improvements, but we have mentioned the main points below. Most importantly, do not worry: Skype works the same as before, all interface elements have remained in their places, and all functions have been preserved. The new Skype will feel as familiar as the old one, but it will only look better and be faster and more stable.
Revamped chat titles with redesigned layouts, group avatars and awesome button gradients We also really like them
Have we already talked about themes? Everyone loves customization
Another news is that we have refreshed our themes with new vibrant colors and gradients.
Let there be color!
We couldn’t resist adding gradients to profiles and chats with default settings. See how bright, colorful and shimmering everything is — you can’t take your eyes off it! Now it will be much easier to distinguish chats from each other, but it’s just nice to admire the avatars.
And all this is an addition to the wonderful possibilities already available!
All of this is in addition to functionality we’ve already added this year, such as the ability to give a meeting a title and emoji. Our internal code name for this feature is «extended headers».
The world’s new best call screen
We’re updating another part of Skype — the call screen. It is by him that everyone recognizes us. You already understood that we are planning to do something incredible with the call screen. And it’s all thanks to your feedback! We believe we have the best video calling interface in the world. Be sure to try the new call screen in action and send us your feedback about it!
So, you ask, what has changed? We have kept a total of interface is already familiar to you, but the call controls of have been modernized and made more accurate. Now you will be able to find yourself on the main screen when you call , because we have simplified the grid and set up the video broadcast so that all participants are together . All participants, even those who turned off the video, will now be visible on the call screen. And when someone turns on screen sharing or Together mode, a video preview will appear on the top bar. No more compromises.
Introducing Light Theme!
In addition to all these improvements, we have developed the best call screen in the world. We seem to have achieved the perfect balance, and now the call screen looks organic with any Skype theme.
Did you notice something else there? Now participants with only audio can set their background on the card during a call. Enough with us gray and boring interfaces. In addition, Since these are pictures from among the background images , you can switch them during calls.
And if you’re looking for something new, we recommend you try the background image setting feature from Bing . The Bing picture of the day will be set as the background, and if you click on the Bing logo, you can learn more about the picture and even search Bing directly from Skype. It’s great, right?
We could talk about the new design for a long time, but we can not help but note the changes in the speed of . Desktop app performance increased by 30% and Android mobile app performance by more than 2000% !
In addition, we care about your data and connection, so you still have the ability to turn off the video broadcast and hide participants who have audio-only enabled from the call screen.
Many new features on the bottom panel:
Powerful «Meet Now» feature
When you don’t feel like signing up or remembering your old accounts and passwords, just use the «Meet Now Now» quick call feature.
Start meeting now is a handy calling tool that doesn’t require you to sign in, create an account or even the Skype app . To join a call as a guest, all you need is one link and the Internet.
We’re redesigning the «Meet Now» «waiting room» to be easier to use, less resource intensive, and much more aesthetically pleasing. We’re working hard to make this feature the easiest, fastest, most efficient, and most enjoyable way to connect with others over the Internet.
Now let’s talk about the users you will send the link to. They will be able to preview the join link with your name and caller avatar.
All Browser Support
We believe Skype should be simple, accessible, and secure, anywhere, anytime, no matter what browser or device you use . Therefore we are implement support for all browsers . Our goal is to make Skype work flawlessly on any device or platform, in any browser.
TwinCam to the rescue
We’ve improved the way documents and pictures are sent, and we’ve added the ability for to add a second device as a camera during calls — because one picture can be worth a thousand words. Whether you want everyone to know how funny your cat sleeps, or you need to teach a geometry lesson, now it’s even easier. you can scan the QR code or join a call from another device near you. We will match you with your video and you will be able to surprise all your interlocutors.
Custom notification sounds
We’re listening to all your feedback and we’re continuing to add the features you’ve been asking for to Skype. For example, you can customize notification sounds . It’s very simple!
Of course, we love Skype’s native sound very much, but sometimes you get tired of it. Yes, and sometimes I want put some song from the 90s on the ringer .
New design of call reactions and super reactions
Reactions and super reactions are a very important part of Skype for us. We believe Skype meetings are world-class and strive to make them even better. With the updated Reaction Picker, you can select any emotion and react to what is happening in less than a second.
We’re serving you the speed to react, the search option, the customization with pinned items . What more could you imagine in a call! The fun you will have with these will be incomparable.
PSTN Translator
Fun is fun, but sometimes during Skype meetings you may need a very serious and useful feature — Skype Translator . This feature has been working in regular Skype calls for a long time, and now it will be available to you in travel and business .