Name of figures: General Data Protection Regulation(GDPR) Guidelines BYJU’S
Posted onList of Figures
List of Figures
Campus Community Health • HEERF I, II & III
Figures in your document
- Use Times New Roman for text in the figures. Use size 12 where able, but 10 or 11
size may also be used to fit text within the figure. Line spacing within a figure should
be single-spaced. - All figures should be labeled and formatted in APA style with numbering, title, notes, etc.
- Figures should be placed after the paragraph where they are first mentioned unless
that splits the figure across two pages. Instead of splitting the figure, insert
the figure at the beginning of the next page after it is first mentioned.If your
figure is so large it must be split across multiple pages, type Figure 1 (Continued)
at the top of the next page. - References in your text to figures must reference a specific figure and number: «As
demonstrated in Figure 3…» Do not use, «As demonstrated in the following figure….» - If your figure needs to be rotated because it is too large, rotate just the figure
with the top of the figure at the 1.5″ margin side. - The title of the figure needs to be placed one double space from the figure number.
- It is important to use the same pattern and placement throughout your paper.
 If your
figure title is on the top, keep it on the top throughout the paper.
 If your
List of Figures page
- Required if there are two or more figures in your document including the appendices.
- Type List of Figures on the top line. Be sure to label this title as a page title
heading to format it properly. See Content/Chapters for more information about headings. - Leave the next line blank.
- Type Page (#), tab once, type Figure 1: Title or caption of figure one.
- If your page number is a single digit, you will need to tab twice so that all figure
names are aligned. - List each figure on a new line.
- If your title/caption is so long it goes onto another line, indent that line to match
where all figure names start. If you have more than one page, do not split title/captions
across pages. - If your list is more than one page, put a page title on only the first page
- Remember all figures in the appendix must be listed on this page.
- Do not use bold or italics.


Figures and Charts – The Writing Center • University of North Carolina at Chapel Hill
What this handout is about
This handout will describe how to use figures and tables to present complicated information in a way that is accessible and understandable to your reader.
Do I need a figure/table?
When planning your writing, it is important to consider the best way to communicate information to your audience, especially if you plan to use data in the form of numbers, words, or images that will help you construct and support your argument. Generally speaking, data summaries may take the form of text, tables or figures. Most writers are familiar with textual data summaries and this is often the best way to communicate simple results. A good rule of thumb is to see if you can present your results clearly in a sentence or two. If so, a table or figure is probably unnecessary. If your data are too numerous or complicated to be described adequately in this amount of space, figures and tables can be effective ways of conveying lots of information without cluttering up your text. Additionally, they serve as quick references for your reader and can reveal trends, patterns, or relationships that might otherwise be difficult to grasp.
So what’s the difference between a table and a figure anyway?
Tables present lists of numbers or text in columns and can be used to synthesize existing literature, to explain variables, or to present the wording of survey questions. They are also used to make a paper or article more readable by removing numeric or listed data from the text. Tables are typically used to present raw data, not when you want to show a relationship between variables.
Figures are visual presentations of results. They come in the form of graphs, charts, drawings, photos, or maps. Figures provide visual impact and can effectively communicate your primary finding. Traditionally, they are used to display trends and patterns of relationship, but they can also be used to communicate processes or display complicated data simply. Figures should not duplicate the same information found in tables and vice versa.
Using tables
Tables are easily constructed using your word processor’s table function or a spread sheet program such as Excel. Elements of a table include the Legend or Title, Column Titles, and the Table Body (quantitative or qualitative data). They may also include subheadings and footnotes. Remember that it is just as important to think about the organization of tables as it is to think about the organization of paragraphs. A well-organized table allows readers to grasp the meaning of the data presented with ease, while a disorganized one will leave the reader confused about the data itself, or the significance of the data.
Title: Tables are headed by a number followed by a clear, descriptive title or caption. Conventions regarding title length and content vary by discipline. In the hard sciences, a lengthy explanation of table contents may be acceptable. In other disciplines, titles should be descriptive but short, and any explanation or interpretation of data should take place in the text. Be sure to look up examples from published papers within your discipline that you can use as a model. It may also help to think of the title as the “topic sentence” of the table—it tells the reader what the table is about and how it’s organized. Tables are read from the top down, so titles go above the body of the table and are left-justified.
Column titles: The goal of column headings is to simplify and clarify the table, allowing the reader to understand the components of the table quickly. Therefore, column titles should be brief and descriptive and should include units of analysis.
Table body: This is where your data are located, whether they are numerical or textual. Again, organize your table in a way that helps the reader understand the significance of the data. Be sure to think about what you want your readers to compare, and put that information in the column (up and down) rather than in the row (across). In other words, construct your table so that like elements read down, not across. When using numerical data with decimals, make sure that the decimal points line up. Whole numbers should line up on the right.
Other table elements
Tables should be labeled with a number preceding the table title; tables and figures are labeled independently of one another. Tables should also have lines demarcating different parts of the table (title, column headers, data, and footnotes if present). Gridlines or boxes should not be included in printed versions. Tables may or may not include other elements, such as subheadings or footnotes.
Quick reference for tables
Tables should be:
- Centered on the page.
- Numbered in the order they appear in the text.
- Referenced in the order they appear in the text.
- Labeled with the table number and descriptive title above the table.
- Labeled with column and/or row labels that describe the data, including units of measurement.
- Set apart from the text itself; text does not flow around the table.

Table 1. Physical characteristics of the Doctor in the new series of Doctor Who
|
Height |
Age (yrs.) |
|
|
Ninth Doctor |
6’0” |
41 |
|
Tenth Doctor |
6’1” |
35 |
|
Eleventh Doctor |
5’11” |
25 |
Table 2. Physical characteristics of the Doctor in the new series of Doctor Who
|
Personal Appearance |
Wardrobe |
|
|
Ninth Doctor |
Close-cropped hair
Blue eyes Slightly stockier build |
Black leather jacket
Dark colored, v-necked shirts Black combat boots |
|
Tenth Doctor |
Longer, mussed-up hair
Brown eyes Very thin build |
Beige trench coat
Pin-striped suit and tie Chuck Taylors |
|
Eleventh Doctor |
Longer, side-swept hair
Green eyes Slightly stockier build |
Brown tweed jacket
Bow tie and suspenders Black Boots |
Using figures
Figures can take many forms. They may be graphs, diagrams, photos, drawings, or maps. Think deliberately about your purpose and use common sense to choose the most effective figure for communicating the main point. If you want your reader to understand spatial relationships, a map or photograph may be the best choice. If you want to illustrate proportions, experiment with a pie chart or bar graph. If you want to illustrate the relationship between two variables, try a line graph or a scatterplot (more on various types of graphs below). Although there are many types of figures, like tables, they share some typical features: captions, the image itself, and any necessary contextual information (which will vary depending on the type of figure you use).
Figure captions
Figures should be labeled with a number followed by a descriptive caption or title. Captions should be concise but comprehensive. They should describe the data shown, draw attention to important features contained within the figure, and may sometimes also include interpretations of the data. Figures are typically read from the bottom up, so captions go below the figure and are left-justified.
Image
The most important consideration for figures is simplicity. Choose images the viewer can grasp and interpret clearly and quickly. Consider size, resolution, color, and prominence of important features. Figures should be large enough and of sufficient resolution for the viewer to make out details without straining their eyes. Also consider the format your paper will ultimately take. Journals typically publish figures in black and white, so any information coded by color will be lost to the reader. On the other hand, color might be a good choice for papers published to the web or for PowerPoint presentations. In any case, use figure elements like color, line, and pattern for effect, not for flash.
Additional information
Figures should be labeled with a number preceding the table title; tables and figures are numbered independently of one another. Also be sure to include any additional contextual information your viewer needs to understand the figure. For graphs, this may include labels, a legend explaining symbols, and vertical or horizontal tick marks. For maps, you’ll need to include a scale and north arrow. If you’re unsure about contextual information, check out several types of figures that are commonly used in your discipline.
Quick reference for figures
Figures should be:
- Centered on the page.
- Labeled (under the figure) with the figure number and appropriate descriptive title (“Figure” can be spelled out [“Figure 1.”] or abbreviated [“Fig. 1.”] as long as you are consistent).
- Numbered in the order they appear in the text.
- Referenced in the order they appear in the text (i.e. Figure 1 is referenced in the text before Figure 2 and so forth).
- Set apart from the text; text should not flow around figures.
Graphs
Every graph is a figure but not every figure is a graph. Graphs are a particular set of figures that display quantitative relationships between variables. Some of the most common graphs include bar charts, frequency histograms, pie charts, scatter plots, and line graphs, each of which displays trends or relationships within and among datasets in a different way. You’ll need to carefully choose the best graph for your data and the relationship that you want to show. More details about some common graph types are provided below. Some good advice regarding the construction of graphs is to keep it simple. Remember that the main objective of your graph is communication. If your viewer is unable to visually decode your graph, then you have failed to communicate the information contained within it.
Pie charts
Pie charts are used to show relative proportions, specifically the relationship of a number of parts to the whole. Use pie charts only when the parts of the pie are mutually exclusive categories and the sum of parts adds up to a meaningful whole (100% of something). Pie charts are good at showing “big picture” relationships (i. e. some categories make up “a lot” or “a little” of the whole thing). However, if you want your reader to discern fine distinctions within your data, the pie chart is not for you. Humans are not very good at making comparisons based on angles. We are much better at comparing length, so try a bar chart as an alternative way to show relative proportions. Additionally, pie charts with lots of little slices or slices of very different sizes are difficult to read, so limit yours to 5-7 categories.
Examples of bad pie charts:
Figure 1. Elements in Martian soil
The chart shows the relative proportion of fifteen elements in Martian soil, listed in order from “most” to “least”: oxygen, silicon, iron, magnesium, calcium, sulfur, aluminum, sodium, potassium, chlorine, helium, nitrogen, phosphorus, beryllium, and other. Oxygen makes up about ⅓ of the composition, while silicon and iron together make up about ¼. The remaining slices make up smaller proportions, but the percentages aren’t listed in the key and are difficult to estimate. It is also hard to distinguish fifteen colors when comparing the pie chart to the color coded key.
Figure 2. Leisure activities of Venusian teenagers
The chart shows the relative proportion of five leisure activities of Venusian teenagers (tanning, trips to Mars, reading, messing with satellites, and stealing Earth cable). Although each of the five slices are about the same size (roughly 20% of the total), the percentage of Venusian teenagers engaging in each activity varies widely (tanning: 80%, trips to Mars: 40%, reading: 12%, messing with satellites: 30%, stealing Earth cable: 77%). Therefore, there is a mismatch between the labels and the actual proportion represented by each activity (in other words, if reading represents 12% of the total, its slice should take up 12% of the pie chart area), which makes the representation inaccurate. In addition, the labels for the five slices add up to 239% (rather than 100%), which makes it impossible to accurately represent this dataset using a pie chart.
Bar graphs
Bar graphs are also used to display proportions. In particular, they are useful for showing the relationship between independent and dependent variables, where the independent variables are discrete (often nominal) categories. Some examples are occupation, gender, and species. Bar graphs can be vertical or horizontal. In a vertical bar graph the independent variable is shown on the x axis (left to right) and the dependent variable on the y axis (up and down). In a horizontal one, the dependent variable will be shown on the horizontal (x) axis, the independent on the vertical (y) axis. The scale and origin of the graph should be meaningful. If the dependent (numeric) variable has a natural zero point, it is commonly used as a point of origin for the bar chart. However, zero is not always the best choice. You should experiment with both origin and scale to best show the relevant trends in your data without misleading the viewer in terms of the strength or extent of those trends.
Example of a bar graph:
Figure 3. Genders of spaceship crew members in popular television series
The graph shows the number of male and female spaceship crew members for five different popular television series: Star Trek (1965), Battlestar (1978), Star Trek: TNG (1987), Stargate SG-1 (1997), and Firefly (2002). Because the television series are arranged chronologically on the x-axis, the graph can also be used to look for trends in these numbers over time.
Although the number of crew members for each show is similar (ranging from 9 to 11), the proportion of female and male crew members varies. Star Trek has half as many female crew members as male crew members (3 and 6, respectively), Battlestar has fewer than one-fourth as many female crew members as male crew members (2 and 9, respectively), Star Trek: TNG has four female crew members and six male crew members, Stargate SG-1 has less than one-half as many female crew members as male crew members (3 and 7, respectively), and Firefly has four female and five male crew members.
Frequency histograms/distributions
Frequency histograms are a special type of bar graph that show the relationship between independent and dependent variables, where the independent variable is continuous, rather than discrete. This means that each bar represents a range of values, rather than a single observation. The dependent variables in a histogram are always numeric, but may be absolute (counts) or relative (percentages). Frequency histograms are good for describing populations—examples include the distribution of exam scores for students in a class or the age distribution of the people living in Chapel Hill. You can experiment with bar ranges (also known as “bins”) to achieve the best level of detail, but each range or bin should be of uniform width and clearly labeled.
XY scatter plots
Scatter plots are another way to illustrate the relationship between two variables. In this case, data are displayed as points in an x,y coordinate system, where each point represents one observation along two axes of variation. Often, scatter plots are used to illustrate correlation between two variables—as one variable increases, the other increases (positive correlation) or decreases (negative correlation). However, correlation does not necessarily imply that changes in one variable cause changes in the other. For instance, a third, unplotted variable may be causing both. In other words, scatter plots can be used to graph one independent and one dependent variable, or they can be used to plot two independent variables. In cases where one variable is dependent on another (for example, height depends partly on age), plot the independent variable on the horizontal (x) axis, and the dependent variable on the vertical (y) axis. In addition to correlation (a linear relationship), scatter plots can be used to plot non-linear relationships between variables.
Example of a scatter plot:
Figure 4. The effect of weather on UFO sightings
The scatter plot shows the relationship between temperature (x-axis, independent variable) and the number of UFO sightings (y-axis, dependent variable) for 53 separate data points. The temperature ranges from about 0°F and 120°F, and the number of UFO sightings ranges from 1 to 10. The plot shows a low number of UFO sightings (ranging from 1 to 4) at temperatures below 80°F and a much wider range of the number of sightings (from 1 to 10) at temperatures above 80°F. It appears that the number of sightings tends to increase as temperature increases, though there are many cases where only a few sightings occur at high temperatures.
XY line graphs
Line graphs are similar to scatter plots in that they display data along two axes of variation. Line graphs, however, plot a series of related values that depict a change in one variable as a function of another, for example, world population (dependent) over time (independent). Individual data points are joined by a line, drawing the viewer’s attention to local change between adjacent points, as well as to larger trends in the data. Line graphs are similar to bar graphs, but are better at showing the rate of change between two points. Line graphs can also be used to compare multiple dependent variables by plotting multiple lines on the same graph.
Example of an XY line graph:
Figure 5. Age of the actor of each Doctor Who regeneration (1-11)
The line graph shows the age (in years) of the actor of each Doctor Who regeneration for the first through the eleventh regeneration. The ages range from a maximum of about 55 in the first regeneration to a minimum of about 25 in the eleventh regeneration. There is a downward trend in the age of the actors over the course of the eleven regenerations.
General tips for graphs
Strive for simplicity. Your data will be complex. Don’t be tempted to convey the complexity of your data in graphical form. Your job (and the job of your graph) is to communicate the most important thing about the data. Think of graphs like you think of paragraphs—if you have several important things to say about your data, make several graphs, each of which highlights one important point you want to make.
Strive for clarity. Make sure that your data are portrayed in a way that is visually clear. Make sure that you have explained the elements of the graph clearly. Consider your audience. Will your reader be familiar with the type of figure you are using (such as a boxplot)? If not, or if you’re not sure, you may need to explain boxplot conventions in the text. Avoid “chartjunk.” Superfluous elements just make graphs visually confusing. Your reader does not want to spend 15 minutes figuring out the point of your graph.
Strive for accuracy. Carefully check your graph for errors. Even a simple graphical error can change the meaning and interpretation of the data. Use graphs responsibly. Don’t manipulate the data so that it looks like it’s saying something it’s not—savvy viewers will see through this ruse, and you will come off as incompetent at best and dishonest at worst.
How should tables and figures interact with text?
Placement of figures and tables within the text is discipline-specific. In manuscripts (such as lab reports and drafts) it is conventional to put tables and figures on separate pages from the text, as near as possible to the place where you first refer to it. You can also put all the figures and tables at the end of the paper to avoid breaking up the text. Figures and tables may also be embedded in the text, as long as the text itself isn’t broken up into small chunks. Complex raw data is conventionally presented in an appendix. Be sure to check on conventions for the placement of figures and tables in your discipline.
You can use text to guide the reader in interpreting the information included in a figure, table, or graph—tell the reader what the figure or table conveys and why it was important to include it.
When referring to tables and graphs from within the text, you can use:
- Clauses beginning with “as”: “As shown in Table 1, …”
- Passive voice: “Results are shown in Table 1.”
- Active voice (if appropriate for your discipline): “Table 1 shows that …”
- Parentheses: “Each sample tested positive for three nutrients (Table 1). ”
 ”
”Works consulted
We consulted these works while writing this handout. This is not a comprehensive list of resources on the handout’s topic, and we encourage you to do your own research to find additional publications. Please do not use this list as a model for the format of your own reference list, as it may not match the citation style you are using. For guidance on formatting citations, please see the UNC Libraries citation tutorial. We revise these tips periodically and welcome feedback.
American Psychological Association. 2010. Publication Manual of the American Psychological Association. 6th ed. Washington, DC: American Psychological Association.
Bates College. 2012. “Almost everything you wanted to know about making tables and figures.” How to Write a Paper in Scientific Journal Style and Format, January 11, 2012. http://abacus.bates.edu/~ganderso/biology/resources/writing/HTWtablefigs.html.
Cleveland, William S.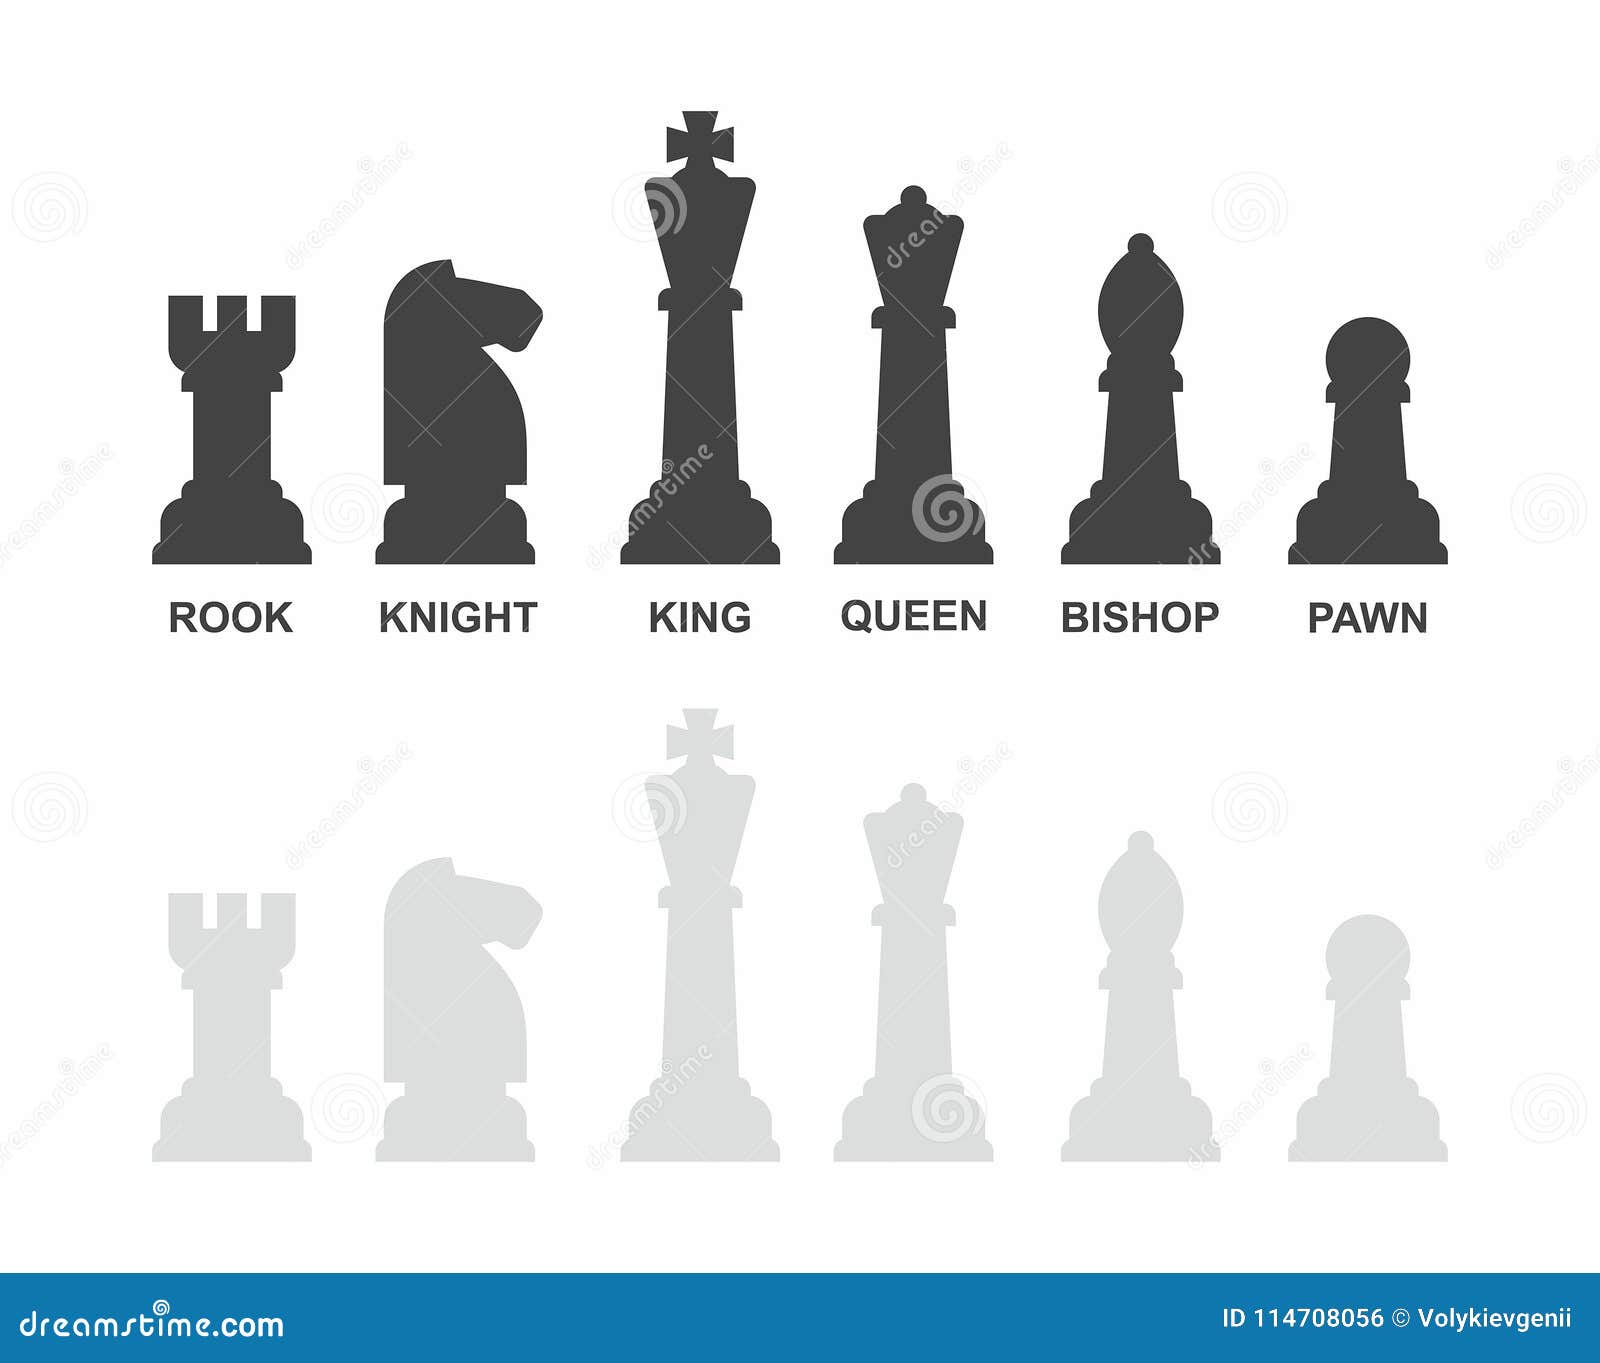 1994. The Elements of Graphing Data, 2nd ed. Summit, NJ: Hobart Press..
Council of Science Editors. 2014. Scientific Style and Format: The CSE Manual for Authors, Editors, and Publishers, 8th ed. Chicago & London: University of Chicago Press.
University of Chicago Press. 2017. The Chicago Manual of Style, 17th ed. Chicago & London: University of Chicago Press.
This work is licensed under a Creative Commons Attribution-NonCommercial-NoDerivs 4.0 License.
You may reproduce it for non-commercial use if you use the entire handout and attribute the source: The Writing Center, University of North Carolina at Chapel Hill
Make a Gift
Chess and chess pieces (names, execution, history) / Sudo Null IT News
Once in India there was a very wise ruler. During his reign, the country prospered and he had two twin sons who differed from each other only in that they liked to wear different clothes. One liked to walk in white clothes, and the other in black. Before his death, the wise ruler did not know which of his sons to make king and divided power equally. But soon the brothers wanted to have one ruler, and each believed that he should be the one. The brothers quarreled and a big war began in which a lot of people died. After some time, the brothers realized that the war is endless, but no one stopped the war, because the one who ends the war will lose and he will not become the ruler. But still, every brother wanted to make peace and find a way to become a ruler. And once an old man came to them and said that if they finish the war in which half of India died, then he will show them how to honestly determine the ruler. The brothers agreed and the old man took out a wooden board and figures in black and white, he told the brothers the rules of the game and a multi-day «war» began in which every move was carefully considered. And in this game, white pieces won, and after this incident, white pieces go first in chess, and a lot of people began to play chess.
Not the myth you expected, right? But there are many myths. An incomplete list of how chess «appeared» can be found here . I won’t list them all in the article — it’s too big. But besides legends, chess has other interesting historical features. That’s what I want to talk about. Just cramming how the pieces move is not so interesting. And to tell children fairy tales or just about the names of figures — for this, one lesson is usually not enough.
The idea to write this article, stepping back from the course of chess, was born on the basis of comments and a dispute — is a pawn a piece or not. An unequivocal answer was given in the comments from my point of view, but all the same, controversial names like «queen», «officer», «tour» and others remain outside the brackets. That’s what I want to write in more detail in this article.
Before starting the excursion into history, let me remind you about the course articles published on Habré:
-
A dozen tips on how to teach a child chess.
And not only (introduction) -
Studying the rook (part 1)
-
Studying the bishop (part 2)
-
Studying the queen (part 3)
900 16
-
Learning about the horse (part 4)
-
Learning the pawn (part 5)
 And not only (introduction)
 History
It is believed that chess is a game that developed from the game of Chaturanga. I think everyone knows about the classic legend when the sage asked for the invention of chess to fill the chessboard with grains of wheat, so that on each next cell there were 2 times more grains than on the previous one (if suddenly someone does not know it, then it is on the link to the list myths which is given at the very beginning of the article). In this case, the mass of all grains of wheat would be equal to 1 199 038 364 791 120 kg. By the way, children perceive such figures poorly, because they need to be compared with something, and there is still little experience. Therefore, it is better to explain the mass by comparison, for example by comparing it with the annual harvest on the entire planet. And this is the harvest of wheat harvested for 1800 years.
The first evidence of the game «Chess» is around 600 AD. It was at this time that the figures imitating reality took shape. The very mention is found in the legend of the 6th century in the Persian poem Shahnameh (Book of Kings). The legend was about how an Indian raja, who paid tribute to the powerful Persian Shah Khosrov, sent a messenger to him with a message written on silk and precious gifts. Among them was a magnificent board for the game and figures. The message was a challenge to the Shah’s courtiers: they had to explain the meaning of this Indian game. If successful, the Raja promised to increase the amount of tribute; if the wise men could not solve the riddle, then it was proposed to pay tribute to the shah. The challenge was accepted. The shah’s wisest vizier, Buzurgmihr, thought day and night, then announced the decision: «The board is a battlefield, on one side is the shah with his army, his vizier is next to him, soldiers line up in front, ready to attack, then war horses, on either side of them — chariots. All the figures are placed in battle order. » Buzurgmihr also indicated how each piece moved. He won, and the Indian Raja was forced to pay the promised tribute to the Shah.
The earliest figures found in 1977 during excavations in Afrasiab (Samarkand) date back to the 7th century AD. 7 figures carved from ivory were found — an image of a vizier, a chariot, an elephant, two armed horsemen and a foot soldier.
Figures found in 1977 during excavations in Afrasiab (Samarkand)
When the Arabs captured Iran in the 7th century, they adopted many of the laws and customs of the more civilized people subordinate to them. Including shatranj (as chess is called in Arabic). The game quickly spread throughout the Arab world and by 950 firmly rooted in the Arab territories.
In the 10th century, Arab chess reached Spain, where it spread thanks to the Moors. By the 12th century, chess had become a favorite pastime in feudal Europe. The pieces retained the Arabic names: king — check, queen — firzan, bishop — fil, horse — faras, rook — roc and pawn — canoe.
Although there are no specific prohibitions in the Qur’an regarding carved chess pieces, these prohibitions existed within Islamic culture. Therefore, under these conditions, «pictorial» chess could not be preserved, and simple geometric figures replaced three-dimensional carvings.
On the left is a Lebanese glass figure, possibly a king or queen, on the right is a figure of a king or queen of the 14th century found in England
In Christian Europe, the situation was different: the work of stone carvers was in demand in Gothic and Baroque architecture, where carved sculptural decoration was widely used. And during the Early Middle Ages, the masters who made chess pieces had to give them new names that would be easy to remember. Arabic names did not make sense for the inhabitants of Christian Europe. We will return to these names later when we consider each figure separately.
Carvings of the 12th century found on the island of Lewis (Norway)
It is also worth noting that already in the early European «pictorial» chess, the image of the queen replaces the Arab vizier.
At the end of the 15th century, chess players in Spain and Italy began to experiment with rules of chess that had hardly changed since they appeared in Europe in the 10th century. According to the new rules, a pawn, making its first move, could move two squares at once. The elephant acquired such freedom of movement that it could walk along the entire length of its diagonal. The queen, who until then could only move one square diagonally, gained the right to move around the entire perimeter of the board.
The Spaniards and the French called the new game «Queen’s Chess». The Italians were less courteous and called it «the game of the mad queen.» The new chess rules demanded more ingenuity from the players.
In Europe in the XIV-XV centuries, lathes became widespread, which could not but affect chess as well — their usual appearance underwent changes. Carved chess gave way to chess made on a lathe.
Florentine chess set by Fabiano Embriaci around 1450 English chess around the 14th-15th centuries
Not only chess itself has changed, but also chess terminology. Most of the Arabic words were supplanted by names in European languages.
|
♔ ♚ |
♕ ♛ |
♗ ♝ 9 0073 |
♘ ♞ |
♖ ♜ |
♙ ♟ |
|||||||
| 9000 2 Indian |
shah |
wazir |
fil |
asp |
rukh 8 |
Arabic |
shah |
firzan |
fil |
faras |
rkhkh |
baidaq |
|
Spanish |
rey |
re ina |
alfil |
caballo |
torre |
peon |
||||||
| 900 02 Italian |
re |
regina |
alfiere |
cavaliere 90 073 |
torre |
pedina |
||||||
|
French 73 |
fou |
cavalier |
tour |
pion German |
konig |
konigin |
laufer |
springer |
turm |
bauer |
||
|
Dutch |
koning |
koningen |
raadsheer |
ridder |
kasteel |
pion 0002 English |
king |
queen 6 rook |
pawn |
|||
|
Russian 3 |
bishop |
knight |
rook |
pawn |
||||||||
|
Serbian |
edge |
edge |
lovac |
jumper 90 073 |
top |
pawn |
We will return to this plate later. If suddenly someone wants to read all the names of chess pieces, then this can be done here here . And by this link found an interesting picture of the distribution of various names of chess pieces in Europe, in one picture they look interesting.
In fact, in a very, very concise way, I retold the key points from Gareth Williams’ book «Chess. History. Pieces. Players», 2004, ART-RODNIK publishing house. The entire text that is written above in the book takes about 55 pages with 1-2 illustrations on each sheet. I recommend reading this book if you are interested.
Modern chess sets
Currently, the Staunton chess set is considered the standard of chess pieces. Howard Staunton (1810-1874) was a renowned Shakespeare scholar and chess champion. Staunton chess got its name in honor of this outstanding person. They were made according to sketches by Nathaniel Cook, who registered them with a special act on March 1, 1849. At his request, Staunton entered his name on the document. Perhaps this is the first time in history that the name of a famous person has been used to successfully sell a product.
Staunton chess pieces
In 1924, the World Chess Federation, choosing pieces for international tournaments, opted for Staunton chess, providing them with a special stigma.
But let’s get back to the chess sets. Currently, there are many sets of chess pieces. I tell the children about this in the 2nd lesson, when I show them all. I have a couple of souvenir chess sets that the kids really like. All modern sets have the following trends:
-
The pawn is always the smallest piece
-
The king is always the largest piece
-
The knight in all sets looks like a knight, or its silhouette is visible
- 900 02 Rook usually looks like a tower.
When I explain to children how to determine which piece is which, I recommend doing the following
-
Find 8 pawns.
-
Find the king (he is the tallest, but I saw the option that the fattest for example)
-
Find a queen (this is a piece that has no pair)
-
Find a rook (usually a turret)
-
Find a knight
- 9000 2 The remaining piece is the bishop.

This is the simplest algorithm for finding shapes in any set. In advance of objections, I will say that the bishop is often more difficult to identify than other pieces. It seems that this figure is simply recouped. I have a set in which elephants are camels … And how to determine that a camel is an elephant? Only as I described above — by elimination.
And now about the names of the figures in more detail.
King
In almost all languages, a king is either a king or a shah, and in Bulgarian a king. It so happened historically that it was he who was the supreme power in the country. Therefore, the options are quite limited — king / shah / padishah / king. So the name of this particular figure is almost unchanged, which cannot be said about the rest.
Queen
Queen fully reflects history and culture. And this is one of the pieces that, after getting to Europe, returned back to Asia with a different move. But the name in Asia did not change. Initially, the queen moved one square. However, in the 15th century, wars raged in Europe, and Isabella I of Castile (Queen of Spain) was one of those who led them. In the legend of the liberation of Spain, it is mentioned that it was the strong-willed march of the queen from Jaen to Basu (90 miles) led to local chess players identifying it with a wooden piece and changing the rules. And in view of the fact that extremely rare competitions of that time were held at the courts of the Spanish kings, the neighbors also had to accept this innovation. Since then, in Europe, the queen has become known as the queen, and in Asia, he has remained a queen.
It is very interesting to learn history through chess. For example, I always cite children’s fairy tales and ask the children a question — who is the leader in the country in fairy tales (you can consider other fairy tales — it will be similar there) Snow White and Aladdin. The correct answer is king/queen in the first and check/vizier in the second. Yes, they are not the main characters (by the way, children get confused with this), but the question is about who is the main in the country. On the example of these fairy tales it is clearly seen that in Asian countries the main in the state are men, and in European countries it is a married couple.
Perhaps the only exception to this is the name Queen in Estonia. I don’t know why, but there the Queen is called lipp, which means Flag in translation. The fact that the Flag Bearer is next to the King during the battle is normal, but nevertheless the name is strongly knocked out of the generally accepted canon. Perhaps someone knows the reason, I could not find it.
Therefore, the correct name for a queen in Europe is Queen . And in Russia — Queen . In this regard, it was interesting to observe how they got out in the translation of the series « Queen’s Gambit «, half losing its meaning … In the original, the title itself indicates the sacrifice of a woman because of her favorite hobby and means that it is also the name of a chess opening, but the name » Queen’s Move «loses its charm without explaining what it is and completely flips the title of the series into a different rut. Indeed, in the Russian name King’s Gambit is played in a completely different way — from the King. And the one that is implied in the series is called Queen’s Gambit , but in this case the meaning of the Queen is lost, alas.
Rook
My favorite topic in chess pieces is the Rook. Here history made the squiggle even cooler than with the Queen.
Let me remind you — initially the Rukhh bird stood in the place of the boat. Visually, this figure was similar to Rook. Further, it is worth considering the historical expansion of chess together with wars, because chess is a military operation on a chessboard. So, in Rus’, Ladya is one of the key military units for quickly moving from one place to another (according to Boris Akunin, the word Russ comes from the word water (rose) due to the presence of many waterways). Additionally, the figurine of the Rukhh bird looked like a boat. And here we do not forget that each nationality stylized chess pieces for themselves, which in Rus’ led to the fact that Rukhh became a Rook.
And what about in Europe? If you remember historically, then in the Arab world, chess pieces gradually switched to geometric primitives (there was no such thing in Rus’). Together with the name Rukhkh, when processing and making «Fine» chess, it is not surprising that some of the authors took the path of depicting a tower (torre in Spain and Italy). If you look at Europe, it is noticeable that the style of the figure is mainly traced in this name. Even the name of the tour that some people use is mobile siege tower . But in England, the name of the boat is different — rook, which, when pronounced, is similar to the name of the Rukh bird.
Another point is connected with a move called castling — castling (in English), which literally means — to hide the king in the castle behind the tower. And the tower (in some translations, the castle) in this case is just Rook.
Therefore, I always emphasize to children that in Russia, Ladya is exactly BOAT . And nothing else. To call it by another name is bad manners. But in Europe, it becomes a tour (or a similar word).
Elephant
Another interesting figure. To be honest, I did not expect that upon closer examination, you can tell more about him than about the rook. But it turned out that it was.
Initially, the Elephant was just an elephant — a combat unit that fought on the battlefield and was quite strong. As already written earlier, in the 15th century, the elephant figure acquired the ability to walk along the entire diagonal. But even more interesting was the transformation of its name.
In Rus’, the elephant, as it was an elephant (exotic animal), so it remained an elephant. True, for some time the figure was called an officer, but then the old name was returned — an elephant.
In Europe, the name of the elephant was transformed differently. The names of the figures in Europe were redefined in the religious XV century, and here it is quite clear that after the king and queen, the clergy are next, they also stand next to the royal couple. The very name Bishop gave the elephant Bishop Vida of Albia around 1510. In his poem The Game of Chess he gave some pieces new names. It was there that he used the name archer (bishop) instead of the Arabic fil (elephant), and rukh he calls «elephant and castle». It is interesting that perhaps the name is due not only to religion, but also to the words pil / fil along with the definite article al used before nouns in Arabic. As a result, the name of the elephant al fil becomes similar to the Spanish alfiere — bishop.
Upd . Here I dare to make a correction. A dictionary search yielded a translation that, in my understanding, is closer to the elephant story. And it is this word that is consonant with the Arabic al fil
In Italy, the name of the elephant is translated as standard-bearer , which is also determined by its approach to the king on the battlefield.
Interestingly, in France, the elephant has the name (le) fou which translates as jester or crazy. The second translation amused me personally, but in any case it is clearly seen that the word is consonant with the original — al fil.
In other languages, the elephant is called catcher (Serbo-Harvatian), archer (Slovak), officer (Bulgarian). I think that the name is determined precisely by approaching the king and queen (precisely to them, because this name of the elephant is found only in European countries).
And only in Estonia the elephant is called oda , which means « spear «. Well, somewhere the elephant should have a name in its course.
Here is such an interesting elephant 🙂 And he is not an officer in Russia at all.
Horse
Everything is easier with a horse. The horse is the animal that allowed humanity to spread throughout the world, gave freedom of movement and power. Horses are loved by both adults and children. In fact, the horse is present in the mythology, I think, of all countries where this domesticated animal is found. Horses, pegasus, unicorns — all this has been present in our lives since childhood. Even in the sea and that is a seahorse fish.
Knights on horseback gave a prototype to a chess piece. In English, the figure is called — Knight — Knight. And other languages \u200b\u200bdo not lag behind him — a jumper, a kovalier, a springer (jumper).
Pawn
That piece, because of which the whole dispute began in the last article. Yes — a pawn is a piece, although sometimes it is not used in this sense and in some cases it is not considered. In fact, if we consider the modern world, then someone who is especially offended can exclaim «What! Calling a pawn NOT a piece is NOT tolerant! This is discrimination!» And it’s true. The pawn is a full-fledged chess piece, with its own rules and features. It is the smallest and cheapest by the standards of chess. But if there are no pawns, then the game can be lost.
Again, if you look at chess historically, the initial formation of pawns forms a phalanx — a formation used in combat. And in the phalanx were not the most noble warriors. Peasants could also be placed there (which in some languages is reflected in chess — in Norwegian, for example, a pawn is a bonde — a farmer / peasant). Therefore, the main transfers of pawns are an infantryman or a peasant.
True, there were some funny names here too. I do not know how true this is, but nevertheless in the text of this article the following words were encountered (I quote the text in full) — «the inhabitants of the Faroe Islands went the farthest, deciding that little women must certainly be at the forefront of the chess army.». And what? Fine! And now try to say that a woman is not a figure.
Conclusion
I must say right away — it is possible that some of the information from what I wrote has objections, but I am not a historian. I did the analysis based on the information that was found on the Internet, plus a consideration of the historical development of chess in Europe. There is no point in considering America and Australia, because by the time they were discovered and settled, chess was already a well-established game in terms of names and set of pieces. The ancestor of chess was Asia, which then received a back-infusion of reworked chess from Christian Europe.
Initially, the article was conceived as an explanation of why the pawn is a piece and why the Queen is not the Queen everywhere. But I had to go further and deal not only with the Rook, but also with the Bishop. Honestly, it was interesting to delve into the heap of information that is. It is a pity that most Internet writers consider this issue very narrowly and do not go further in their reasoning about the names of figures. Most often this applies to Rook and Bishop.
In fact, in the classroom I try to give children this information in a more interesting way than I have described here, after all, children perceive information differently. My goal is to get children interested in chess. In my course, the overview lesson on chess pieces is the second, in the first lesson we go through the geometry of the chessboard.
Let me remind you that you can sign up for classes on the website. All the terms and conditions of the classes are written on the site. If you have questions — ask — I will answer.
Area
The Area command is used to determine the area of an arbitrary figure.
| How to call a command |
Procedure
1. Pick a point inside the enclosed area. The figure, the area of which will be measured, will be highlighted in color. The name of the resulting figure will appear in the Objects field of the Options Bar. The indication of the figures is described in detail below.
2. Set the measurement parameters. Read more…
|
Only those objects that are located in the current view can be used to calculate the area (for information about changing the state of views, see Changing the state of a view). |

You can quickly view the measurement results, or you can enter them in the Information window.
When quickly viewing measurement results, the value of the area of the specified figure is displayed next to the cursor. You can view the area values of other shapes by hovering over them. To enter measurement results into the Information Window, successively click inside these shapes with the mouse.
You can save or print the measurement results. To do this, use the menu commands of the Information window.
3. To end the command, click the Finish button on the Options Bar or close the Information Window.
|
To measure the area and calculate the coordinates of the geometric center of a complex figure, consisting of several parts and / or with holes, use the command of the MDC of planar figures. |
Pick shapes
To measure the area of a closed area, pick a point inside it. The figure, the area of which will be measured, will be highlighted in color. The name of the resulting figure will appear in the Objects field of the Options Bar, and its area will appear in the Information Window.
Similarly, you can specify several enclosed areas. The names of the resulting shapes will appear in the Objects field. The Information window will display a list of measured areas. At the end of the list is the sum of all measured values.
To exclude a shape from the list, specify it again or delete the name of the shape from the Objects field. In this case, the list in the field will be renumbered, and the selection of this figure will be canceled. The entry about the area of the figure will be removed from the Info Window, and the sum of the areas will be recalculated.
Using the Options Bar, you can calculate the area of the following figures.
•A figure formed by a set of geometric objects. To do this, click the Collect Path button on the Options Bar, and then specify the path segments.