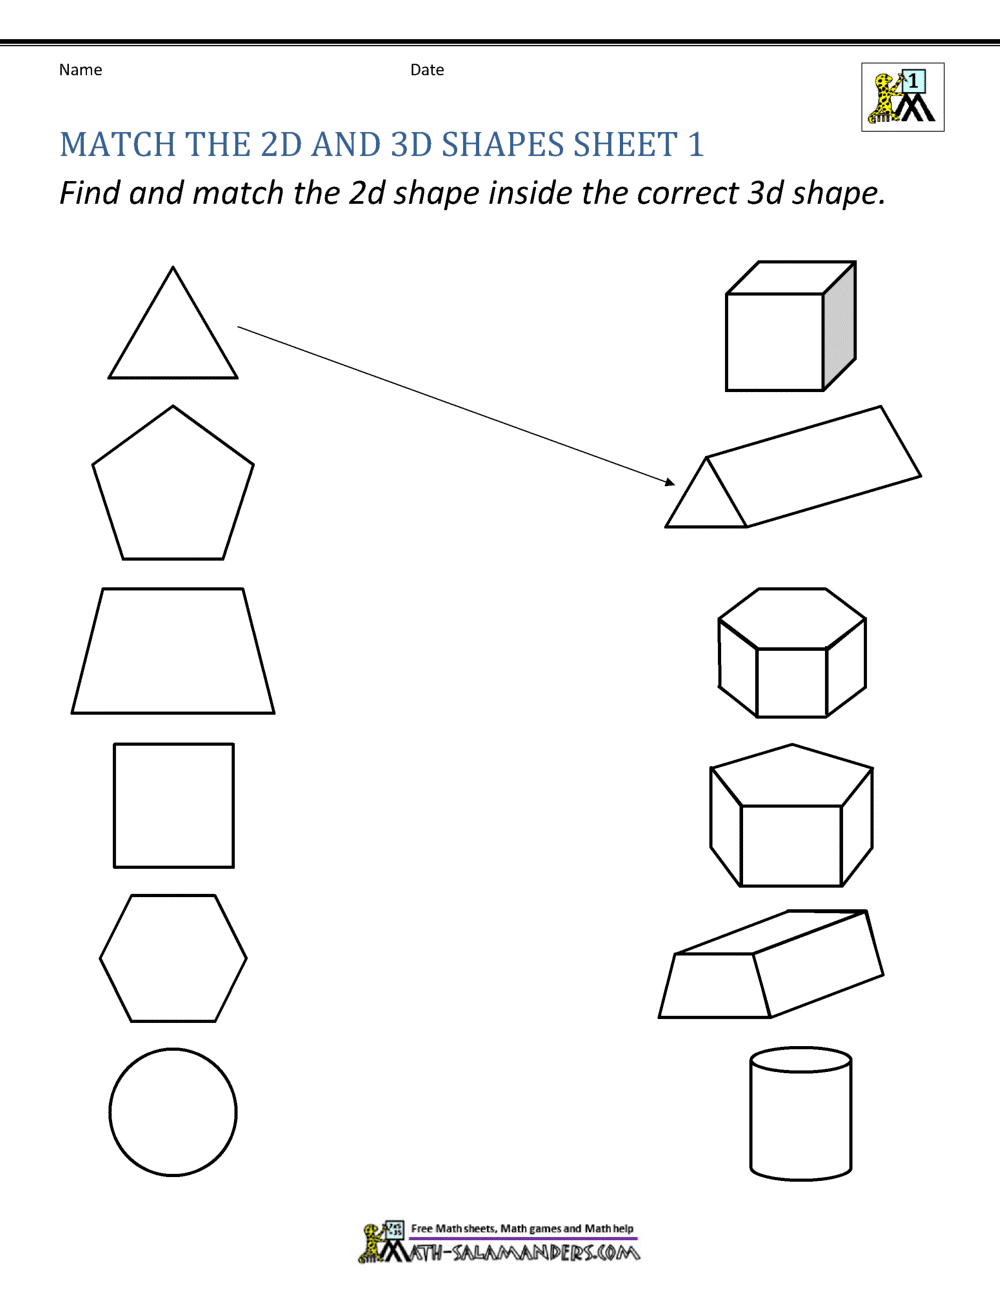
3D worksheets: 3D Shapes Worksheets | K5 Learning
Posted onPrintable PDF 3D Shapes Worksheets
3D Shapes Worksheets
Math becomes a much more involved subject once a child
reaches the middle-school level. Middle school-aged children sometimes have a
tough time mastering 3D shapes and their associated math problems.
Although most children master the naming of 2D and 3D shapes
by the end of elementary school, putting these shapes into math problems can
suddenly make a child feel overwhelmed. We have created a wide array of worksheets
to help your child master this math skill, so they are ready to continue their
education into high school and beyond.
The worksheets we offer at Cazoom Maths are designed for the
middle-school level but are also ideal for high school students who need a
refresher course on the subject. We offer a 3d shapes worksheet for the types
of problems sixth-and seventh-grade students come across while learning common
core math and going through testing.
DIFFERENCES BETWEEN 3D AND 2D SHAPES
The “D” in 2D and 3D shapes, specifies the dimensions of the shape. The primary difference between 3D and 2D shapes is that the 2D shapes are comprised of only length and width. On the other side, 3D shapes are incorporated into three dimensions, length, width, and height.
Why 3D Shapes Are Sometimes Difficult for Students
We are faced with 3D shapes daily, but we do not always look to these shapes as being mathematical. Many children find it difficult to master the principles of 3D shapes when it comes to mathematics because they find the subject boring.
When students are presented with real-world shape examples, their understanding is heightened and they are able to stick with the subject without becoming bored. Cazoom Maths 3d shape worksheets are designed with bright colors and easy-to-follow diagrams that make learning interesting. You will find your child or student is engaged in learning from the moment you hand them their worksheet.
Middle-school children need to learn four dimensions by the
time they graduate from high school. The following is a brief description of
the dimensions children will encounter in math.
- Zero dimension – These are represented as dots and
there is no length, height or width to measure. - One dimension – If your child connects the dots and
forms a line, they have now created a one-dimensional object, called a line
segment. - Two dimension – This is a shape that has a length and a
width that can be measured. We offer 3d and 2d shapes worksheets to help your
child master these dimensions before they graduate from seventh grade. - Three dimension – Three-dimensional objects can be
touched and picked up. They offer a third dimension that is depth. - Fourth dimension– The fourth dimension has been described by
Einstein as being time. The fourth dimensions are something your child will
likely not encounter until high school and beyond, but it never hurts to help
them get a start on learning core concepts they will later need.

-
Sphere
- Cylinder
- Cone
- Cube
- Cuboid
- Tetrahedron
- Dodecahedron
- Icosahedron
- Octahedron
- Square pyramid
- Hexagonal pyramid
- Triangular prism
- Pentagonal prism
- Hexagonal prism
- Ellipsoid
While most middle-schoolers can easily identify spheres and
cubes, some of the 3D shapes are more difficult to identify. Our 3d shapes
worksheets have been created to help middle-school students easily learn the
fundamentals of 3D shapes so they will be able to take this knowledge and learn
to excel at math problems that involve these shapes.
Being able to name the 3D shapes is a solid first step in
learning this type of math. As your child or student progresses in age, they
will be introduced to 3D shape formulas that ask them to find the surface area
of the shape.
Our worksheets are designed to introduce 3D shape formulas
in an easy to understand format. The worksheets help middle-school students
slowly buildup their knowledge of formulas, so they do not feel overwhelmed.
Sometimes, middle-schoolers simply need extra help in math
and that is why this site was created. We want to empower students, their
parents, and their teachers with the added resources that will help to secure
the child’s understanding of integral math topics.
Finding the surface area of different shapes requires
understanding slightly different formulas. It is helpful if a child can become
well-acquainted with these formulas before they enter high school and begin
taking geometry.
In addition to finding the surface area of 3D shapes,
middle-schoolers also need to know how to figure perimeter. Cazoom Maths offers
worksheets on 3D shape formulas to not only help middle-schoolers understand
how to work these formulas, but to also start memorizing them.
When children begin to struggle with math issues in middle
school, they often feel like giving up. Grades begin to fall and patience grows
thin. The goal of Cazoom Maths is to help kids get back on track by providing
them with worksheets that pique their interest and make them want to learn math
concepts.
A Cazoom Maths worksheet can be printed and posted in a
child’s classroom or bedroom to help them remember the formulas. We recommend
also including one in the child’s math textbook for easy referral during
homework and study time.
Children are all individuals and learn in different ways. Some children do better with a more hands-on learning approach, while others
need to consistently perform math problems to understand the concepts. There is no cookie-cutter approach that is going to help every student.
- We have worked tirelessly to make sure our worksheets are varied and interesting. There are many proven benefits to helping children learn math with worksheets.
- Worksheets help to summarize the math topics that have been taught in class. They work well in the classroom and as homework assignments to help students master what is being taught.
- A simple instruction is not enough for most children. Worksheets help to bridge the gap between being instructed and being able to do the work they have been taught.
- Worksheets help students to be able to see the bigger picture and how working with 3D shapes evolves into many areas of math.
- A worksheet becomes an extension of the textbook and helps to expand the topics being taught in the classroom.
- These worksheets help to encourage students to express their mathematical ideas and discover new concepts.
- Completing worksheets helps to give a child a sense of accomplishment in their studies. Many children love being able to accomplish their work and feel as if they are making strides towards understanding new math concepts.

Who says worksheets have to be boring? When introduced with engaging worksheets, middle-schoolers respond positively and actually enjoy completing their work. These worksheets do not become a chore, but rather a source of fun learning. Our 3d shape worksheets are just what your child or student needs to accomplish their goals of learning important math concepts.
There are many ways to make worksheets a part of everyday learning for middle-schoolers. Here are a few strategies to help make worksheets more exciting in the classroom and at home.
- Cut the worksheet up into sections with each problem on its own piece of paper. The students can place the papers facedown and then each student draws a paper like a game. The first student to get the right answer wins.
- Students can be placed in small groups and worksheets can be passed out to each group. The teacher will call out a problem and the group has so much time to respond with an agreed-upon answer. The group that gets the answer right wins a prize.
- Go through the worksheets as small groups and compare answers. This helps to increase communication skills and improves a student’s ability to participate in positive groupthink.
- Have students complete their worksheets and make an intentional error. Pass the completed worksheets to different students and see if they can spot the error. This challenge is often fun for students of all ages.
- Allow students to complete worksheets in pairs. Working tandemly will make the process much more engaging for students.
 Pass the completed worksheets to different students and see if they can spot the error. This challenge is often fun for students of all ages.
We recommend offering an award system for successfully completing 2d and 3d shapes worksheets. While learning is certainly a reward, students are likely going to feel more motivated if they receive a small tangible reward for their hard work.
If your child or student is struggling with 3D shapes and formulas, our worksheets will provide them with the instruction they need for success. No child should be left feeling overly frustrated on any math subject.
Our 3d shapes worksheets offer engaging topics that will open up your child’s mind and help them begin to understand this math concept in a way that is on their age and grade level. The worksheets start off teaching simple concepts and then progress to tougher subjects when the child is ready.
We make it simple for teachers and parents to search for the worksheets they need. Simply search by topic or grade level and find just what you need. These worksheets print in crystal clear definition with bright colors and engaging graphics.
You will find kids become excited to complete these worksheets because they can build their math skills with much less stress. While mastering 3D shapes is not always easy, our teaching worksheets make the process of learning much more engaging and fun.
We welcome parents and educators alike to browse through our 3d shapes worksheets to choose the perfect one for their students. Keep visiting frequently to discover the latest worksheets we have available. As your child progresses in their sixth- and seventh-grade years, they will be able to learn all of the key math concepts they will need, to be prepared for high school.
Get started today on printing all the 3d shapes worksheets you need for your child or your classroom. Cazoom Maths offers free worksheets for everyone and membership allows you to download worksheets with answer keys for easily making sure your child is on track with his or her learning.
Join today to get started! If you have any questions, contact Cazoom Maths now. Allow our math worksheets to begin to open your child’s mind and help them learn like never before. These are perfect for classroom work, homeschooling, and extra practice at home.
At Cazoom Math, we have created many middle school worksheets that will help support your child with 3d shapes while also being aligned to the Common Core Standards. We have also provided a volume reference worksheet which will be an invaluable tool to have as your child will be learning about the of 3d shapes for several years. With these resources, we are confident your 6th, 7th, or 8th grader will receive the support and help they need with 3D shapes.
Volume is a foundational geometric topic in the middle school years, so we have also included reference worksheets for finding volume. In 6th grade, your child will find the volume of cuboids and rectangular prisms. In 7th grade, your child will continue to work with cuboids and will also find the volume of pyramids. In 8th grade, your child will find the volume of cones, spheres, and pyramids.
At Cazoom Math, we include answer keys with each worksheet, so your child will not only be able to practice certain topics but will also be able to check his or her work. With our worksheets providing a variety of different skill levels, you can be sure that your child will receive the support that they need.
50+ 3D Shapes worksheets for 1st Year on Quizizz
3D Shapes: Discover a collection of free printable Math worksheets for Year 1 students, designed to help them explore and understand the fascinating world of three-dimensional shapes.
year
- KG
- year 1
- year 2
- year 3
- year 4
- year 5
- year 6
- year 7
- year 8
Subjects
-
Math
Mixed Operations Number Sense Math Puzzles Percents, Ratios, and Rates Fractions Math Word Problems Division Addition Measurement Geometry Congruent Figures 3D Shapes Spheres Rectangular Prisms Cylinders Composing Shapes Similar Figures 2D Shapes Transformations Classifying Shapes Angles Shape Patterns Decomposing Shapes Volume Triangle Theorems Perimeter Symmetry Money Math Multiplication Subtraction Algebra Data and Graphing Decimals
-
Science
-
Social studies
-
Social emotional
-
Fine arts
-
Foreign language
-
Reading & Writing
-
Typing
Recommended Topics for you
- Spheres
- Cones
- Cubes
- Rectangular Prisms
- Cylinders
Worksheet
3D shapes
10 Ques
1st — 3rd
Worksheet
3D Shapes
21 Ques
1st — 2nd
Worksheet
3D Shapes Attributes
10 Ques
1st
Worksheet
Maths 3D Shapes
10 Ques
1st
Worksheet
3D Shapes
10 Ques
KG — 1st
Worksheet
3D SHAPES FOR KINDERGARTEN
15 Ques
KG — 1st
Worksheet
2D and 3D Shapes
7 Ques
1st
Worksheet
3D SHAPES
10 Ques
1st — 10th
Worksheet
3D SHAPES
15 Ques
1st — 3rd
Worksheet
3D Shapes
9 Ques
KG — 1st
Worksheet
3D SHAPES NETS
20 Ques
1st — 3rd
Worksheet
3D shapes
13 Ques
1st
Worksheet
3D Shapes Quiz
10 Ques
1st
Worksheet
3D Shapes
10 Ques
KG — 1st
Worksheet
3D SHAPES YEAR 1
10 Ques
1st
Worksheet
2D and 3D shapes
20 Ques
1st
Worksheet
3D Shapes
10 Ques
1st
Worksheet
3D Shapes
12 Ques
KG — 1st
Worksheet
3D SHAPES
22 Ques
1st
Worksheet
3D Shapes
18 Ques
1st
Worksheet
3D Shapes
20 Ques
1st
Worksheet
3D Shapes
20 Ques
1st
Worksheet
Review 3D Shapes
10 Ques
1st — 2nd
Worksheet
2D and 3D Shapes
11 Ques
1st — 3rd
Previous Next
Explore worksheets by grade
- KG
- year 1
- year 2
- year 3
- year 4
- year 5
- year 6
- year 7
- year 8
Explore printable 3D Shapes worksheets for 1st Year
3D Shapes worksheets for Year 1 are an excellent resource for teachers who want to introduce their students to the fascinating world of Math and Geometry. These worksheets provide a fun and engaging way for young learners to explore the properties of three-dimensional shapes, such as cubes, cylinders, and spheres. By incorporating these worksheets into their lesson plans, teachers can help their students develop a strong foundation in geometry, which is essential for success in higher-level math courses. With a variety of activities and exercises tailored to the needs of Year 1 students, these 3D Shapes worksheets are an invaluable tool for any teacher looking to enhance their students’ understanding of geometric concepts.
Quizizz is a fantastic platform that offers a wide range of educational resources, including 3D Shapes worksheets for Year 1, to help teachers create interactive and engaging learning experiences for their students. In addition to worksheets, Quizizz also provides teachers with access to thousands of quizzes and games that can be easily integrated into their lesson plans. These quizzes and games are designed to reinforce key concepts and skills, making them an excellent complement to the 3D Shapes worksheets. By utilizing Quizizz’s extensive library of resources, teachers can create a comprehensive and dynamic learning environment that caters to the unique needs of their Year 1 students. With Quizizz, teachers have everything they need to help their students excel in Math and Geometry.
Excel 47. Workbook — Effective work in MS Office
When creating a new workbook, we often have to refer to already existing tables. For example, the authorities demanded from us a report on all projects for the past six months. And so we open several tables and collect the data necessary for the report into one table. That is, we will have a new workbook.
By the end of this lesson, you will be able to :
- Move and copy worksheets between files
- Link data from different workbooks
1. Moving and copying worksheets between files
In the article «Excel 7. Worksheets» I described how you can work with sheets within one workbook. But sheets can be exchanged between other books. In that article, I suggested that you work with the «Move or Copy …» command from the context menu of the sheet name (label). Like almost all commands in Microsoft Office applications, this command is duplicated elsewhere.
Download the file here and open it. At the same time, create a new file, which you name «Report», or «New Workbook», or something of your choice.
Step 1. Ribbon Home → group of commands Cells → command Format → command «Move or copy …» from the drop-down menu:
The already familiar window will appear:
The drop-down list contains only our working file and New Book. As you can see, we don’t need to create a new table. We will simply transfer the necessary sheets to a new book, and then we will not forget to save it. In order to work with an existing book, let’s open an already created file called «Report», and then repeat Step 1 .
Step 2. The «Report» workbook that we select has appeared in the drop-down list. Be sure to tick the «Make a copy» box:
| Understand and remember! | If we forget to check the box, the sheet in the source book will disappear, which is very bad. That is, we will carry out the operation «cut → paste». Be careful! |
Looking at the picture:
Did you notice that the font type of the word “Courses” has changed? And the font color has changed. What brings us to the idea that it would be nice to have a ready-made template in which all employees would work without fail. But more on that later.
This operation will save us time if we need to collect copies of sheets from several books in one book. But often we need to combine the data of some cells on one sheet. First of all, we turn to the clipboard.
By cutting and copying data from one workbook to the clipboard and then pasting it into another workbook, you can easily collect the information you need in one place.
There is a significant drawback here — when changing the value in the original cells, the values copied to other cells will remain the same.
| Understand and remember! | Copy and paste from the clipboard does not provide a link between the original cell and the one where the data was copied. |
To make the data in the new cells change in the same way as the data in the original cells, you can create a relationship between two cells.
2. Link to data from other workbooks or 3D links
Working with two workbooks. In my case, these are “E47_Training file — copy” and “E47_Report”.
We receive a task from the authorities: to show how much profit we received for each course and the total amount. That is, we need two ranges from the source book:
- Name or list of courses
- Cost
Consider the source.
The cost of profit from a particular course is determined by the formula:
(3)=(1)×(2) formula will change the address of only the first factor, but the second factor will be constant or absolute (article «Excel 10. Range and calculations in it»). Range and calculations in it»).
And now we activate the «Report» book and create a new sheet there (you can create a new book). Step 1. In the «Report» book on sheet 1, select cell A2 and enter the «=» sign: Step 2. Mark cell B4 (the first course name in the list) in the source book and press Enter: Step 3. And since we have 4 courses, in the Report book we drag the cell filling cursor 4 lines down: And we see an unpleasant picture. The thing is that, by default, a reference to a cell in another workbook or on another sheet is inserted with an absolute address:
This link contains information about the workbook, worksheet, and the cell we clicked on.
Therefore, the reference will always be to the same cell. What to do? Let’s go through steps 1 and 2 again, but step 2 do this: Step 2. Select the entire range of course names B4:B7: And press Enter : Now great! Of course, you need to set word wrapping (article «Excel 22. Merging cells»), correct the appearance, adjust the height and width of the cells (article «Excel 23. Cell size»). At the same time, determine the cost range that we will transfer from book to book. To link to the entire «Cost» range, follow the previous steps:
But we will try differently. Now you can :
ArchiCAD + AutoCAD + 3D Max. Comprehensive training in interior design, decoration and designArchiCAD trainingModule 1 1. Acquaintance with the capabilities of the program, the start window and the program interface. 3. Viewports. 3. Main project parameters, project profile 4. Types of cursors 5. 2D primitives and methods for their construction, details 6. Types and input of coordinates Practical task
Module 2
1. 2. Grouping elements 3. Drawing modes Practical task
markup Module 3 1. Editing elements 2. Hatching. 3.Text and callout Practical task
Module 4 1. Drawing and drawing tools. 2. Dimensions. 3. Working in the 3D window Practical task
Module 5 1. Walls 2. Overlays 3. Beams 4. Columns Practical task
Module 6 1. Work in layers 2. Floor construction 3. Axis grid 4. Windows and doors Practical session (project)
Module 7
1. 2. Zones 3. Detail 4. Worksheet 5. 3D document Practical session (project)
Module 8 1. Roofs 2. Shells 3. Three-dimensional networks Practical session (project)
Module 9 1. Library object staircase 2. Stair design with Stair Maker 3. Library elements and library objects 4. Coatings and textures
5. Practical session (project)
Module 10 1. Construction of photographic images using the internal mechanism and the Sketch mechanism. 2. Create a layout template. 3. Creation of project layouts. 4. Translation of layouts into PDF format. Printout. 5.Interaction with other programs: AutoCAD, 3ds max, Artlantis. Practical session (project)
AutoCAD training
Module 1. List of main questions to be studied: — Program interface. Opening a document. Screen areas. Right mouse button. Setting. Types of mouse pointer. — World and user coordinate systems. Menus, lines and toolbars. Command line, text window, dialogue with the program. — ZOOM tools and commands. Updating and regenerating a drawing. — Line tool. — Coordinate systems (absolute, relative, polar). Ways to enter coordinates. — Completion of work and saving the drawing. File types used in AutoCAD. Practical lesson. Creation of objects using different coordinate systems. Module 2. Working with objects. Working with primitives.
List of main questions to be studied:
— Units. — Workspace modes. — Ways to enter commands and complete them. Command options and options for their selection. Cancellation of erroneous commands. Command return. Repeat the last command and previously used commands. — Construction from the end of the segment. Selection of objects. Selection by a frame, types of a selection frame. Cancel selection. — Remove objects, eraser. — Plotting modes: orthogonal mode, polar mode. — Grid and Snap. Permanent and one-time (temporary) object snaps. object tracking. — Primitives in AutoCAD: point (use and change the appearance of a point), rectangle, circle, polygon arc, ellipse, elliptical arc, spline, construction line. — Hatch: Hatch single, nested, multiple objects. Gradient fill. Hatching properties: associativity, transparency, background. Hatching editing. — Create new drawings. Inserting ready-made drawings or their fragments.
Practical lesson. — Creating objects in AutoCAD using primitives: rectangle; circle; arc; polygon; ellipse; elliptical arc; spline; construction line. — point (change point view). Module 3. Object modification. List of main questions to be studied: — Editing panel tools and their options: move, offset by a specified distance, copy, rotate, scale, mirror, array, 3D alignment, trim and extend lines, chamfer, fillet. Tools «gap», dismember («blow up»). — Modification with handles. Practical lesson. — Editing created objects using the tools of the Editing panel Module 4. Working with layers: creating and adjusting. List of main questions to be studied: — Create a new layer. Removing layers. — Layer selection. Making the layer active.
— Set layer parameters. — Move objects to other layers. — Layer locks. Layer isolation. — Building axes. — Individual parameters of objects. Changing the properties of objects using the «object properties» window. — Quick selection. — Copy object properties. — AutoCAD Control Center (DesignCenter). Practical lesson. — Create a layer. — Working with layers. Module 5. Working with text. List of main questions to be studied: — Text: Single-line and multi-line text. Text editing. Special symbols. Text scaling. Alignment. Creating a correct fraction. — Create text styles. — Find and replace text. — Spell checker. — Callout. Callout style. Practical lesson.
— Create multiline text based on specification table creation. Module 6. Working with dimensions. List of main questions to be studied: — Dimensioning: Simple dimensions. — Complicated dimensions. Accelerated installation. Various ways to edit dimensions. Dimension styles. Scaling objects with dimensions. — The concept of annotative dimensions. — Measurement tools. Methods for measuring area. Convert units of measure with a quick calculator. Practical lesson. — Dimensioning on previously created drawings. Module 7. Working with polyline and multiline. List of main questions to be studied: — Poly lines. Poly line editing. — Multi lines (m/l): Modification m/l. Style m/l. Scaling m/l. Leveling m/l. Practical lesson.
— Create construction drawings using the poly line and multi line commands. Module 8. Blocks. List of main questions to be studied: — Create a block. Block insert. Insert blocks using the control center. — Save the block to a file. Inserting a block from a file. — Editing a block. Block cutting. — Dynamic blocks. — Create a palette of tools from blocks. — Remove unused blocks. Renaming blocks. Cleaning up a drawing using the Cleanup tool. — Text attributes of the block. Editing block attributes. Extracting data from blocks with attributes. Practical lesson. — inserting ready-made blocks contained in the AutoCAD program, using the example of arranging doors in construction drawings; — creating a block using the example of creating a window; — Creating a dynamic block saved in a separate file using the example of creating a corner stamp.
Module 9: Printing a document. List of main questions to be studied: — World and user coordinate systems. Creation of named custom coordinate systems and techniques for working with them (on the example of a construction drawing). — Insert pictures. Editing and cropping pictures. — Seal. Manual setup (layout). Paper space and model space. Setting sheet parameters, creating viewports, drawing layout, scaling. — Save file as PDF. Create multi-page PDFs. Practical lesson. — preparation of the drawing for printing; — Create multi-page PDF files. Final certification. 3Ds Max training from scratch
MODULE 1. Software interface Autodesk 3 ds Max . Basic operations for creating and transforming standard and extended primitive objects. List of main questions to be studied: — an overview of the interface of the Autodesk 3ds Max program — standard primitives and their properties — extended primitives and their properties — features of creating objects in Autodesk 3ds Max — basic scene navigation operations in Autodesk 3ds Max — commands for selecting and transforming objects — customization of viewports and units of measurement in Autodesk 3ds Max — copying objects — creating a simple composition in Autodesk 3ds Max — saving and opening files with backwards compatibility — import and export operations
MODULE 2. The basics of stage-by-stage creation of a scene in the program “ Autodesk 3 ds Max «. List of main questions to be studied: — modes of copying objects and their physical meaning — the reference point of the object, its physical meaning and ways to change the position of the reference point — coordinate systems — hiding and freezing objects — basic properties of objects — grouping — ungrouping objects — mirroring objects — different modes of binding objects — object alignment — copying objects by array MODULE 3. The concept of a polygonal model. Converting a primitive object to an editable polygon. Sub-object levels of the polygonal model. Basic operations with subobjects. List of main questions to be studied: — converting a geometric primitive into an editable polygon — sub-object levels of the edited polygon — basic operations with sub-object levels of an edited polygon when creating a polygonal model (Extrude, Bevel) — properties and capabilities of the edited polygon at the sub-object level — modeling of realistic objects based on an editable polygon in a real scale — basics of polygonal modeling
MODULE 4. List of main questions to be studied: — description of the meaning of modifiers and their effect on objects — use and settings of the BEND modifier — use and settings of the TAPER modifier — use and settings of the TWIST modifier — use and settings of the LATTISE modifier — use and settings of the RELAX modifier — use and settings of the STRETCH modifier — use and settings of the WAVE modifier — use and settings of the RIPPLE modifier — use and settings of the PUSH modifier — use and settings of the SLICE modifier — boolean operations, BOOLEAN, PROBOOLEAN MODULE 5. Splines. Basics of modeling using splines. List of main questions to be studied: — principles of working with splines, editable spline, sub-object levels of the spline — work with spline vertices — work with spline edges — basic properties and tools for editing splines — creating an extrusion object using a spline, EXTRUDE modifier — creating a rotation object using a spline, LATHE modifier — creating lofted models using the LOFT operation
MODULE 6. List of main questions to be studied: — creating a model of a complex interior using splines 1) Selection of an apartment plan to create an interior model and create a virtual studio in compliance with proportions and the correct size 2) Creating an interior wall extrusion object using splines according to the virtual studio plan 3) Creating the necessary cutouts for door and window openings using the BOOLEAN and PROBOOLEAN operations 4) Creating a floor and ceiling, floor and ceiling plinths using the SWEEP modifier 5) Creation of doors, windows and arrangement of furniture and interior items MODULE 7. Materials in 3 ds Max . Basic Materials and Texturing Principles List of main questions to be studied: — the concept of materials in 3ds Max — material editor, editor interface and material creation principles — material shaders — the concept of material and maps — creating a simple material using a texture map — material property channels — BUMP channel for creating material roughness — REFLECTION channel for creating material reflections — REFRACTION channel for creating material refractions — use of channels and maps to create complex material — object texturing — polygonal texturing — UVW map modifier
MODULE 8. List of main questions to be studied: — theory of light in 3D graphics, principles of scene lighting in Autodesk 3ds Max. — properties and settings of the standard OMNI light source — properties and settings of the standard SPOT light source — properties and settings of the standard DIRECT light source — properties and settings of the standard SKYLIGHT light source — purpose and properties of cameras — framing — Sharing lights and cameras when creating an image from a 3D scene MODULE 9. Creating interior materials and texturing the interior, installing a light source and cameras for rendering various types of interior, rendering process of interior views and basic rendering settings. List of main questions to be studied: — creating interior materials and interior texturing — installation of a light source and cameras to obtain visualizations of various types of interior — interior view rendering process and basic rendering settings 1) creating the assignment of materials for floors, walls, and interior elements 2) installation of light sources in the interior, various interior lighting schemes 3) installation of film cameras in the interior and framing 4) setting the size and quality of the output image in the Autodesk 3ds Max program, rendering settings 5) receiving and saving images during rendering in Autodesk 3ds Max
MODULE 10. By alexxlab |

 But more on that in the next article.
  Tools and methods for selecting elements
:max_bytes(150000):strip_icc()/Shapes3-56a602483df78cf7728ade8c.jpg) dwg
dwg  Sections and facades
 Light sources
 Introduction to AutoCAD.


 Selection and loading of line types.
 Filling in the corner stamp.


 General concept of three-dimensional graphics.
 Basic operations with scene objects when creating an advertising or architectural composition. The concept of the reference point of an object. Bindings.
 Modifiers. Basics of modeling using modifiers.
 Creating a complex interior model using splines.
 Theory of light, the basics of scene lighting in the program0006 . main sources of light. Cameras
